The process of exporting your images from Adobe Lightroom is a crucial step in your workflow. It’s essential to get the export settings right to ensure your images look their best.
In this blog post, I’m going to break down each factor of exporting to give you the best export settings for photographers using Adobe Lightroom.
I’ll cover the different options available, their optimal values, and how to use them to produce high-quality images.
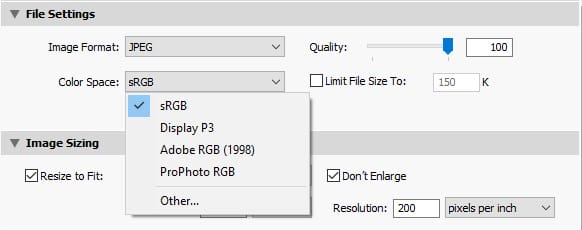
The first step in exporting your images is to choose the correct file type. Adobe Lightroom offers a range of options, including JPEG, TIFF, PSD, and DNG. JPG is the most common format for web and social media use, while TIFF and PSD are better for print and editing purposes.
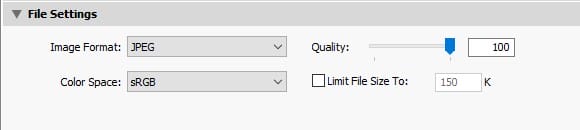
For online and social media use, select JPG as your file type. Choose sRGB as your colour space, as this is the standard for web use, and I’ll tell you why shortly.
For printing purposes, I would recommend selecting TIFF or PSD, as these formats offer higher quality and more editing options.
The next step is to determine the size and resolution of your exported photo. If your image is only going to be seen on social media, a resolution of 72 PPI. For print, the resolution should be at least 300 DPI.
The size of your photo will depend on your intended use. For online use, an image size of 1200 pixels on the long edge is suitable. For print, the size will depend on the print size and resolution required. Instagram, Facebook and Twitter all have different guidelines as to what they recommend your photo size and ratio needs to be.
Vertical images are in greater demand to maximise the display on phones and tablets. 4:5 and 9:16 ratios are the most popular for Instagram posts and stories respectively.

Compression is an important consideration when exporting JPG files. If you require a higher amount of compression it can result in smaller file sizes (which is great for saving hard drive space) but can also reduce image quality. It’s important to find a balance between file size and image quality.
When exporting JPG files for web and social media use, I recommend setting the compression to 70-80. For print purposes, set the compression to 100 (i.e. no compression) to ensure the best image quality.
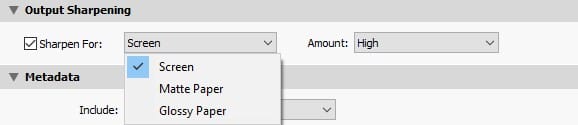
Sharpening a photo gives extra details. When you upload a photo to a website some form of compression occurs to help the website control loading speeds. Therefore, it’s useful to compensate for this compression by sharpening your photo.
However, sharpening settings can vary depending on the image and intended use. But while you can add sharpening for print and screen when exporting images from Adobe Lightroom, it’s actually best to turn off this sharpening option in the export dialogue box.
This is because sharpening settings are better applied during the editing process to suit the specific image and intended use.
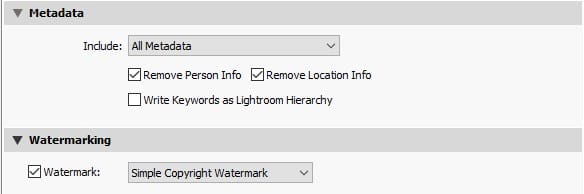
Watermarking is a way to protect your images from unauthorised use and to promote your photography brand/business. Adobe Lightroom offers a watermarking option in the export dialogue box, allowing you to add your logo or copyright information to your images.
When watermarking your images, ensure that the watermark is not too distracting and doesn’t take away from the image itself. Position the watermark in a non-intrusive area, such as the bottom right corner and adjust the opacity to balance between visibility and subtlety.
It must be noted that adding a watermark will not necessarily prevent your photo from being stolen and reposted by users online. There are too many effective AI tools that can remove small details such as a watermark from a photo but there is certainly no harm in adding a watermark to your photos for a little crumb of comfort.
Colour space is important to think about when exporting your photo from Lightroom. Different devices and platforms have different colour space requirements.
For web and social media use, the standard colour space is sRGB, which is compatible with most web browsers.
For print, use Adobe RGB or ProPhoto RGB. This offers a wider gamut of colours and more accurate reproduction.
To set your colour space, navigate to the “File Settings” panel in the export dialogue box and choose the appropriate colour space from the “Colour Space” dropdown menu.

Bit depth refers to the amount of colour information that is captured in each pixel of an image. Higher bit depths result in more accurate colour reproduction and smoother tonal transitions. However, higher bit depths also result in larger file sizes and longer processing times.
For most purposes, the 8-bit colour depth is sufficient. However, for printing purposes or if you plan to do extensive editing on your images, consider exporting your images at 16-bit colour depth to ensure maximum colour accuracy and smooth tonal transitions.
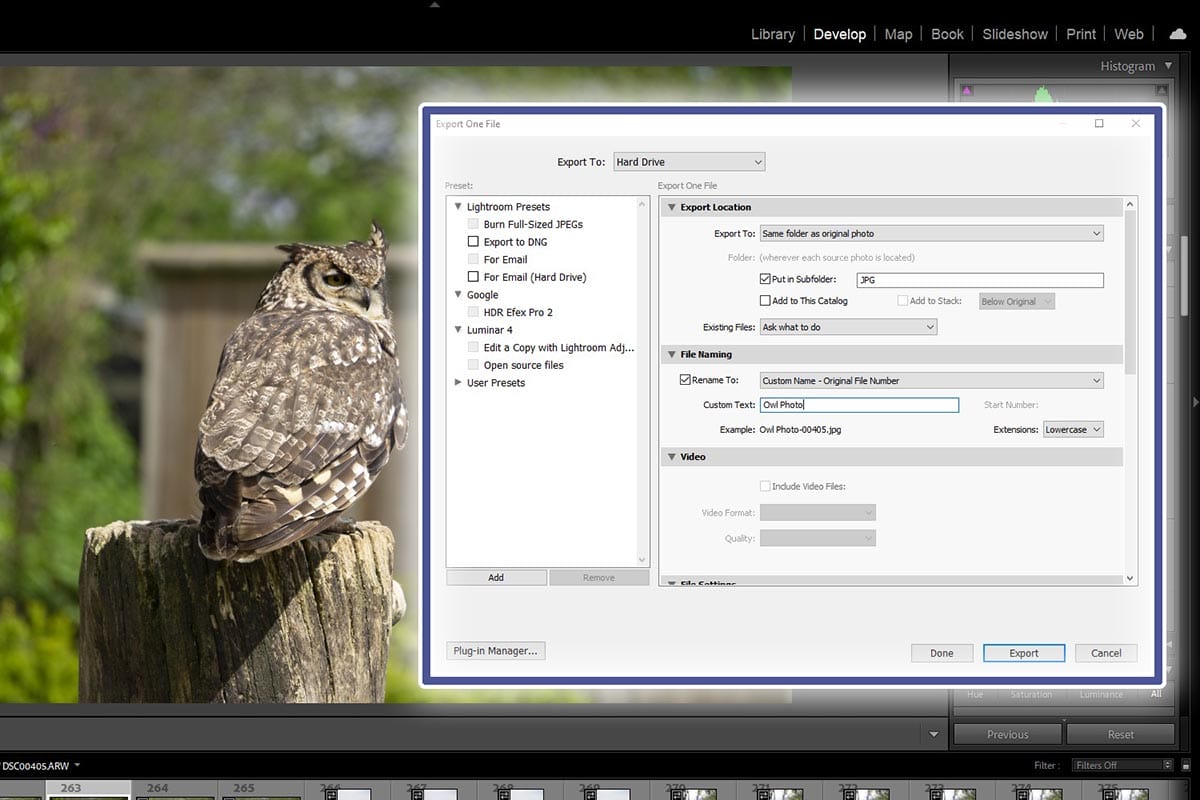
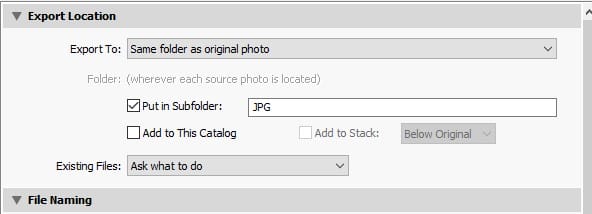
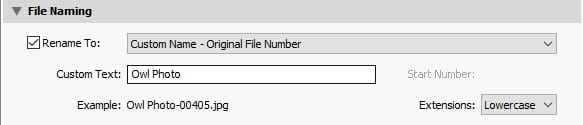
When exporting your images, it’s important to consider the file naming and destination options. Adobe Lightroom allows you to customise your file naming conventions and save your exported images to a specific folder or location.
Customizing your file naming conventions can help you keep track of your exported images and organise them more effectively. For example, you can include the date, time, or subject in your file name to make it easier to identify your images.
Saving your exported images to a specific folder or location can also help you stay organised and keep track of your files.
If you need to export multiple images at once, batch exporting can save you a lot of time and effort. Adobe Lightroom allows you to select multiple images and export them with the same settings using the “Export Selected Photos” option.
Batch exporting can be a great time-saver if you need to export a large number of images with the same settings. However, be sure to double-check your export settings before proceeding to ensure that all of your images are exported correctly.
Finally, Adobe Lightroom allows you to create and use presets to streamline your workflow and ensure consistent image quality. Presets can save time and effort by automating the export process with your preferred settings.
Creating a preset is simple. Set your desired export settings, including file type, image size and resolution, compression, and watermarking, and then click “Add” in the Preset panel. Give your preset a name and save it for future use.
Check out the iPhotography Lightroom Preset Packs and Bundles for all your photo editing.
In conclusion, exporting your images from Adobe Lightroom is an essential step in producing high-quality images.
By considering these additional details and optimizing your export settings, you can ensure that your images are displayed correctly and look their best, whether they’re being shared on social media, printed, or used for other purposes.
With the right export settings and techniques, you can create stunning images that showcase your skills and creativity as a photographer.

Discover TOP features in the Lightroom CC mobile app with this guide for enhancing your photo editing skills. For desktop and tablet too.

Shooting sunsets using amazing 5-in-1 magnetic lens filters from Kentfaith, the 1st choice for photo & video products.

Popular memory cards for photography – what’s the best SD card for your digital camera? Choose the right capacity and class speed in our guide
Learn the basics of photography – fast – with our FREE 60-Second Photographer online course. Each class is short and sharp with simple, actionable steps that give you immediate results.
x 30 lessons

© iPhotography™
Become a confident and competent photographer in less than 30 minutes!
Before you leave, make sure you’ve secured your FREE online photography course (worth £29.99)
Each class is just 60-seconds or less making it the fastest and easiest way to learn photography!
