 Stephen Walton
Photography as an art form, is always looking for ways to expand, cross over and blend itself into different mediums.
Therefore, the idea of turning your photo into a painting would be a great tutorial to share. I’ll show you how to transform your pictures into classical works of art. See if your friends can tell the difference!
Today we’re working in Photoshop – but if you’ve got similar tools in other software then feel free to go off-script. Firstly, pick a picture to send back in time to the Renaissance.
Scour through your photo archives for a period looking shot. Maybe a nice still life or a formal portrait perhaps. We’ve dug out a few favs on these free stock sites if you’re interested.

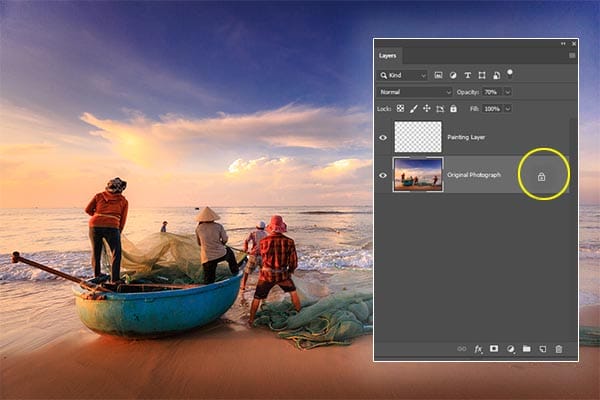
Open your shot up and let’s get photo painting! First off you need to create a new transparent layer above your original shot. That’s going to be our blank canvas to paint on.
But to make it easier to copy our painting we should also unlock the background layer, by clicking the lock icon and then lower its opacity to around 70% so you can still see it.
Onwards to the brush settings. You can’t just use any brush to turn your photo into a painting, we need a special tool called a ‘Mixer Brush’. Furthermore, it’s so special it’s not even stored with the other brushes. Therefore, you’ll need to look under the extra options towards the bottom of the vertical toolbar.
Return to the top toolbar and plug in these settings that we’ve been working with. Feel free to experiment with different options though for your own effect.
• Turn off ‘Loading brush after each stroke’
• Turn on ‘cleaning brush after each stroke’
• Wet – 30%
• Load – 27%
• Mix – 37%
• Flow – 31%
• Smoothing – 30%
• Turn on ‘sample all layer’
Some of these settings may not be available depending upon your version of Photoshop, just try to implement as many as you can.

Image: Use the settings laid out in the above text to prepare your Mixer Brush.
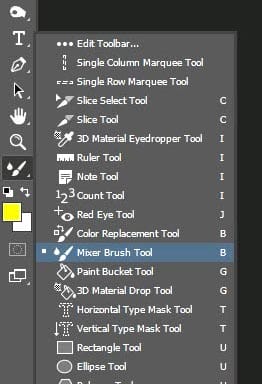
Image: The Mixer Brush tool may be found in the sub-menu of the vertical toolbar.
Next up, it’s time to get painting – at least you won’t get messy! Zoom in close to the document and with the top blank layer active start brushing, just like you would a painting, tracing over the lines and contours of the picture underneath.
The mixer brush will work in a similar way as a normal paintbrush. The more strokes you make over one area the heavier the effect will be therefore, try to be consistent where possible. To blur features and backgrounds further, brush over them a few times.
Go slowly and paint over the whole layer, covering every inch of the canvas. It’s actually very therapeutic, especially knowing if you mess up you can use the history states to undo your boo-boo.
Channel your inner Rembrandt, mix between short and long strokes, even throw on a little Vivaldi in the background and stand back from your monitor to admire your masterpiece coming together.
Once it’s all finished, though any artist will tell you, a painting is never truly finished, it’s time to compare the effect. Raise the opacity of the bottom layer back to 100% and change the visibility of your masterpiece on and off to see how much it’s changed from the photo.
If you get a little addicted, as we did, make a new layer, hide the old one, drop the opacity again and have another go with different settings. Even label your layer with the settings you’ve used so you can see what works, and what doesn’t.


Finally, it’s time to display your work for the world to marvel at. Flatten your layers, save them and upload them to the iPhotography member’s gallery.
We want to see what you’ve done, stroking our imaginary beards, peering over our glasses, whilst sipping some vintage bubbly and discussing the inner mechanics of the artist that you are!
Let’s start a discussion about what settings really show that painting effect off. Send us your before and afters too so we can really lay on the plaudits.
Above all, if you’ve found any other tips that you’ve discovered then let us know – did you find a faster way, a little shortcut or a totally different approach? Share your knowledge and help other budding artists!

Shooting sunsets using amazing 5-in-1 magnetic lens filters from Kentfaith, the 1st choice for photo & video products.

Popular memory cards for photography – what’s the best SD card for your digital camera? Choose the right capacity and class speed in our guide

Discover the BEST way on how to clean a camera sensor using swaps, rocket blowers and pencil brushes to give your shots a dust-free finish!
Learn the basics of photography – fast – with our FREE 60-Second Photographer online course. Each class is short and sharp with simple, actionable steps that give you immediate results.
x 30 lessons

© iPhotography™
Become a confident and competent photographer in less than 30 minutes!
Before you leave, make sure you’ve secured your FREE online photography course (worth £29.99)
Each class is just 60-seconds or less making it the fastest and easiest way to learn photography!