Noiseless AI is an extension for Luminar Neo that enables you to reduce noise from your photos effortlessly with just a single click, taking Luminar Neo to the next level of photo editing.
The noise reduction, powered by AI technology, provides exceptional outcomes for all types of noise and can be used with all photography formats. Photographers who prefer to keep their editing workflow simple will benefit from the ability to apply advanced AI noise reduction to their photos in Luminar Neo.
Experience the world of photo editing AI with Luminar and get $10 USD OFF 12 and 24-month plans when you enter the promo code ‘iPhotography’.
Photography noise, also known as “image noise” or simply “noise,” is the random variation of brightness or color in digital photographs. It often appears as unwanted and random speckles or graininess, especially in areas of an image that should be smooth. Noise can significantly affect a photograph’s overall quality and clarity, especially when shooting in low-light conditions or using high ISO settings.
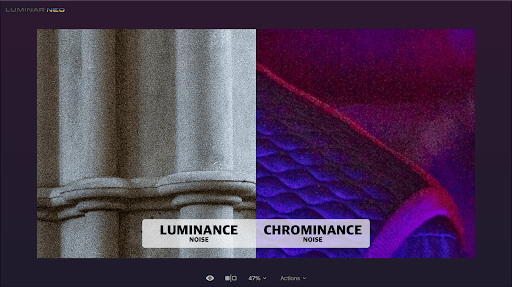
There are two main types of noise in images: luminance and chrominance. Luminance noise affects the brightness levels of pixels and can appear as grainy patterns in low-light or shadow areas of a photo.
Chrominance noise affects the color information and can appear as random specks of color, especially in areas with low light or shadows.
Understanding the factors that cause image noise in photography is important for photographers to manage and minimize it in their images. Here are some common causes of image noise:
Increasing the ISO setting on a camera makes the sensor more sensitive to light, allowing for better performance in low-light conditions. However, higher ISO values can also introduce more noise, especially in the form of luminance and chrominance noise.
In situations where there is not enough available light, the camera may struggle to capture a clear image. To compensate, photographers might increase the ISO setting, increasing noise.
Extended exposure times, such as in night photography or long-exposure shots, can contribute to noise. The longer the exposure, the more time the camera sensor may accumulate random signals, leading to increased noise.
The size and quality of the camera sensor can influence the amount of noise in an image. Larger sensors generally perform better in low-light conditions and show less noise than smaller sensors.
When working with digital images, it is possible to reduce unwanted noise using various post-processing tools, such as Noiseless AI. However, to achieve the best results, minimising noise during the initial image capture is generally recommended.
This can be accomplished by using thoughtful camera settings and practical techniques, which will help to preserve fine details and overall image quality.
Additionally, it will streamline the workflow and save time during photo editing. Minimising noise during image capture can avoid potential drawbacks, such as loss of sharpness and a “smoothing” effect that can occur with aggressive post-processing noise reduction.
Here are some tips to help you minimise noise while capturing images:


When taking photographs, it is important to use lower ISO settings. This means selecting the lowest ISO setting possible for the given lighting conditions. By doing so, you will reduce the sensitivity of the camera to light, which will usually result in images with less noise.
To achieve a balanced and well-exposed image, you can adjust the aperture, shutter speed and ISO settings. This will help you avoid relying solely on high ISO values.
Many cameras have built-in noise reduction features. If your camera has these features, explore the settings and enable noise reduction, especially for long exposure captures.
Capturing images in RAW format rather than JPEG is also beneficial. RAW files contain more data and provide greater flexibility during post-processing, including noise reduction.

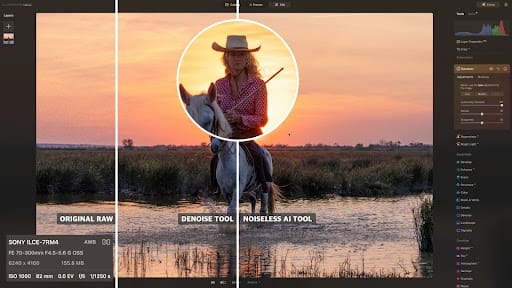
Luminar Neo provides a complete suite of noise reduction options, featuring both traditional and AI-powered tools. The tools can be used individually or in combination, depending on the type and level of noise in the photo.
The non-AI tools for image editing in Luminar Neo include the Develop (Develop RAW) and Denoise tools located in the Essentials section of the main toolbar in the Edit module. These tools use the Luminosity and Color sliders along with additional Boost options to reduce noise in photos.
However, their excessive use can lead to a loss of fine details and introduce artifacts, which can negatively impact the overall quality of the image. While they may be useful for reducing noise in photos with lower levels of noise, they should be used with caution to avoid compromising the image quality.
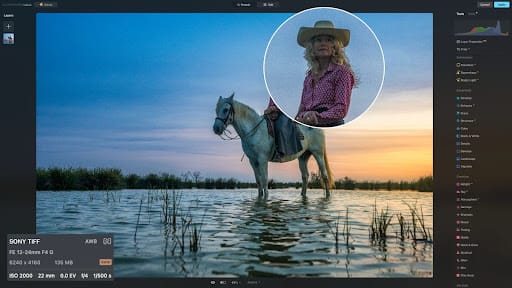
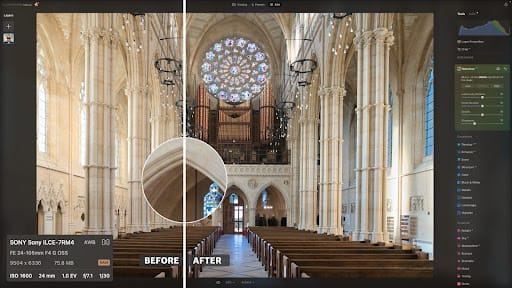
The Noiseless AI extension located in the Extensions section of the main toolbar can be used on any photos in Luminar Neo. However, as it offers advanced noise reduction features, you will more likely use it for pictures with a higher noise level that can’t be reduced with the classic Denoise tool.
Using Noiseless AI is very easy. All you need to do is bring the image into the Edit module and apply the noise reduction in Noiseless AI. When opened, it pre-scans the image and suggests what noise reduction adjustment preset you should use for this specific image.
You can choose between Low, Middle or High noise reduction adjustments — and once you decide — you can click on one of the adjustment buttons. The powerful AI technology will start to scan the image and apply the noise reduction accordingly.
Once finished, it will zoom in to 100% of the image and activate the additional noise reduction sliders to allow you to fine-tune the result.
Depending on the outcome, you can continue with the edit or make further adjustments with the noise reduction presets and one of the three fine-tune sliders.
Noiseless AI performs the best, like other similar tools, when it has access to as much data as possible. For this reason, it is recommended to use RAW files and apply the AI noise reduction at the beginning of the RAW development process before applying any other creative tools.
To get the best possible result, start by following the advice offered by the extension and then move between the three adjustment options (Low, Middle or High) to see which provides the best outcome. Once you are happy with the effect, you can use one of the three sliders to fine-tune the result. The Luminosity Denoise slider will allow you to add or remove noise reduction from your photo.
The Details and Sharpness sliders will help you recover some details lost in the process. You will notice that adding more noise reduction with either of the sliders will result in losing details and sharpness in your photo. Contrarily, you will reintroduce noise with the heavy use of Details and Sharpness sliders.
The key is to find the balance between the two sets of sliders and remember that some noise is always better than a heavy loss of details.
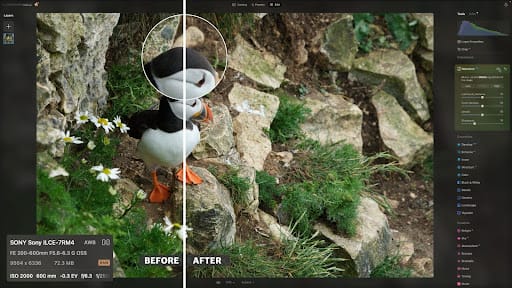
When we talk about low noise images, we think about photos captured with a slightly higher ISO or with some underexposure level. These photos often showcase some luminosity noise, but you can easily fix them with the help of the Noiseless AI extension.
Medium noise on a photo is often represented by adding color noise on top of luminosity noise. This is usually caused by a higher ISO or incorrect exposure settings. You can remove the medium noise with presets, but it sometimes requires additional adjustments with the noise reduction sliders to get the best possible result.
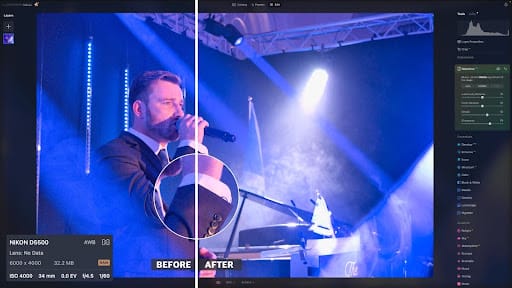
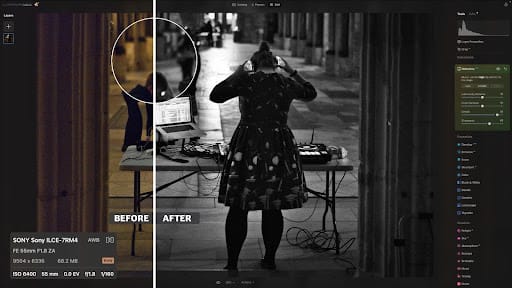
High ISO, extreme long exposure or underexposed photos can introduce high noise. As a result, you will often see lots of luminosity and color noise in the image. If this is the case, you will usually have to spend extra time fine-tuning the noise reduction within the Noiseless AI extension.
Photos with an extreme level of noise are often not repairable as, at some point, the noise will overtake the details and color information stored in the image. However, you can always try to remove as much noise as possible following the same technique as in High Noise Photos and apply other creative methods to create an appealing result.
Noiseless AI performs best on RAW files, but there will be a time when you will handle noisy photos in JPEG format. If that’s the case, you should always try to get the best-quality JPEG in the highest resolution possible. To get the best outcome, just like with the RAW files, start with the noise reduction process at the beginning of the editing
Noiseless AI is far more effective at removing noise artifacts than other standard noise reduction tools. The impressive results and the possibility of using it in Luminar Neo on all types of photos offer an exciting addition to this award-winning software.
Following the popular style of Luminar Neo, the interface is powerful yet incredibly intuitive, and you will be able to master it in a few minutes.
Experience the world of photo editing AI with Luminar and get $10 USD OFF 12 and 24-month plans when you enter the promo code ‘iPhotography’.
(iPhotography may make small commissions from links in this article.)

Discover TOP features in the Lightroom CC mobile app with this guide for enhancing your photo editing skills. For desktop and tablet too.

Shooting sunsets using amazing 5-in-1 magnetic lens filters from Kentfaith, the 1st choice for photo & video products.

Popular memory cards for photography – what’s the best SD card for your digital camera? Choose the right capacity and class speed in our guide
Learn the basics of photography – fast – with our FREE 60-Second Photographer online course. Each class is short and sharp with simple, actionable steps that give you immediate results.
x 30 lessons

© iPhotography™
Become a confident and competent photographer in less than 30 minutes!
Before you leave, make sure you’ve secured your FREE online photography course (worth £29.99)
Each class is just 60-seconds or less making it the fastest and easiest way to learn photography!
