 Stephen Walton
Home photography projects are a great fallback for all new and creative photographers to rely on when the outdoors just isn’t accessible or appealing.
If you enjoy doing indoor photography, check out the iPhotography Home Projects course here.
I wanted to bring you easy and fun 10 home photography projects that will only motivate you and your photography further.
All of these projects are easily done at home. There are no specific camera settings needed, just some props and planning in advance. You could even try out many of these home photography projects with an iPhone.
Why not get your children or grandchildren involved in these photo projects too!

Start off by heading down to your local craft store or scour the internet for rolls of coloured cellophane. Choose two colours that complement. Place two light sources either side of your subject and block out all other ambient light.
If the colours aren’t appearing strong enough fold the cellophane in half to make the colour denser.
The effect of coloured lighting can add emotion, atmosphere and totally change the natural perspective of your original subject.
If you want to try out frozen photography whip out your ice cube tray from the freezer. Go hunting around the house for small objects to place in the tray.
Think about buttons, beads, petals, dice, marbles etc. Fill the tray up to the brim and then pour in the water. Leave them in the freezer overnight.
The next day, rescue the tray from the freezer and pop out your newly created ice cubes. Pop the cubes on to a reflective base – a shiny black tile looks great – and match the background with a similar colour (try some coloured card).
Use the flashlight on your smartphone to light up the ice cube. Hard light will give a better shine and glimmer to the ice. You’ll need to work quick to avoid melting!
For flat lay photography clear yourself some floor space and get out your tripod. Arrange all the items of your chosen subject, in parts, on the floor.
Think about:
Spread out all the objects on the floor in the square arrangement. Make sure the spacings are even throughout.
Get yourself a stool if you need to raise the camera higher and look straight back down (90-degree angle) to the flat lay photograph. Try different arrangements each time you shoot.
Read more about flat lay photography here

Compact and frameless mirrors are cheap and instantly creative props to have around the house. Reflection photography can be sourced in different locations, naturally or self-made.
The first rule of using mirrors or shooting reflections in photography is to clear off any fingerprints!
Next, go hunting around your house looking for some double perspectives. Position the mirror in the middle of your subject and touching the rim of your lens so you’re shooting right along the surface for the best effect. If you’re too close to focus, then stand back and zoom into the mirror gradually.
Mix it up a little and position the mirror on the vertical, horizontal and diagonal across your camera’s view to see what odd perspectives you can create. It’ll educate you in creating depth, attempting half crops and the power of reflections.

This home photography project can be done with any existing photos. You don’t need to go out shooting fresh photos. But, if you wish to, choose an object and take 4, 9, 12 or 16 photos of it from a fixed position on a tripod.
On each photo zoom in to a different area of the object to focus on a small part.
Take all your shots and upload them into a collage creator, something like Photo Joiner or Pixlr X have free templates to help with this. Create a collage of all your shots but mix up the natural positionings to create a mosaic view.
It’s a great way to tease audiences as to what the original object was and a great talking point when you have visitors at home.
To do this home photography project with an existing image you’ll need to re-crop it and save individual versions in editing and then upload it to make the collage.

If you’ve seen or studied our Light Tricks course, you’ll know all about the Harris Shutter effect. But if you’re a beginner to this blend of photography and editing to create a very psychedelic look watch the video below to see how it’s done.
There’s nothing better than totally abandoning every rule of composition you’ve been told about in photography! Rules are made to be broken right? Well in this home photography project I’m telling you to break the traditional rules about framing.
Instead, pick a range of objects around the house and only have half of them in the each shot. Slide it to the left, right, top or bottom of the frame – it doesn’t matter. Just make sure only half of your subject is in the frame and is empty space.
Its new-wave, modern, unusual, thought-provoking, and surprisingly fun home photography project.

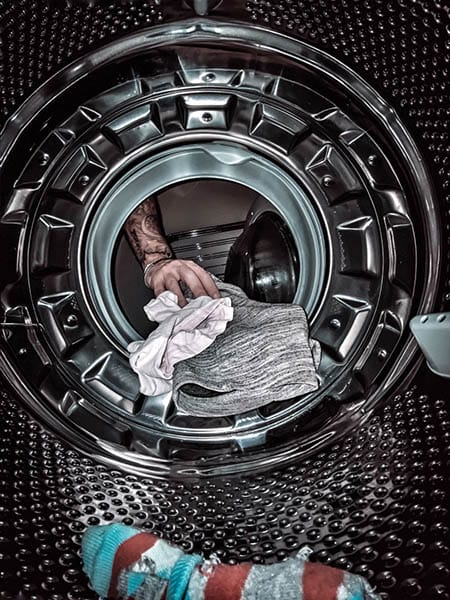
This is a clever home photography project that doesn’t involve you behind the camera. Look to pick out some household appliances or places you can put your camera inside. Think about:
• Washing Machine
• Oven
• Fridge
• Cupboard
• Sock Draw
• Under the Bed
You’ll need to set your camera up with certain settings too:
• Set your focal length to go as wide as possible
• Spin around your camera screen to check the exposure
• Turn the camera’s self-timer to 5 or 10 seconds
• Turn on the pop up/built in flash
• Set focus mode to wide
Find a balanced place to put your camera inside the appliance and press the shutter button, you’ll have a few seconds to adjust yourself. Stand back and reach your hand into grab the camera just as the shot is taken for a brilliant point of view perspective. Make sure your cooker and washing machines are turned off first!
Creative photo editing is another home photography project that you can do without the camera.
Grab an adult, children or grandkids and get them to put on hold a picture frame in front of their body.
Don’t move the camera after this taking shot but ask them to step out of the frame and shoot the empty background too.
Take the two shots into editing and make a selection of the area exposed when they were holding the picture frame. In Photoshop you can do this by using the Magic Wand Tool or the Lasso Tool.
Once you’ve got your selection, go back to your shot of the empty background and copy and ‘paste into’ the selection you made.
Slide and transform the new layer so it fits the perspective that makes your subject look like they have a hole seeing through them! You can use other pictures instead to create a more sci-fi feel of stars, planets and galaxies.
With this last home photography project, it’s a chance to head out into the garden.
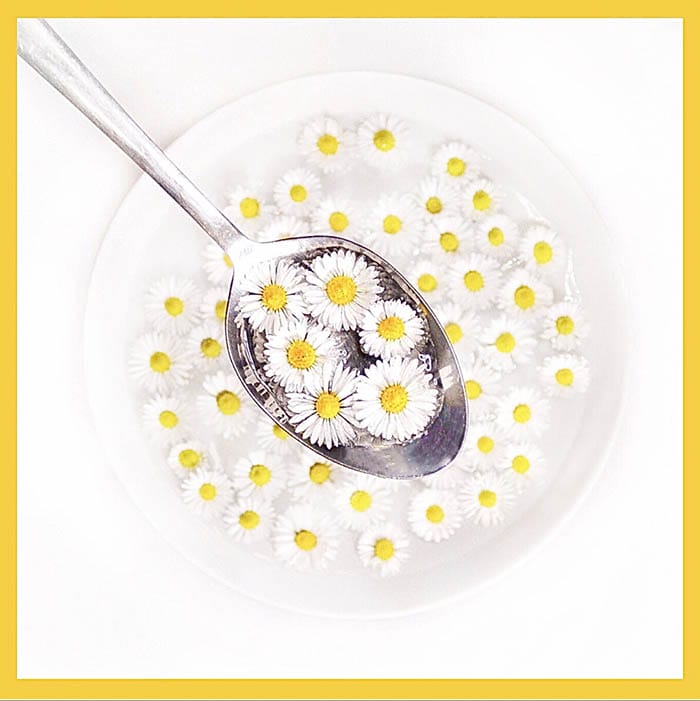
For floating flower photography it’s best to look for small headed flowers – Daisies I’ve found are perfect. Start off by removing the stem and find yourself a plain coloured plate. Carefully pour water on to the plate to just below the rim.
Gently place your chosen flower head on to the plate so they float on the surface. Let them settle before shooting from an overhead position (like flat lay photography).
Consider getting a few different flower heads and petals from your garden to mix up the colours. In the summertime you could crack out the kid’s paddling pool and do the same effect on a larger scale!
If you’ve tried your hand at any of our 10 home photography projects, then let us know. Don’t forget to post your efforts to the iPhotography feedback gallery. Alternatively, tag us on Instagram, Twitter and Facebook for every to see.
But if you’ve tried out any other home photography projects tell us what you’ve been shooting and how you’ve done it.

Discover TOP features in the Lightroom CC mobile app with this guide for enhancing your photo editing skills. For desktop and tablet too.

Shooting sunsets using amazing 5-in-1 magnetic lens filters from Kentfaith, the 1st choice for photo & video products.

Popular memory cards for photography – what’s the best SD card for your digital camera? Choose the right capacity and class speed in our guide
Learn the basics of photography – fast – with our FREE 60-Second Photographer online course. Each class is short and sharp with simple, actionable steps that give you immediate results.
x 30 lessons

© iPhotography™
Become a confident and competent photographer in less than 30 minutes!
Before you leave, make sure you’ve secured your FREE online photography course (worth £29.99)
Each class is just 60-seconds or less making it the fastest and easiest way to learn photography!