 Stephen Walton
If you’re looking to make your photos more striking with a clear structure then you’ll want to have a look at these framing tips for photographs.
Framing your subject in a photo can be done several different ways. Whether you’re creating a frame in front or behind them you need to choose the right object to create your frame.
In this framing tips for photographs guide I’ve got a run-down of what makes a good frame. I’ll also show you what it should do to your composition and ways you could frame your subject naturally and using man-made objects.

You may have come across the frame within a frame compositional technique within Module 7 and 6 of the iPhotography or Portrait courses respectively. But have you ever put it to good use in your photography?
Creating a frame in-camera is an effective and simple way to structure your shots. You should always be on the lookout for objects and opportunities to tell the story of your photo. Creative framing can add depth, interest and will pull your audience into the moment – adding engagement, intrigue and context.
While this compositional may not work for every subject you shoot it can certainly make a mundane view or subject look more interesting and dynamic without too much effort.


Foreground framing is probably the least common style of framing, but it is the most interesting.
When you’re out and about looking for opportunities to peer through objects to see your subject in the distance. Take this example of a lighthouse through the trees. The total framing encapsulates our attention to only look at the lighthouse. There are no distracting objects outside of this framed area.

Another approach to foreground framing is to use a shallow depth of field (F/4 or wider) and bring your ‘look through’ object close to the lens. This technique is particularly handy for weddings, parties or other events where you want to capture the atmosphere but keep the main subject sharp.
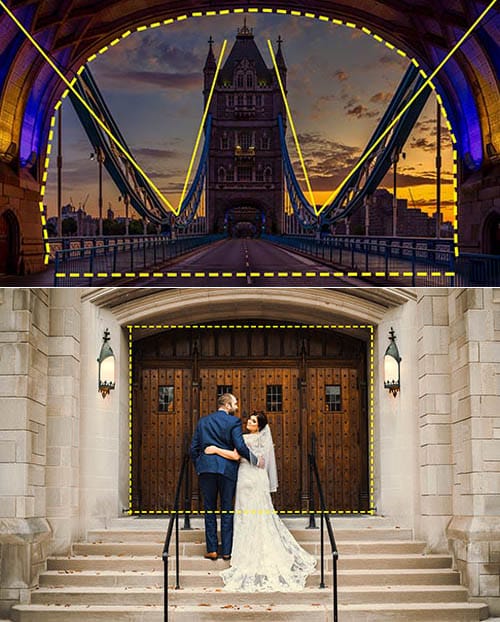
Take the same principals of foreground framing and place them behind your subject instead. But whereas foreground framing is down to you to create, background frames may already exist – and you just need to spot them.
The most common example you’ve probably seen 1,000 times but never assessed (until now) is with newlyweds. Standing in the doorway to the church creates an arcing frame over the top of the couple encompassing them within an isolated moment whilst being surrounded by others.
Transfer the same thinking and apply it to doorways (they don’t have to be symmetrical), tunnels, signs, windows, arches etc.
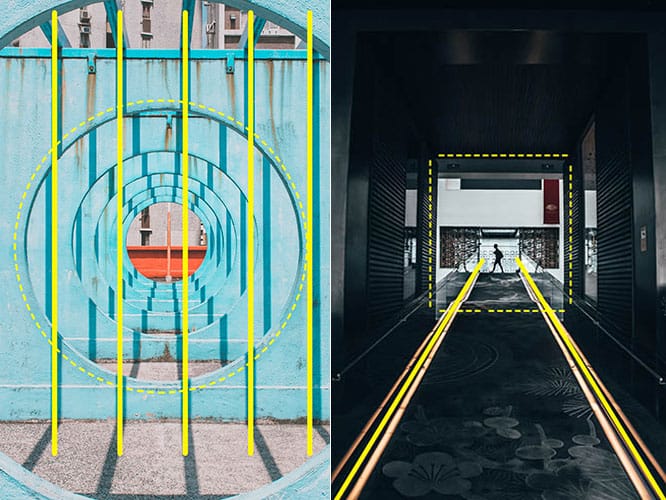
Us iPhotography tutors LOVE it when our course members combine multiple compositional techniques in their gallery shots. It shows consideration, creativity and progression so we actively encourage any photographer to multi-layer their frames with throwing in some leading lines to draw our attention to the point of the story faster.
Employ leading lines to set a path through the photo towards or through the frame you’re creating. They can be horizontal, vertical, diagonal or curved, the more lines the better (providing they are all pointing at the same place). Position your camera so the lines begin at the edge of your shot and travel for as long as possible towards your subject.
Make sure they aren’t interrupted for the strongest and fastest reaction.
We are surrounded by natural and man-made frames everywhere, every day. When you’re next out with your camera take a moment to look around and search for opportunities to create some framed artwork.
For example, think about:
• Create partial frames using over hanging branches
• Hollowed out logs
• Cracks in rocks
• Caves
• Parting the long grass
• Archways
• Gaps in fences
• Car tyres
• Windows
• Doorways
The opportunities are everywhere if you open up your imagination – so don’t allow yourself to feel restricted. And if all else fails, just make your own frame…

If you’ve never implemented this creative framing into your photography before then it’s your turn to have a go. Use all the tips and ideas we’ve given to implement this powerful tool of photography. When you’ve taken your shot it’s time to share it.
Upload it to the iPhotography gallery or tag us on social media and we’ll share out some of the best versions.
Did you find this article helpful? Let us know. We love to hear what you thought. If you’ve got any other approaches or ideas about how to use framing in your shots, then just drop us a comment.

Discover TOP features in the Lightroom CC mobile app with this guide for enhancing your photo editing skills. For desktop and tablet too.

Shooting sunsets using amazing 5-in-1 magnetic lens filters from Kentfaith, the 1st choice for photo & video products.

Popular memory cards for photography – what’s the best SD card for your digital camera? Choose the right capacity and class speed in our guide
Learn the basics of photography – fast – with our FREE 60-Second Photographer online course. Each class is short and sharp with simple, actionable steps that give you immediate results.
x 30 lessons

© iPhotography™
Become a confident and competent photographer in less than 30 minutes!
Before you leave, make sure you’ve secured your FREE online photography course (worth £29.99)
Each class is just 60-seconds or less making it the fastest and easiest way to learn photography!