 Emily Lowrey
Clone photography can be a great project to try. You can shoot this project indoors or outdoors, and it can be the perfect starting point for you to learn some basic tools in Photoshop.

To create cloning photography, you will need to take three or four separate images. You’ll need to use a tripod to make sure that everything else in your frame remains identical aside from your moving subject.
You can shoot these photos alone by using a timer on your camera, or ask a friend to press the shutter.
You’ll need to use manual focus so that the focus point stays the same throughout all the images. It can be handy to use a narrower aperture (F/8 for instance) so more of the frame is in focus.
After you’ve taken your different shots, it can also be very handy to take a blank frame with no subjects in it. Make sure you keep the focus exactly the same as in the other shots. This step is optional, but it can help in editing.

Here are the 5 steps in a nutshell. We will go into them in more detail shortly:
1. Choose your scene and set your tripod and camera up
2. Set focus on your subject (more info below) and switch to manual focus
3. Take your different photos one after the other
4. Take a shot of the empty room/space without changing focus
5. Done!

You should set yourself up for success and use a narrow aperture of around F/8 or so. This means that a lot of your scene will be in focus naturally, and it gives you some room for error when you move your subject around the scene.
If you’re shooting alone, you can put an object in the frame to act as a stand-in and focus your camera on that. Something of a similar height to your subject would be handy, like a broom, or a chair with a high back. Focus on that object, lock your focus, then take its place. You can mark a spot on the floor so you know you’ll be in focus when you get into frame.
Use a 10-second timer function on your camera to give you time to get into position.
It is absolutely essential that you keep the focus the same in every shot. If you don’t then the images won’t blend together in editing.

Images that don’t have cross-over will be much easier to edit. To begin with, you should consider trying a simple cloning photo where your subjects don’t touch at all.
If you do want your subjects to touch, like several of the images in this article, it will take a little more attention in Photoshop to pull it off.
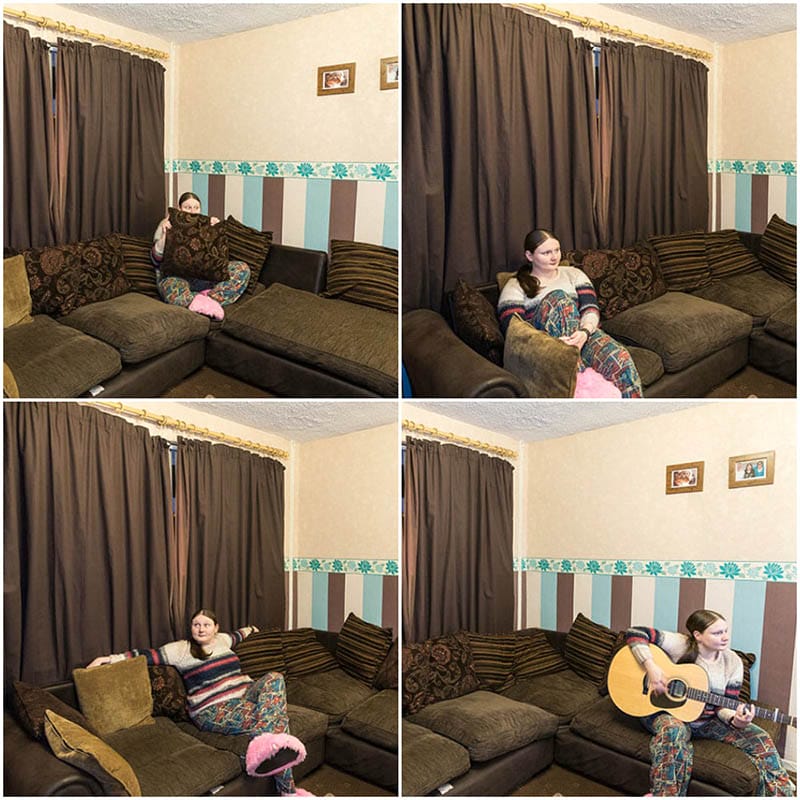
Your imagination is your only limit once you’ve mastered the basics! You can add in however many clones you like, like this example below. Now we have our separate photos. They should look something like this:
There is a dedicated video down below that will show you how to edit clone photography photos in Photoshop, so definitely give that a watch at the end.
1. Import your images by going to File > Script > Load Files Into Stack.
2. Select your images.
3. Make sure you click “attempt to automatically align source images”. This will align everything for you.
4. Once your stack of images has loaded, order the layers so that the subjects in the back of the scene are at the bottom of the layer stack, and the subjects closest to the camera are at the top of the layer stack.
5. Select the first layer you want to work on and press the Adjustment Mask button. You can find this at the bottom right of the screen.
6. Press CTRL+I (Windows) or CMD+I (Mac) to invert the white mask to black. This will make the layer completely invisible, which is what we want.
7. Choose a white paintbrush and paint back in where your subject is, and they’ll appear. If you make a mistake you can switch to black to erase what you’ve done
8. Repeat this for every layer.
9. Finished! Export as a JPG when you’re finished editing. It’s always a good idea to keep a copy of your work as a .PSD so you can go in and change things if you notice anything at a later date.
Watch the clone photography video to see how to edit your images together.
You should now have all the skills you need to make some fun clone photographs! Remember, it’s OK to start out small and work your way up to the more complex edits. Have fun and good luck!
If you enjoyed this article, you might also enjoy learning about levitation photography.

Discover TOP features in the Lightroom CC mobile app with this guide for enhancing your photo editing skills. For desktop and tablet too.

Shooting sunsets using amazing 5-in-1 magnetic lens filters from Kentfaith, the 1st choice for photo & video products.

Popular memory cards for photography – what’s the best SD card for your digital camera? Choose the right capacity and class speed in our guide
Learn the basics of photography – fast – with our FREE 60-Second Photographer online course. Each class is short and sharp with simple, actionable steps that give you immediate results.
x 30 lessons

© iPhotography™
Become a confident and competent photographer in less than 30 minutes!
Before you leave, make sure you’ve secured your FREE online photography course (worth £29.99)
Each class is just 60-seconds or less making it the fastest and easiest way to learn photography!