 Stephen Walton
Have you ever seen this Photoshop technique? Creating 2D landscapes is the editing tutorial if you love creating something from nothing.
This full illustrated 7 step guide will require nothing but Photoshop (ideally the CC version but we’ll give you a few pointers for earlier editions) and your imagination to create a 2D landscape picture.
You won’t need any photographs or resource images to start. This free Photoshop tutorial one is all made in the software itself.
Once you’ve mastered this Photoshop technique, you’ll be able to transfer these newly learnt skills into all manners of designs. Don’t think it’s just a landscape that you can create the possibilities are endless with 2D designs.


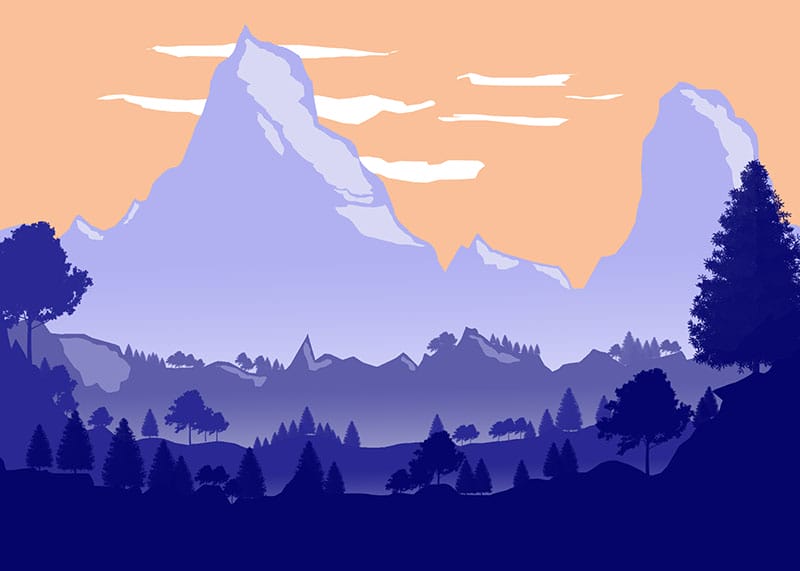
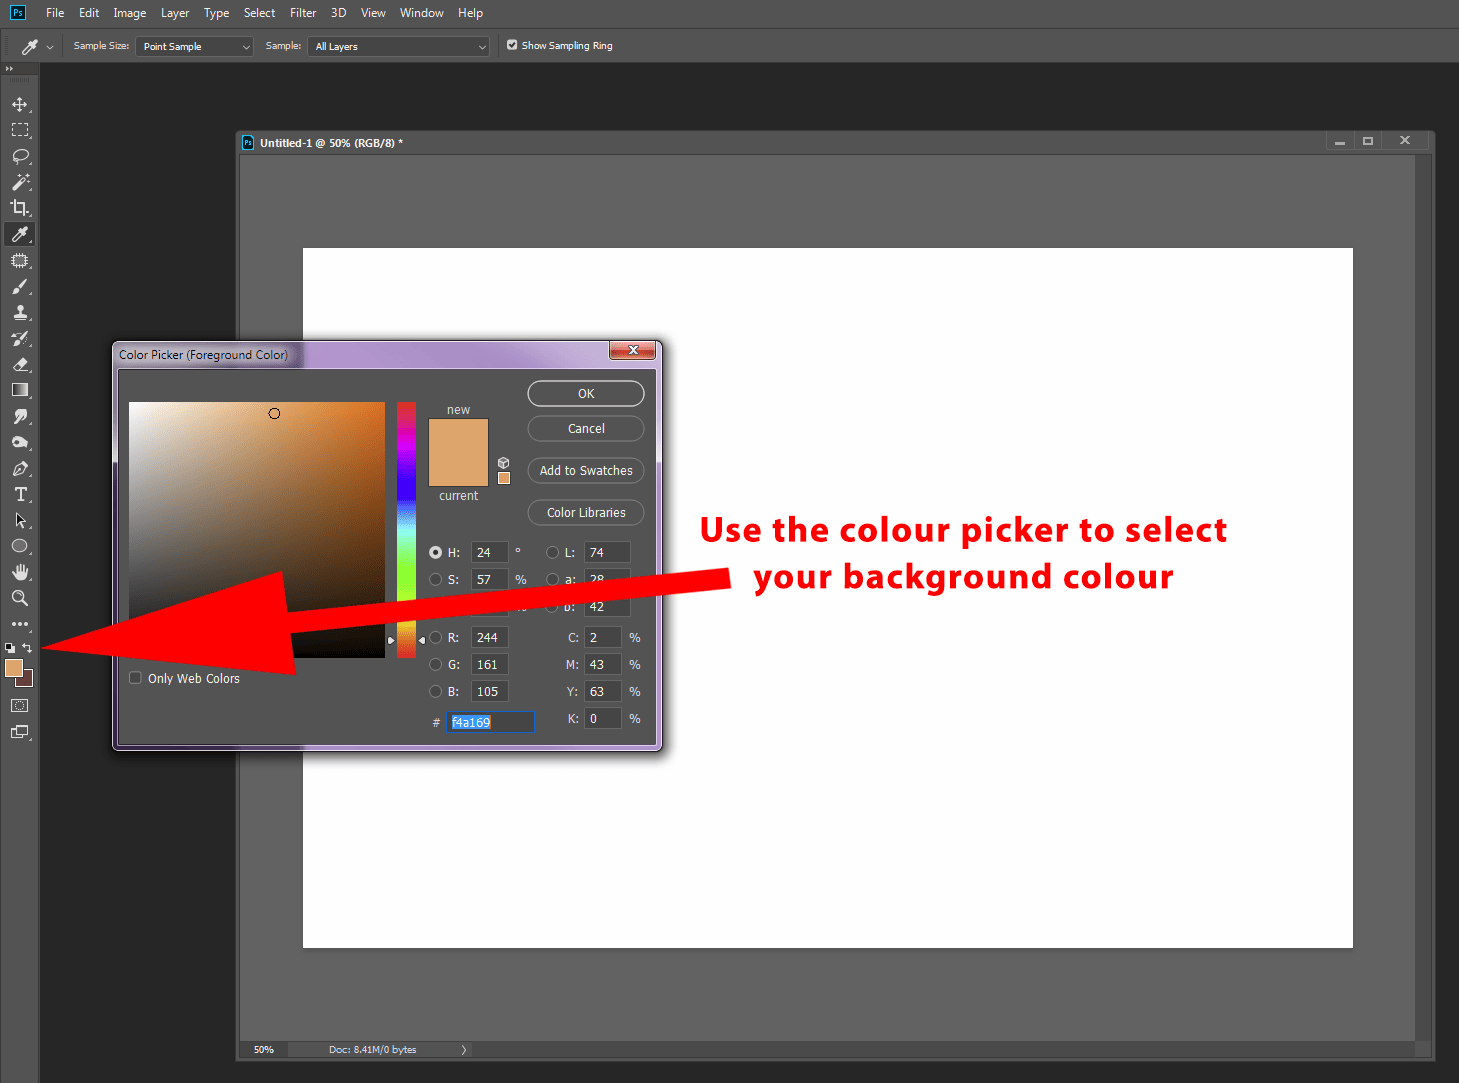
Open a new horizontal (landscape) document and fill the background with a pale-orange colour. This is going to be the sky in our version, but you can choose a blue or yellow if you want to set your landscape in a different time of day.
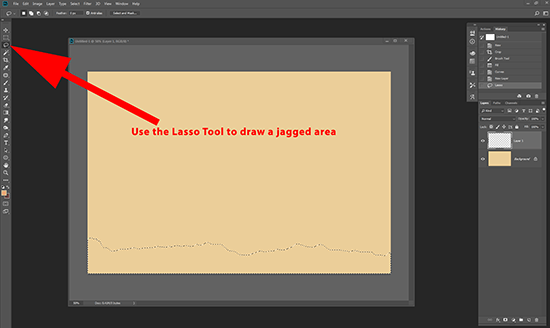
Create a new layer to begin with using Layer>New>Layer and pick out your Lasso tool and draw a jagged outline around the bottom of your document, this is going to be our foreground. Make sure you draw a complete line conjoining both ends by drawing along the bottom of the document too (see the video if this sounds complicated).
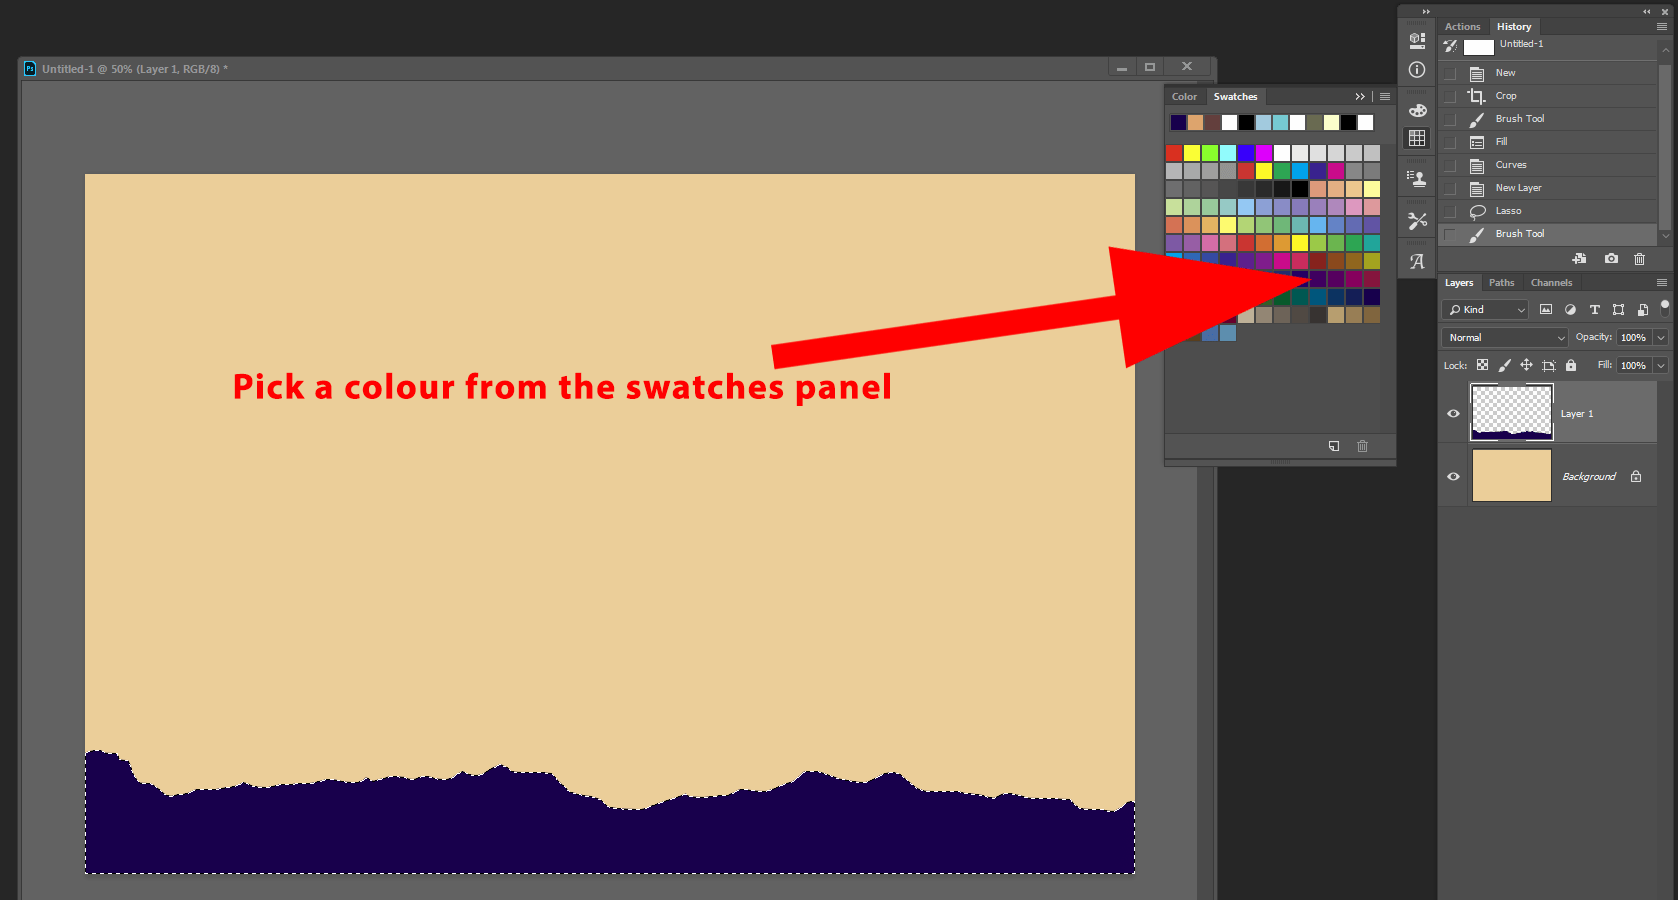
Pick a dark colour and fill it in to the area you’ve just made. Something like a dark purple or blue could be nice, but the choice is yours.
Use the foreground colour from the paint palette at the bottom of the vertical toolbar to select the active colour.
The next step is essentially repeating step 2 and 3 a few times over.
Each time draw a jagged line different from the last and make the colour you fill it with a little lighter than the one before. If your new layers appear over the top of the previous just change their positions in your layers panel to create the sense of depth that we’re looking for.
The last jagged area you draw could look more dramatic with a nice mountain shape in the background to give your design a main subject matter. You could do one main mountain and couple of smaller ones either side of it perhaps.
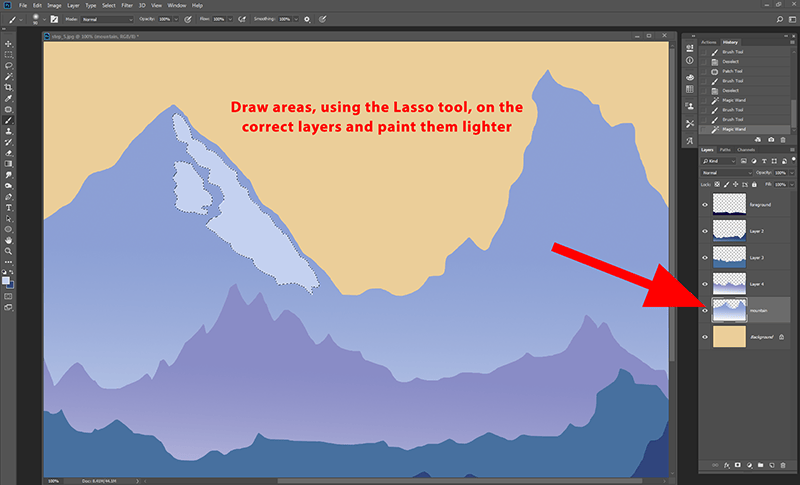
Now that our 2D landscape layers have been created you can see the effect taking place and now it’s up to you what you want to add in next, but we’re going to show you a neat little trick about how to add more shape and dimension to this flat lay.
Select your mountain layer (the last one you made) and use the Lasso tool to draw small, jagged areas on one side of your mountains, select a slightly lighter colour than the mountain and paint that area in.
When you deselect the area (CTRL+D or CMD+D) you can see it looks like there’s light shining on that side which adds the extra dimension!
You could do this on the smaller mountains too if you made a few – just make sure you do it on the same side each time for realism.
Feel free to do the same little trick to the background layer (the first one you created) and make the new areas white to make them look like clouds behind the mountains.
Now you can either leave your design there and say ‘I’m all done’ or press on to the next step and we’ll add in some landscape foliage.
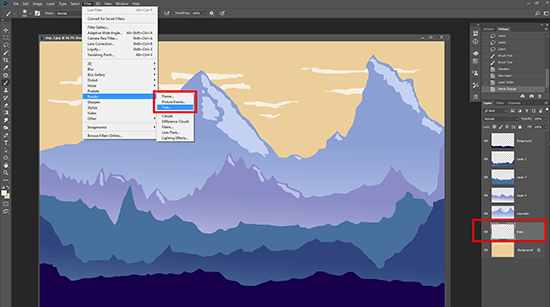
This where different versions of Photoshop may require a different approach. We’ve outlined below what you need to do to add trees to your 2D landscapes in Photoshop depending on which generation of software you are using.
Pre CC versions will find the option to add trees by creating a new layer and drag that layer just above the background layer.
Select that whole layer by choosing Select>All and then choosing Edit>Fill>Pattern and at the bottom under Scripted Patterns pick trees.
Photoshop will give you a collection of different types of trees to use. Pick the one you like and change the colour, using the sliders to match your foreground layer – remember the dark purple?
Then place your tree wherever you want and repeat this process with different sizes and litter them across your foreground.
For users of Photoshop CC firstly create a new layer, place it above the background layer and choose Filter>Render>Tree for the menu bar at the top of your screen.
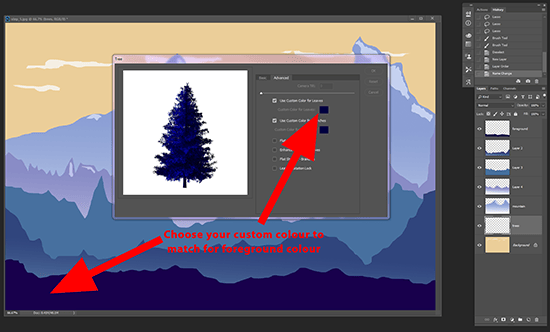
Choose from the list the type of tree you want and change the leaves and branches colours (in the advanced tab) to match your dark purple foreground, or whichever colour you choose.
If you find this option greyed out, go to Edit>Preferences>Performance and turn on Use Graphics Processor.
If it was already on, then turn it off, restart Photoshop and turn it on again and then restart it again. SAVE YOUR LANDSCAPE BEFORE DOING THIS THOUGH!!
Continue to fill your 2D landscape with trees of different heights and shapes to give a realistic environment. You can copy and paste the first tree you made if you find it easier.
Swap to different layers of your landscape and add more trees in the distance, just remember to change the colours as you go.
Eventually you’ll have added enough foliage to create a beautiful 2D landscape scene. If you want to go further feel free to add in some birds or planes in the sky. You can find custom brushes like these online, and a lot of them are free!
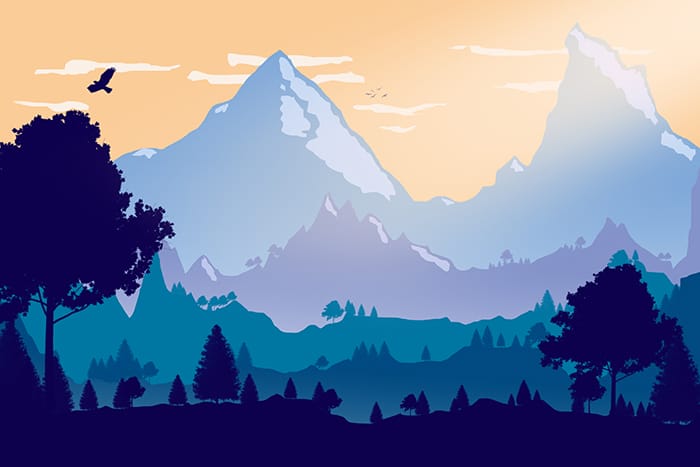
And with that you are complete. Your 2D landscape should look a little similar to our examples. The more time you spend using the tools in this free Photoshop tutorial will help you. You’ll understand how to add more elements making the scene more authentic and packed with interest.
When you’ve finished your Photoshop masterpiece don’t forget to share your idyllic 2D landscape scenes with us.
iPhotography members can post their examples in the feedback gallery. If you’re not a member, tag us on social media with your 2D landscapes.

Shooting sunsets using amazing 5-in-1 magnetic lens filters from Kentfaith, the 1st choice for photo & video products.

Popular memory cards for photography – what’s the best SD card for your digital camera? Choose the right capacity and class speed in our guide

Discover the BEST way on how to clean a camera sensor using swaps, rocket blowers and pencil brushes to give your shots a dust-free finish!
Learn the basics of photography – fast – with our FREE 60-Second Photographer online course. Each class is short and sharp with simple, actionable steps that give you immediate results.
x 30 lessons

© iPhotography™
Become a confident and competent photographer in less than 30 minutes!
Before you leave, make sure you’ve secured your FREE online photography course (worth £29.99)
Each class is just 60-seconds or less making it the fastest and easiest way to learn photography!