Understanding the interplay of highlights, midtones, and shadows is essential for any photographer looking to elevate their work.
These elements form the cornerstone of photographic exposure, influencing mood, depth, and the overall visual story. This blog post explores each component in detail, providing insights into how to effectively use them to enhance your photography.
Midtones represent the range of tones in an image that are neither very dark nor very bright. They are crucial because they usually contain the most information in a photograph, making up the bulk of what we see in a typical scene. Midtones define the overall tone of the image and are pivotal in achieving a balanced exposure.

Midtones play a significant role in setting the image’s contrast and colour balance. They act as the balancing point between the lightest and darkest elements, providing a reference point for adjusting contrast levels.
Effective management of midtones ensures that the image appears as natural and true-to-life as possible, maintaining the integrity of colours without skewing towards extremes.

Highlights refer to the brightest elements in a photo, where light is most intense. These are often the first places where a viewer’s eye might be drawn. Managing highlights is crucial as they can dictate the mood of the image and highlight important details.

Clipped or blown out highlights occur when areas of the image are so bright that they lack discernible details, appearing as pure white spots. This often results from overexposure, where the camera sensor could not capture any information in these areas because of the excess light.
Clipped highlights can diminish the quality of an image, making it essential to monitor exposure carefully to avoid losing detail in these critical areas.

Shadow tones represent the darkest parts of an image, crucial for adding depth and dimension. They help in defining the form and are integral to creating the feeling of three-dimensionality in a photograph.

Recovering details from shadows and highlights depends largely on the image’s initial exposure and the camera’s dynamic range. While some details can be brought back in post-processing through techniques like shadow/highlight recovery, excessive recovery can lead to noise and unwanted artifacts. Thus, it’s best to aim for balanced exposure at the time of shooting.
While often discussed in terms of lightness and darkness, tones in photography also encompass colour. Colour tones refer to the warmth or coolness of the colours in the image, impacting the emotional feel and atmosphere of the photo.
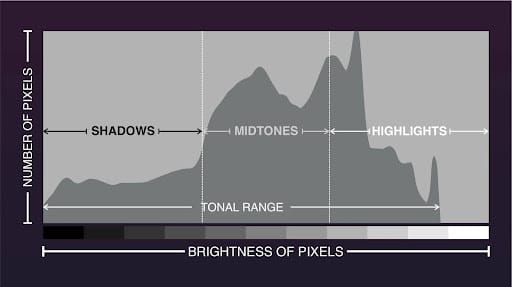
A histogram is a visual tool that represents the tonal distribution in your photo. It shows the spread of shadows, midtones, and highlights across the image, providing a quick insight into overall exposure and balance.
Learning to read a histogram is fundamental in adjusting exposure settings both during and after the shoot to ensure that all areas of the image are well-represented.

Experience the world of photo editing AI with Luminar and get $10 USD OFF 12 and 24-month plans when you enter the promo code ‘iPhotography’.
A histogram is an essential tool for photographers, displayed on the back of most digital cameras and in photo editing software.
It graphically represents the tonal values of your photograph, helping you understand exposure and tonal distribution at a glance. Here’s a step-by-step guide to reading a histogram to enhance your understanding of what it means and how it represents the tones in your photos.
A histogram is a bar chart representing the distribution of tones in your photograph, from the darkest on the left (shadows) to the brightest on the right (highlights).
The height of each bar shows how many pixels in your image fall into each tonal range. This visual representation can quickly tell you if your image is well-exposed or if certain areas are too bright or too dark.

If the left side of the histogram is touching the edge, it indicates that your image has pure black areas, potentially losing detail in the shadows.
A gap on the left side suggests no pure blacks, which might be preferable in some shooting conditions to avoid underexposure.
This part of the histogram represents the bulk of the image’s tonal range. Ideally, this area should show a balanced distribution, indicating good exposure across the scene.
If the midtones are skewed too far to the left or right, it may suggest an overall underexposure or overexposure, respectively.
If the histogram spikes and touches the right edge, there are likely blown-out highlights in your image, where detail in bright areas is lost.
A gap on the right side means there are no pure whites, which could be suitable for scenes where you want to maintain detail in highlights, like in landscapes with clouds.

Balanced Histogram: Ideally, the histogram should be spread evenly across the graph without significant spikes at either end, indicating a well-exposed shot.
High Contrast Scenes: In scenes with high contrast, such as bright sunlight and deep shadows, the histogram might show spikes at both ends. Here, you may need to decide which area (shadows or highlights) is more important to expose correctly, depending on the subject of your photo.
Low Light Conditions: In dim lighting, ensure the histogram does not skew too far left unless you are capturing a night scene and preserving the mood is essential.


Understanding the histogram during shooting is crucial, but it’s also vital in post-processing.
When editing your photos, continuously refer back to the histogram to ensure adjustments such as exposure, contrast, and brightness don’t push the tones beyond desirable limits, ensuring that details are maintained across shadows, midtones, and highlights.
Every photograph is a complex blend of various tones, each contributing to the final composition. Identifying these tones involves observing how light interacts with the subject and the scene’s environment. It requires an understanding of how camera settings, lighting conditions, and post-processing affect the visual output.
Highlights, midtones, and shadows are not merely technical aspects of photography—they are powerful tools that, when understood and manipulated correctly, can dramatically enhance the artistic quality of your images.
By mastering these elements, you open up new dimensions in your photographic work, turning simple shots into compelling narratives.
By diving deep into the realms of highlights, midtones, and shadows, photographers of all levels can achieve a greater understanding and control over their images, leading to more expressive and impactful photography.
(iPhotography may make small commissions from links in this article.)
Whether you are photographing women or men, understanding how to direct poses can make your boudoir sessions more effective and evocative.
Who is Annie Leibovitz? Learn about one of the USA’s most iconic portrait photographer from Rolling Stone, Vanity Fair to Queen Elizabeth II
Learn how to calibrate your camera and monitor for accurate colours in digital photography. What are the signs you need calibration?
Learn the basics of photography – fast – with our FREE 60-Second Photographer online course. Each class is short and sharp with simple, actionable steps that give you immediate results.
x 30 lessons

© iPhotography™
Become a confident and competent photographer in less than 30 minutes!
Before you leave, make sure you’ve secured your FREE online photography course (worth £29.99)
Each class is just 60-seconds or less making it the fastest and easiest way to learn photography!