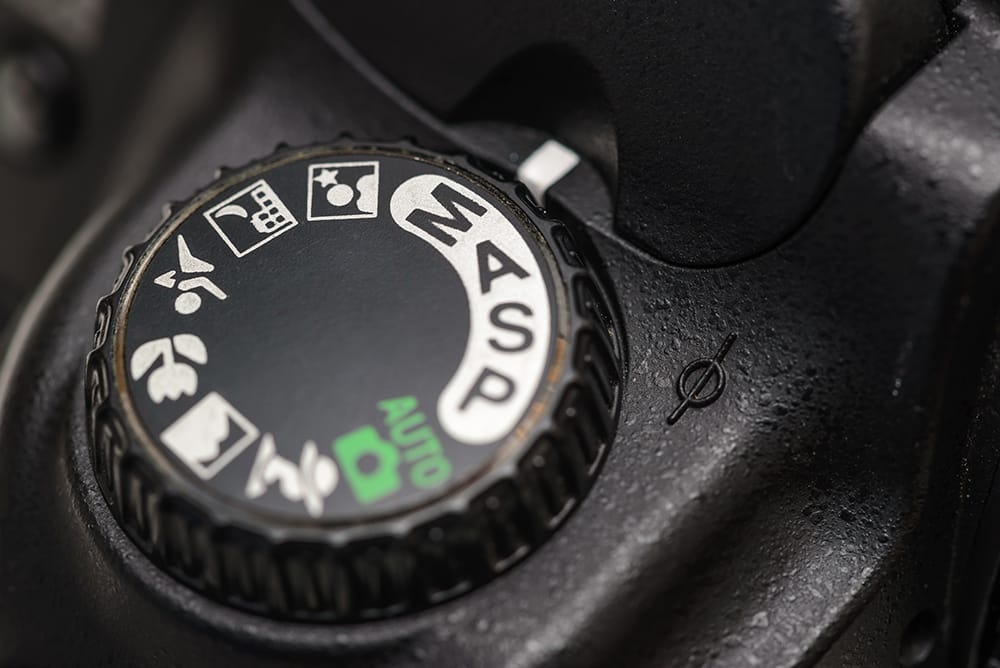
With so many options on the modern-day digital camera dial mode, it is forgivable for anybody to forget what they all mean. Therefore, in many instances with a beginner photographer, it’s easiest to head for the simplest option – AUTO mode.
Getting out of auto on your camera dial will allow your photography to take the next creative step. I thought it was important to explain what all those modes mean on your camera dial.
I’ve tried to make sure that lots of different camera types from compacts to DSLRs are taken into consideration, so that most of this information will apply to your camera. But some functions may be limited to specific camera types or brands, so we’ll try to point that out as we go through!

Maybe you’ve just bought a new camera and you don’t know where to begin. Camera manufacturers have beginner photographers in mind when they created the basic camera dial modes.
They simply help you concentrate on having fun with your photography. The camera will do all the hard work by adjusting the exposure based on the conditions you shoot in. It’s the perfect way to enjoy taking photographs and getting to know your camera before advancing further.
What else can you say – it does what it says on the tin! Auto is quite literally the automatic mode that most beginners opt for. The camera will choose all settings based upon its light meter reading which is taken milliseconds before you take a picture – so quick you won’t even notice. Sometimes it may be symbolised by a simple green rectangle.

This icon is your macro function, which will allow you to unlock an extra focus range on your camera so you can get in nice and close to capture small details, ideal for floral, insects and abstract photography. Remember to switch back to different setting after using your macro mode though, otherwise you’ll suffer a delay in your focusing time.

For the landscape lovers, most cameras have a dedicated mode for bringing out the best in a scene. This option will automatically make the camera focus on as much of the scene as possible by using a wide depth of field. The camera may also use a slower shutter speed in some cases to compensate for the small aperture, so it’s always worth using a tripod to avoid camera shake.

Sometimes called Night or Party mode, they both mean the same thing – its suitable for working in low light. Night mode forces the camera to use slower shutter speeds knowing there isn’t much ambient (natural) light available. It will fire your flash automatically to help with the exposure, so expect some quirky light trails along with freeze framed motion.

Ideal for action and rapid movement, sports mode will do the opposite to night mode and push the shutter speed to a higher rate to make sure any motion is frozen still and no movement blur occurs. The camera will widen the aperture if necessary to compensate for the fast shutter to make sure you get an even exposure. The camera may implement a facial tracking focus mode to make sure the focus follows the action, but this depends on the camera.

One of the more common features on the camera dial is the unmistakeable portrait mode – suitable for humans and animals (but subjects in motion maybe better in sports mode). The aperture will be widened significantly to reduce the depth of field, throwing the background out of focus and making your subject the obvious feature. Use it for formal portraits rather than candid shots, which can sometimes end up soft if there is movement.

The flash will not fire under any circumstances, ideal if you are trying to be discreet with some street photography. Not common on many camera dials nowadays as its normally included within the menu system under flash settings.

This is an option for shooting specific specialised scenes (sometimes called creative modes), the choices will vary brand to brand so it’s hard to detail all of them. You may see options such as Candlelight, Autumn Colours, Dusk, Toy Camera Effect, Miniature Effect and High/Low Key. The camera may directly apply colour filters to your LCD screen so you can see the effect live.
This basic camera dial mode is a Nikon specific function. It allows the user access to frequently used and useful options such as time stamps, languages, viewing and deleting images. It is designed to save time looking through the normal menu system.
When you are ready to take your images to the upper level, then the next group of camera dial modes will give you more control and therefore creativity in your photography.
The camera will start take a partial or complete step back, depending upon the setting, so you can directly affect the outcome of the image.

The power is in your hands with manual mode. The camera will sit back and let you make all the decisions over aperture, shutter speed and ISO. It will not help you balance the exposure if you get your settings wrong, but learning this function opens up a whole world of fantastic creativity!

It’s like a shared responsibility these next two options – part of the decisions will be made by you; the camera will help you out with the rest. Aperture priority allows you to choose the size of aperture, but the shutter speed and ISO are automatically adjusted to give you the best exposure possible. It’s great to use if you want to learn about aperture, but without the burden of other settings.

If you can understand aperture priority, then shutter priority will be a piece of cake! It’s a fantastic tool to use if you want to learn about the effects of long exposures its relationship to capturing stunning motion photography. The camera will continue to change the aperture and ISO based upon your chosen shutter speed.

Despite aperture and shutter speed being extremely important to photography, they aren’t the only functions that need consideration on your camera and program mode will help you learn them. Switching into program allows you control over the ISO, exposure metering and white balance whilst shooting. Ideal for those slightly more advanced users who like to perfect their work when out in the field.

This camera dial mode is a Canon only function. It will tell the camera which part of the shot needs to be sharp, by using your focus button and the A-DEP mode picks the corresponding aperture to guarantee it gets the aperture spot on. It’s like having a virtual assistant when learning about aperture!

Another Canon camera mode speciality. It allows users quick access to multiple functions which will appear on the cameras LCD. You can change the exposure, depth of field, drive mode selection (single shot/burst mode) and a few other settings.
This camera dial mode is designed for new photographers to get straight into achieving great quality images, but not getting too technical about how the exposure is set.

A unique Pentax mode now, which is more commonly referred to as ‘ISO priority’ amongst the brands users. So just like aperture and shutter speed priority, you choose the ISO and camera will adjust the f/stop and shutter values to balance the exposure.
It’s a rare camera dial mode to see as photographers ideally use their aperture and shutter speed primarily to increase the exposure, before changing the ISO.

Given that we are focusing on camera dial modes for photographers we aren’t going to linger too much on the video mode, but it’s pretty obvious what it’ll do. The live view will appear on the cameras LCD and you can make live adjustments to the brightness of the shot in the same way that you adjust your aperture.
Whether it’s expressed as ‘C1, C2 or C3’ or as a ‘User’ button they are just slightly different terms for a custom camera dial mode.
When you get more confident with your camera and you find you love shooting similar subjects frequently, it’s worth saving your camera settings to have a quick reference whenever you need. Think of it like speed dial for your favourite type of photography!
Normally built into many cameras drive modes, Sony like to keep the panorama option on their camera dials instead. Panoramas change the shots ratio from 3:2 to 3:1 giving you a wider perspective.
As you slowly pan the camera around, the image is built from multiple shots of the scene as it changes, giving you the best reproduction of a landscape.

Many cameras will have it a bulb mode, but not many advertise. Either way if you encounter bulb mode its worth knowing its advantages. Bulb mode will allow you to determine your own shutter speed if the cameras slowest speed isn’t slow enough for you.
Keep your finger pressed down on the shutter button for as long as you want the shot to last. 30 seconds is usually the maximum time allowed, any longer and the sensor can be damaged due to too much light exposure.

Well, I hope that’s cleared a few things up for you about camera dial modes. Fingers crossed it’s saved you trawling through your user manual for 20 minutes reading the instructions in the wrong languages, before you find what you need!
Discover the BEST way on how to clean a camera sensor using swaps, rocket blowers and pencil brushes to give your shots a dust-free finish!
Capture the magic of the night with our beginner’s guide to night photography. Learn tips and techniques for stunning results.
Master the art of solar eclipse photography with expert tips on equipment, settings, and precautions for stunning celestial images.
Learn the basics of photography – fast – with our FREE 60-Second Photographer online course. Each class is short and sharp with simple, actionable steps that give you immediate results.
x 30 lessons

© iPhotography™
Become a confident and competent photographer in less than 30 minutes!
Before you leave, make sure you’ve secured your FREE online photography course (worth £29.99)
Each class is just 60-seconds or less making it the fastest and easiest way to learn photography!