 Emily Lowrey
The rule of thirds is probably one of the first “rules” a beginner photographer will come across. And for good reason. It’s used all the time, not just in photography, but in almost every film or TV show you’ve ever seen.
What is the rule of thirds exactly? When should we use it effectively, and when can we throw out the rulebook and ignore it entirely?
The rule of thirds is a composition concept where we split out our image into nine equal squares. We use these segments — and the lines they create — to help us compose our images better.
You can add these guidelines on most camera displays, and we suggest turning them on if your camera allows it. You can also use guidelines on your phone’s camera as well. This is a good tip so you can get used to seeing the grid regularly and you can practice composition even when you’re taking a quick photo on your phone.
You can use the rule of thirds grid in many ways. A good place to start is by lining up the subject of the image on one of these lines. Whether it is science, art, or just familiarity, you will notice straight away that the image becomes much more pleasing.
The four markers in the centre of the image, where the lines cross, are known as power points. If you line up interesting parts of your image with these points, you should get pleasing results.

Image by Emily Lowrey
Using this simple trick can level-up a beginner photographer almost straight away.
One of the key beginner mistakes is that they stick the subject directly in the middle of the frame. It makes sense in a way, doesn’t it? You’re taking a photo of THIS subject, so you want to put it front and centre, right? Well… sometimes… but generally, using the rule of thirds technique will work better.
Let’s look at some more examples…
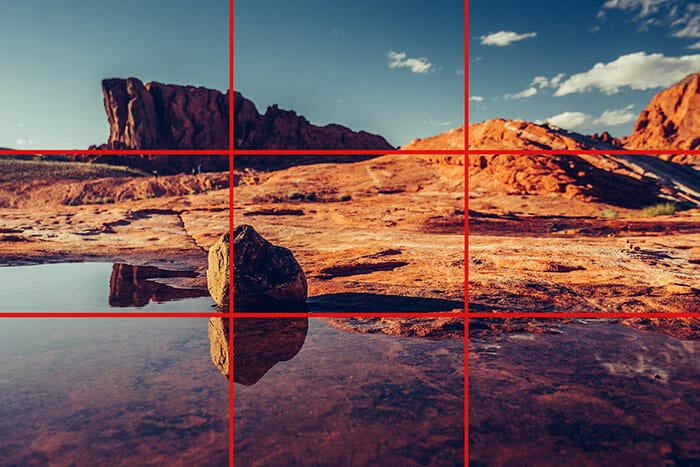
Image by Emily Lowrey
You can see in this example that the subject (the stone) is right on one of the lines — right on a power point in the grid — and the horizon is also along the top third line. In each third of this image, we have:
• Water at the bottom
• Land in the middle
• Sky at the top
Remember you can compose using multiple lines in one single image. This technique works for almost all types of photography and is especially effective for both portrait and landscape shots. It works hand-in-hand with other techniques too, like leading lines, and negative space.
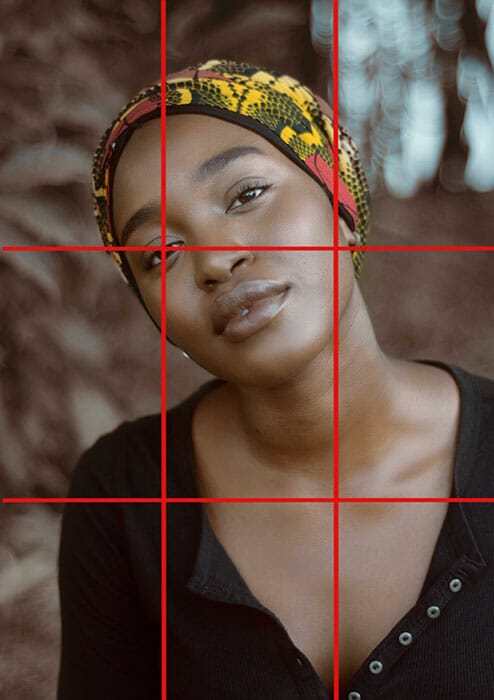
Image by Emily Lowrey
In this portrait example, we can see that the model’s eye is on the top left power point. This helps to balance the composition and it works really well. When composing for portraits, it can be very effective to place the subject’s eyes on the top line of thirds.
Another technique is to centre your subject and use the centre square as a frame like this example below.
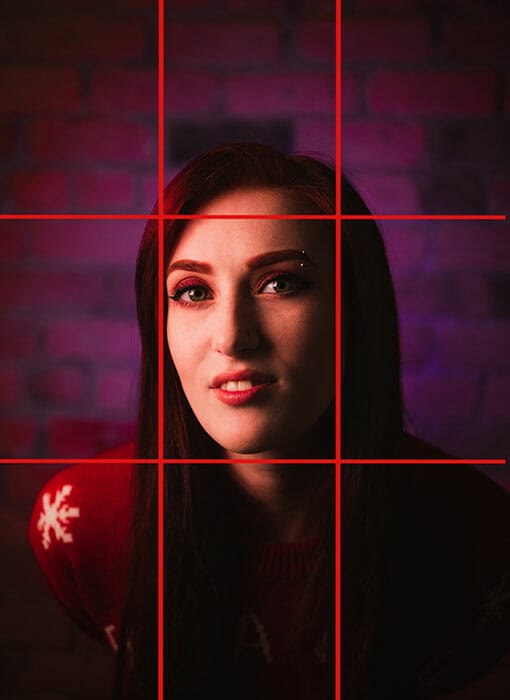
Image by Emily Lowrey
The great thing about the rule of thirds technique is, generally speaking, it works brilliantly for any style of photography. Landscape? Portraiture? Astrophotography? All good.
It’s ideal for product photography, weddings, for EVERYTHING! It’s should be your go-to composition to try out first and foremost in any photography situation before experimenting with other things. and you absolutely should experiment with other composition ideas too!
The great thing about photography is the rules are just a guide. Once you understand them it’s totally fine to experiment and break them. Here’s an example below that breaks the rule of thirds entirely. And it’s much better for it!
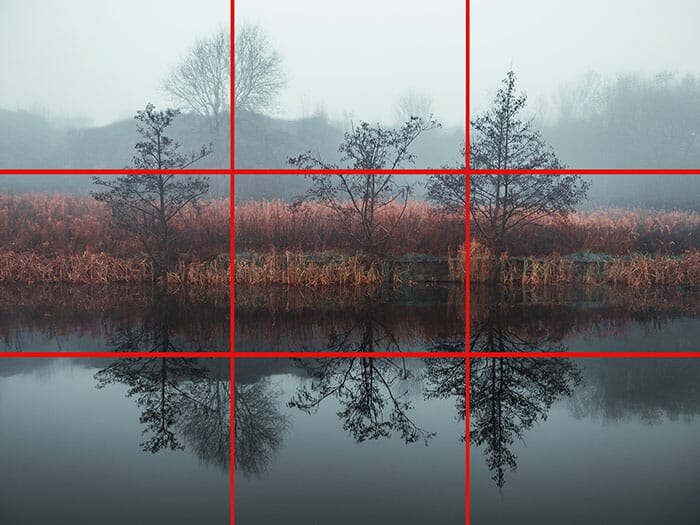
Image by Emily Lowrey
The symmetry in this image directly contradicts the rule of thirds idea of placing your subject on a power point, but it is a much stronger image because of it. You could argue that even this image adheres to the rule in some ways though.
The central third has the bulk of the image (what we’d consider the subject) and then the top and bottom thirds mirror one another.
• All rules can be broken. When is a good time to ignore the rule of thirds?
• Symmetry is a great composition style that doesn’t lend itself too well to the rule of thirds.
• Shooting macro in a 1:1 ratio can also make the rule of thirds quite challenging.
• Reflections in water or mirrors etc. don’t often work.
• Abstract photography doesn’t always adhere.
• Sometimes, unique compositions that don’t make sense on paper just work in practice!


While it’s always better to get your composition right in-camera, sometimes we don’t. We’re all human after all. But all is not lost!
If you’ve taken an interesting photo and it isn’t quite working out for some reason, you can always adjust the crop in your editing software.
It’s a great opportunity to try out different styles in post-production, and it can create something new and fresh that maybe you didn’t spot on the day of shooting.
Cameras with larger megapixel sensors are best for this. The more megapixels your image has, the more you can crop in without losing detail.
Take this example below for instance. Out of camera, the horizon was neither on the top nor the bottom rule of thirds line.
This led to an unbalanced image with the subject being lost in the frame. With one simple crop in editing, the image is much more effective!
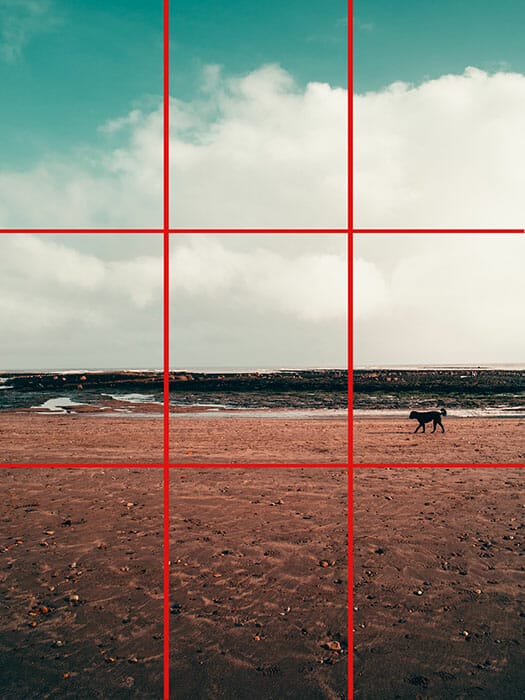
Image by Emily Lowrey
Horizons, pay special attention to them.
Horizons have the power to make or break an image, and the rule of thirds grid can come in super handy.
First of all, you can use your grid to keep your horizons straight. They probably should be straight at all times unless you’ve gone for something intentionally jaunty.
Secondly, because a horizon is such a divisive line through your image, if you don’t follow the rule of thirds, you can risk splitting your image in two. This generally makes a composition less pleasing.
It’s a good idea to ask yourself a quick question before shooting: do I want the land or the sky to be more of a focus in this image? And then you can position your horizon either on the bottom or top line depending on what you prefer. This will work in both portrait and landscape compositions.
You’re shooting digital images most likely, so take several different compositions and make your mind up later.
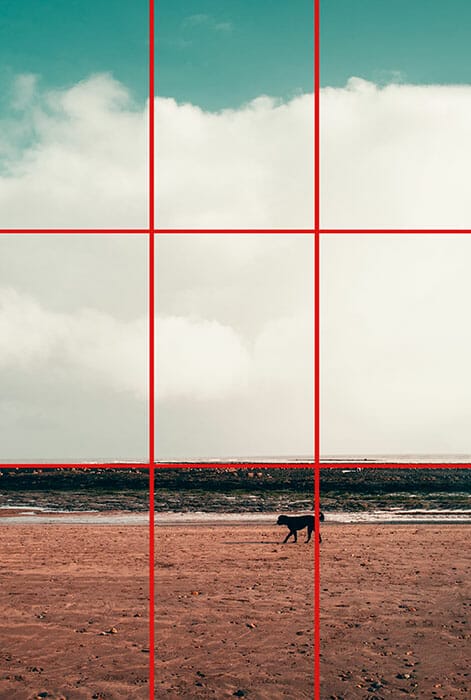
Image by Emily Lowrey
To conclude, the rule of thirds is an essential stepping stone in developing our own unique style. Once we know how it works, and get to grips with it, we can experiment and have fun with our photography.
The rule of thirds is a perfect starting point to get your creative ideas flowing. Get into the habit of taking several shots per subject (or location) and see what you can come up with.
Digital images are free, after all, so long as we have enough space on our memory cards. There is no harm in experimenting to see what might work best.

Shooting sunsets using amazing 5-in-1 magnetic lens filters from Kentfaith, the 1st choice for photo & video products.

Popular memory cards for photography – what’s the best SD card for your digital camera? Choose the right capacity and class speed in our guide

Discover the BEST way on how to clean a camera sensor using swaps, rocket blowers and pencil brushes to give your shots a dust-free finish!
Learn the basics of photography – fast – with our FREE 60-Second Photographer online course. Each class is short and sharp with simple, actionable steps that give you immediate results.
x 30 lessons

© iPhotography™
Become a confident and competent photographer in less than 30 minutes!
Before you leave, make sure you’ve secured your FREE online photography course (worth £29.99)
Each class is just 60-seconds or less making it the fastest and easiest way to learn photography!