 Stephen Walton
Getting creative with slow shutter speeds isn’t just for capturing the silky-smooth texture of a waterfall. Instead, you can apply long exposures to any moving object or light source to create what we call a light trick.

Light tricks are creative explorations on the manipulation of one or more light source. This may be diffracting, refracting or reflecting like amongst other techniques. You don’t need specialist camera kit in most cases either. There are over 70 tricks and techniques to learn in our dedicated light tricks photography course.
But to get your excited here are 5 photography light tricks for beginners. Each technique has a step-by-step process laid out along with a description of all the props you’ll need and how long it will take.

Equipment: Household object, Laser Pen/Pen Light
Time to complete: Less than a minute
Difficulty Rating: ⭐
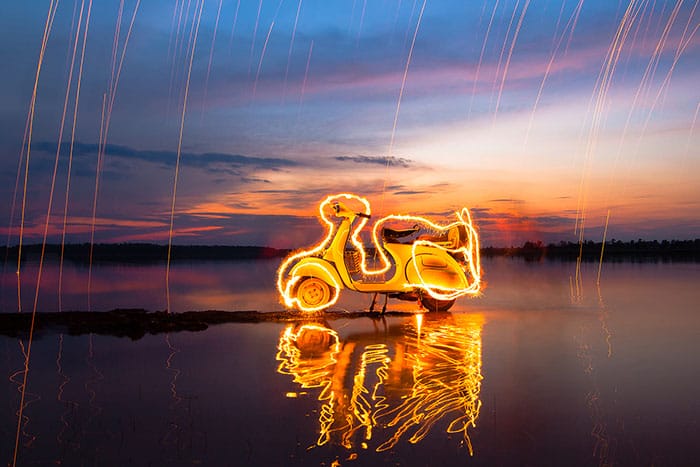
Light Tracing is the art of tracing around an object, with light!
If you’ve seen examples before of light tracing, then you’ll know it’s a visually stunning way of re-creating the form of any object. You’ll amaze yourself how easy it is to make a simple household object look futuristic!
All you need is an object with a distinctive shape – headphones, bicycles, flowers or a toaster for example. Don’t choose objects that have narrow outlines such as forks, it’s hard to trace the outline precisely.
1. Get behind the object as opposed to in front. The camera needs to see the object constantly so find a decent space to work in and make sure it’s dark.
2. Keep your camera set to the longest shutter speed it will allow. It depends on the size of your chosen object, but a shutter speed of 30 seconds should be more than enough. If you need longer, use bulb mode.
3. When you are light tracing small objects use a small light source. A laser pen or pen light, but for larger items use a torch or the light from your phone. Make sure there’s enough battery life in it.
4. Steady the camera and keep the ISO low (200 max). Use shutter priority mode so the aperture is taken care of. But if you prefer to use manual mode then start at F/16 and tweak it based on your results – you may need to do this a few times.
5. When the camera is set up and you are ready, hit the shutter and start tracing the outline of your object. Make sure you keep as close as possible to the actual outline. Try to follow all the curves and shapes to make your tracing look as obvious as possible.
Equipment: String, Tape, Finger Light / Laser Pen
Time to complete: 2-5 minutes
Difficulty Rating: ⭐⭐
Although the name sounds highly scientific and complex, photographing physiograms are actually rather simple.
1. Start by attaching a long piece of string (approx. 1 meter) to a small laser pen or finger light and pin (or securely tape) it to the ceiling of a dark room.
2. Mount the camera to a tripod, beneath the light, and tilt it 90 degrees so it’s looking upwards.
3. Focus the camera on the light source. Put your camera into shutter priority mode (or manual) and slow down the shutter speed to around 10 seconds to begin with.
4. When you are ready to start, push your dangling light so it starts to swing and press the shutter on your camera straight away! The first few movements may be a little chaotic but as soon as they regulate, begin your exposure.
5. The effect of the light moves in a pendulum-like motion then slowly progressing to different directions as it slows gives you a consistent and equal path of movement. It looks a little like the old Spirograph toys that we used to see in the 80’s & 90’s!
You can manipulate the shape of this physiogram light trick by changing the force of your nudge and the direction of it.
Because the camera is low down and pointing at an awkward angle, flip out your LCD screen, if you have one, to stop it being backbreaking work.
Physiograms take on the look of a futuristic science illustration. It will certainly impress any audience given the simplicity of the light trick – especially since it’s a great project to try at home.
If you need to improve the contrast or the saturation of the colour after the shot has been taken, then don’t be afraid to make those adjustments in post-productions.

Equipment: Empty Box, Wrapping Paper, Battery operated Fairy Lights
Time to complete: 5 minutes
Difficulty Rating: ⭐⭐
There’s nothing more magical than capturing the reaction of a child opening up a surprise present. It’s that expression above anything else that will make this next light trick a brilliant idea to try out if you love taking portraits.
1. Firstly, find a box and decorate it with some wrapping paper to make it look like the perfect gift. Make sure it’s easy to open, with some loose flaps or a lid so the lights inside can be seen clearly.
2. Next, place a bundle of battery-operated fairy lights into the box (similar to Christmas Tree lights). The more the better, as they will make the effect brighter. Make sure not to fill them to the rim, you don’t want them visible in the final shots. White lights are best, as they are going to be illuminating your subject’s face too.
3. If you decide to place an actual present in the box too then remember the first seconds of their reaction is the most genuine. It could be a good idea to switch to continuous/burst mode just for those moments.
4. The lights in the box will light up the face offering a soft glow emitting from the box as if they’d opened an amazing treasure. This looks perfect with children as it adds a magical feeling to the atmosphere. It’s best to give a child a smaller box to hold so they can manage to bring it closer to their faces, otherwise the shot maybe a little too dark.
5. Because you’ll need the surroundings to be dark, open up your aperture as wider as you can (F/5.6 or wider). This will help create that sumptuous shallow depth of field. Keep the ISO below 400.
If you want to step up the creativity of this photography light trick, then apply the same process to opening large books. Or add in some coloured fairy lights to add a bit of ambience to the shot too.

Equipment: Bath, Water, Milk, Flowers
Time to complete: 15 minutes
Difficulty Rating: ⭐⭐⭐
It sounds more like relaxation therapy rather than a photography light trick. But nevertheless, milk baths create great opportunity for serene and peaceful portraits.
1. The first secret of this light trick you need to know, despite the pictures, you don’t need to fill up your bath entirely of milk. Just use water and then pour in pint of milk at the end. The more milk you add, the stronger the white will appear. A bold, white, watery background can provide the perfect blank canvas to any portrait.
2. Ask your subject to lie in the bath side on so you can see the shape of their body cut through the white canvas. Consider if you want to cover up private areas with petals and flowers leave them exposed.
3. The subject will need to remain still for a while to let the milk settle so there’s no ripples of movement in the liquid. Ask them to close their eyes to make the shot look peaceful once the water is still.
4. Contrast is the key to a successful milk bath photo. Use colours that aren’t white or pale in addition. Brunette and redhead models photograph better than blondes because of this. Bright red lipstick looks great and if you want to go further then throw in some props.
5. Flowers and petals are a beautiful touch for a female model. Shower your subject with floral delicacies around their body to increase the contrast in colour. Don’t use too many different colours – the simpler the better.
6. Alternatively, what not use one lone flower. Maybe a rose to match red lipstick is a striking combination. It’s important to remember which colour you are using as this will hold the emotional narrative to your image. Reds are romantic, blues are formal, yellows are alarming, and oranges can look exciting.
Remember to remove any flowers from the bath before you drain it, or you’ll end up with some serious clogging! Remind your subject to shower off as well – no one wants to smell of milk!

Equipment: Wire Wool, Whisk, Dog Lead, Water
Time to complete: 30 minutes
Difficulty Rating: ⭐⭐⭐⭐
I’ve left the most impressive light trick until last. Before starting this photography light trick you need to know that safety is paramount when working with wire wool. Keep a bucket of water or sand nearby in case of any accidents. Remember to bring extra wire wool too, you can’t reuse it once it’s burnt.
1. With wire (or steel) wool photography, choosing the right location is key. Aim to ensure you have enough space around you as you’ll be playing with fire ultimately. Look for big spaces like parks, fields, scrubland, empty car parks, beaches, disused tunnels, empty roads, in a lake or even the sea.
2. Employ a very willing and competent assistant to help you in this situation, make sure they are sensible and reliable (no children). Make sure everyone involved is covering their body as much as possible, especially important for your assistant. They need to be clothed head-to-toe. Wear hats, gloves, boots, goggles – imagine going on an arctic expedition and dress with that in mind. If the clothing is black, even better.
3. I would recommend the best type of steel wool to purchase is called ‘fine’ or ‘extra fine’. It’s easy to find at your local DIY store.
4. Once you’ve got your wool, you’ll need a ‘cage’ to keep it in. It needs to be metal (to withstand the heat). Something like a household whisk would be perfect. A whisk is also a useful tool because it has a long handle, meaning you don’t have to touch the cage after it’s been burning.
5. Next prop we need is a dog lead. Clip it to the hook on the end of your whisk, this will help keep the burning wool away from your assistant’s face. Don’t forget to take a tripod and 9v battery with you too – we’ll explain why in a moment.
6. Once you’ve got all your props ready, you’ll need to stuff the wire wool into the whisk; make sure you break up the wool, so it appears fluffy. The looser the wool is, the more sparks that will be produced, as air can pass through easier.
7. Mount the camera on a tripod. If you’re using a compact camera, you could try the night mode but be aware that this might not slow the shutter for long enough. Otherwise choose shutter priority or manual mode, to be able to customize your settings based upon your results.
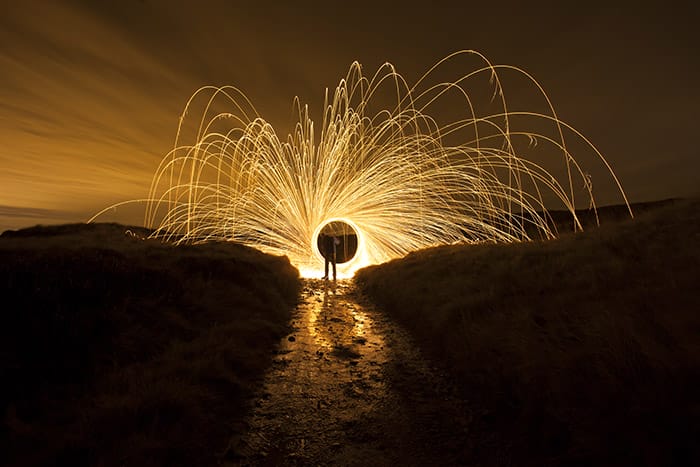
8. Just before you’re ready to start shooting, ask your assistant to rub the battery on the wire wool and it will start to ignite (more like a slow burn). Once it’s glowing then get into position and ask them to start spinning the wool around their head like a lasso.
9. Make sure you start the shot after they’ve begun spinning otherwise, you’ll get awkward shapes. You may need to try out this light trick a few times, but don’t be afraid to change up the angles and direction of the spinning. The long exposure and flying embers will illuminate your surroundings to give a sense of space and location, it’s brilliant to shoot at sunset for those warm colours.
These 5 creative light tricks are just a small portion of the photography tutorials we’ve got to share with you. Our light tricks course covers over 70 different techniques and lessons on how to create inspiring images based on the movement of light.
If you’ve tried out any of these light tricks share them with iPhotography on social media. If you’re a member of iPhotography then upload your photos to our gallery instead.

Popular memory cards for photography – what’s the best SD card for your digital camera? Choose the right capacity and class speed in our guide

Discover the BEST way on how to clean a camera sensor using swaps, rocket blowers and pencil brushes to give your shots a dust-free finish!

Capture the magic of the night with our beginner’s guide to night photography. Learn tips and techniques for stunning results.
Learn the basics of photography – fast – with our FREE 60-Second Photographer online course. Each class is short and sharp with simple, actionable steps that give you immediate results.
x 30 lessons

© iPhotography™
Become a confident and competent photographer in less than 30 minutes!
Before you leave, make sure you’ve secured your FREE online photography course (worth £29.99)
Each class is just 60-seconds or less making it the fastest and easiest way to learn photography!