 Stephen Walton
How, when where and why to light your subject in photography are questions that will deliver different answers for every situation.
This photography lighting tutorial is going to help you understand the basic principles of lighting, so you’ll be fully prepared in whichever situation you find yourself in.

Firstly, to understand how to light a photo you’ll need to know what types of light sources are available to use. You’ll find different options depending on your situation. Sometimes you can use natural light if you’re outdoors but other times you may need to rely on a flash.
Let’s look at the 4 most common types of light photographers use.

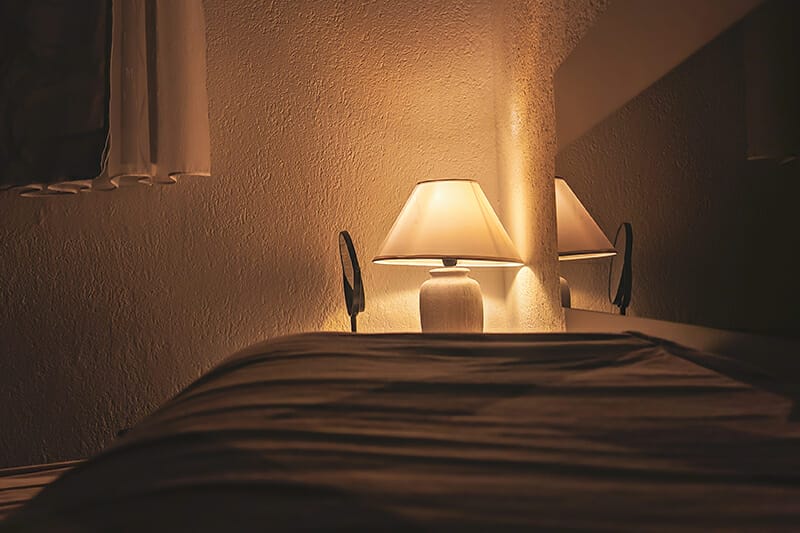
Ambient lighting doesn’t just mean sunlight – though that’s the most abundant and cheapest form of ambient lighting for photographers. If you’re indoors, ambient lighting simply refers to light that already exists in that room – a lamp, ceiling light, light from a tv etc. Ambient light is basically a light that you don’t add to your photo; it’s the light that already exists before you took the shot.
Continuous lights are sources that don’t flash. They stay on continuously. Sunlight is continuous (as well as ambient) so are household lamps and small LED panels. Many photographers love using continuous light sources because they give you a live simulation of how the final image will look before you take the shot, unlike flash.
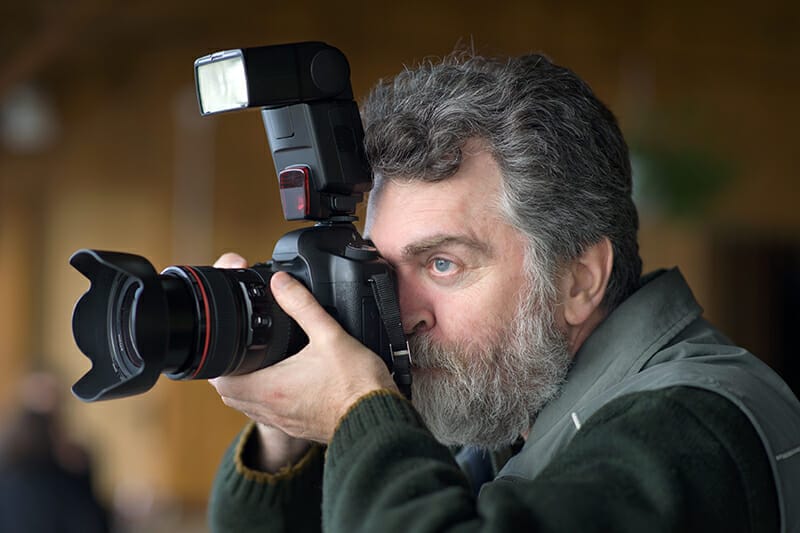
Most cameras have either a built-in or pop up flash integrated into the body. Think of them as an emergency light source. They are small and give a blast of hard light which isn’t always flattering for your subject. Some high-end DSLR cameras don’t have pop up flashes built-in anymore as they aren’t favoured by professionals. They (like all flashes) don’t emit light continuously.
Different camera brands may name their off-camera flashes, so you’ll hear varying terms such as speedlights and flashguns etc – they all mean the same thing. Off-camera flashes can either be mounted to your camera’s hot shoe plate or (with using a wireless flash trigger/flash sync cable) you can use it remotely.
Off-camera flashes give photographers more creative control as their power output can be set manually or based on the camera’s settings (called ETTL – Evaluative Through the Lens).
When you are looking to upgrade from working with off-camera flash the next step is to use studio quality strobes. Strobe is just a different word for flash. Studio grade strobes are much taller, brighter and more expensive than off-camera flashes.
Most strobe lights require a power socket connection, so they limit you to shooting indoors. But strobe manufacturers are starting to produce strobes that can run off portable battery packs making them suitable for outdoor use.
You can, like off-camera flashes, sync multiple strobe lights together. But unlike off-camera flash you can create a flash sequence between multiple strobes to capture incredibly unique photographs where a different strobe flashes at a different point during an exposure.
Strobes again, like off-camera flash, are connected to your camera via a wireless transmitter (radio or infrared signals) or using a flash sync cable. The recycle time (the time in between each flash) is faster on strobes than off-camera flash.
Some studio grade strobes also contain a modelling bulb (which is a continuous light) as well as a flash tube. This allows you to focus on your subject before the flash goes off. If you’re only using a flash in a dark room, it can be very hard to lock focus without a modelling bulb.

With different types of light sources come different light quality. Light quality in photography is important to understand so you can use it to your advantage. There are 3 commonly accepted types of light quality in photography – hard, soft and reflected.
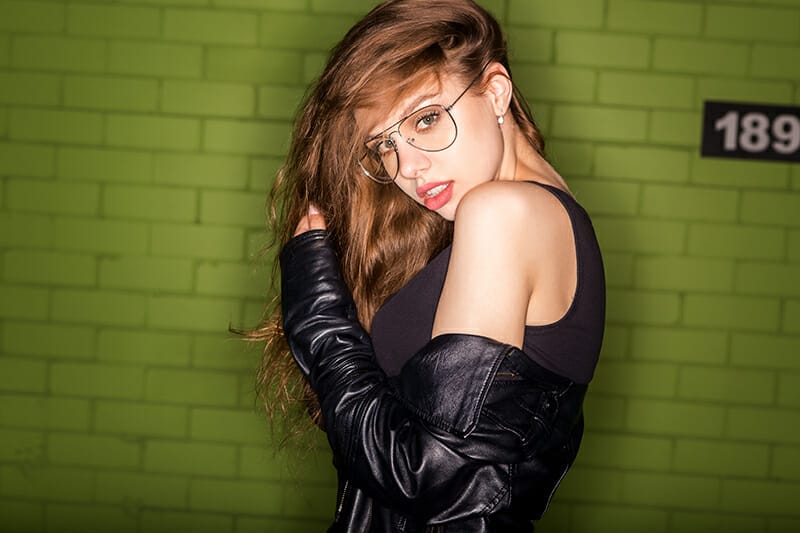
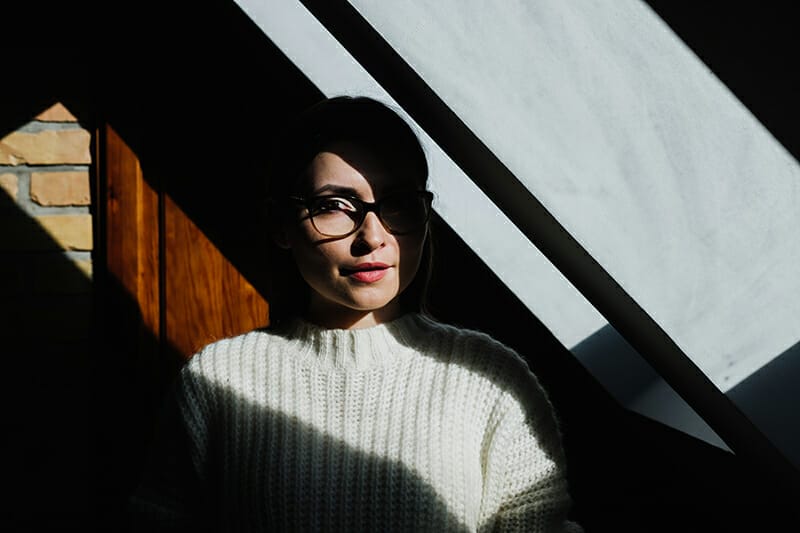
If you are looking at a light and squinting, then chances are it’s a hard light source. The sun, on a cloudless summer day, is the most common source of hard light. Hard lights are bright and direct like a strobe/off-camera flash/torch/flashlight shone in your eyes.
To spot a hard light in action all you need to look for is where the light stops, and the shadows start. If the transition from light to shadow is short with a hard line dividing the two then it’s a hard light.
A hard light cast a heavy shadow which is great for black and white photography but also to highlight shapes in architectural photography for example. Hard light doesn’t work so well for flattering portraits or photographing delicate subjects like flowers.
Confusingly you can still use the sun as a soft light too! The same is true of all hard light sources – they just need to be modified first.
Lighting modifiers are positioned in front of the hard light to diffuse the intensity. This makes the light spread out wider and therefore become softer in intensity. Clouds are nature’s lighting modifier. Shooting on a cloudy day gives you instant soft light. You can purchase lighting modifiers for off-camera flashes and strobes to do the same thing. Shoot-through umbrellas, soft boxes and scrims are all examples of photography lighting modifiers.
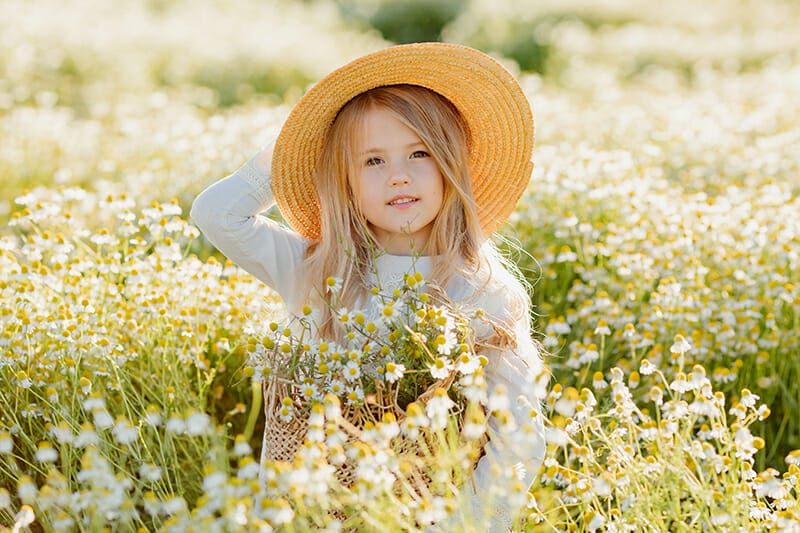
The transition between light and shadow with soft light is longer and slower. There isn’t as clear a line between the two, it’s more gradual. This means you can deliver more depth and texture in your shot. Portraits and still life photos are great in soft light.

The third type of light quality is when, either soft or hard, light is reflected. Without boggling your mind with maths and physics, Sir Issac Newton’s Inverse Square Law states that light falls off evenly over a given distance.
This means that as light gets further away from its source it gets weaker. Therefore, when light is bounced off a surface and changes direction it reduces in brightness immediately.
You can reflect light by pointing your initial source towards a wall or surface with reflective properties. Mirrors, glass, metallics, highly polished plastics and marble etc will all reflect light well.
You’ve probably seen photographers use circular reflectors when shooting with natural light. These circular props can be gold, silver or white. They are useful for filling in the dark side of a subject where the initial light source isn’t reaching by bouncing the light back on the dark side.
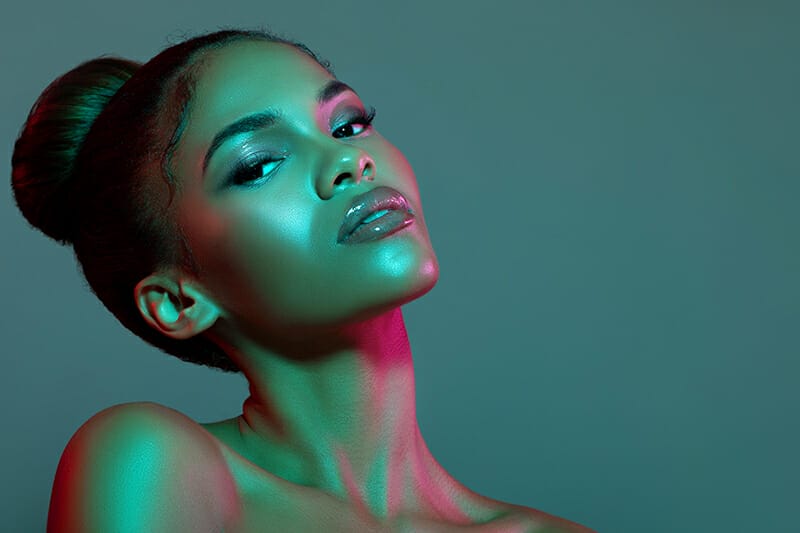
Beware that bouncing a light off a surface with colour means that colour will transfer on to your subject. This happens when using gold reflectors (but used intentionally) to give a tanned sun-kissed look to skin on a portrait. White reflectors are best if you want to keep the light balanced and natural-looking.
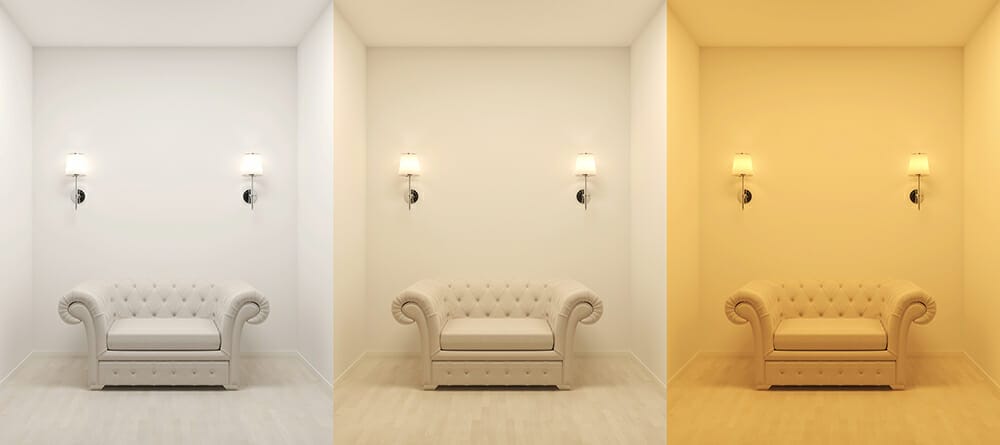
All lights emit light at different temperatures. This is measured on the Kelvin scale. Different types of bulbs and light sources are given a rating based on this scale to determine how warm or cool the temperature emitted is. This is where you may see bulbs rated as 4000k or 6000k etc (K meaning Kelvin). The lower the rating the warm the colour emitted by that light source is.
Candles for example would be towards the bottom of this scale around 2000-2500K, standard white light is 3500K and daylight is around 5000-6000K. Anything above this will appear cooler in tone.
If you’ve ever looked at a photo and it has a warm orange cast to it then chances are you’re using a light source that is low on the Kelvin scale. Household incandescent bulbs tend to give off a warm glow which can affect how the subject that you are photographing looks.
While correcting colour temperature isn’t that hard these days in editing it’s best to solve it in camera first by selecting the right white balance option. Most DSLR and Mirrorless cameras have presets based on the Kelvin scale to adjust the colour temperature of a shot.
AWB (Auto White Balance) does a good job in most situations. But if it’s not looking right to your eyes then choose a different preset to suit the conditions you’re shooting in.
In-camera you’ll see options of auto, shady, cloudy, indoors, tungsten, incandescent or fluro – simply choose the right preset based on your lighting to help the camera make the lighting look neutral and flattering.
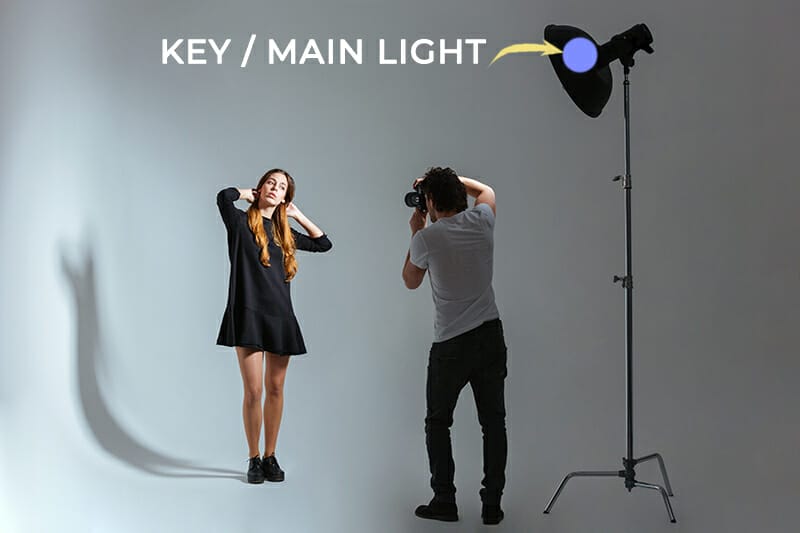
If you read a photography lighting tutorial book you may hear terms such as key, primary, secondary or fill light. This all relates to the hierarchy of which light is most important. The key light is the brightest one. It’s the one that’s doing most of the work.
Depending upon the look you’re going for it may not always be the one facing your subject directly – it could be behind. Any type of light (sun, strobe, desk lamp etc) could be a key light. The key light may also be called the primary light.
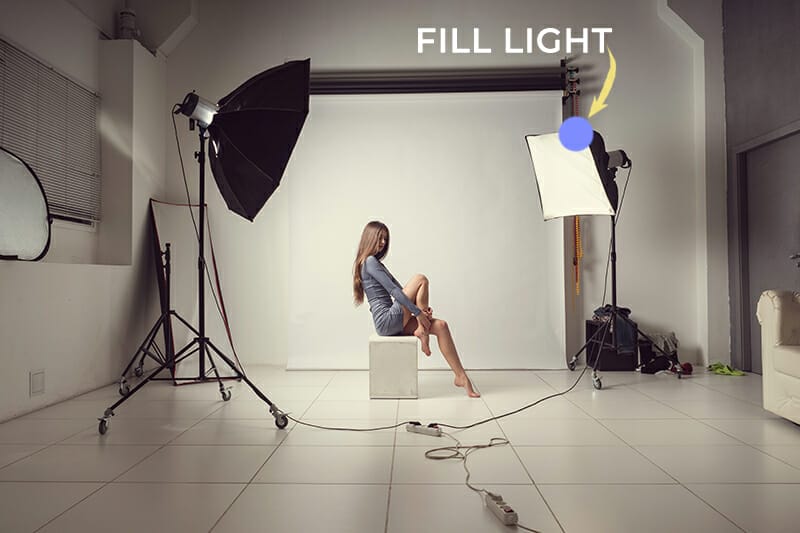
The fill light is your key light’s sidekick – though you may not always be using one. The fill light may be provided by a slightly different light source to your key and is used to ‘fill’ in shadows on certain areas of your subject.
A reflector could be used as a fill light (even though it’s not technically a light source). Fill lights are used at a different angle to your key light and there can be more than one fill-in use. We’ll come to 3 point lighting positions shortly to demonstrate this further.
In photography lighting tutorials it’s important to explain the effect light has when placed in different positions around a subject. While there is a myriad of lighting positions (separated by minutiae of varying angles), in photography we tend to focus on 5 basic lighting positions which can be used with any subject.
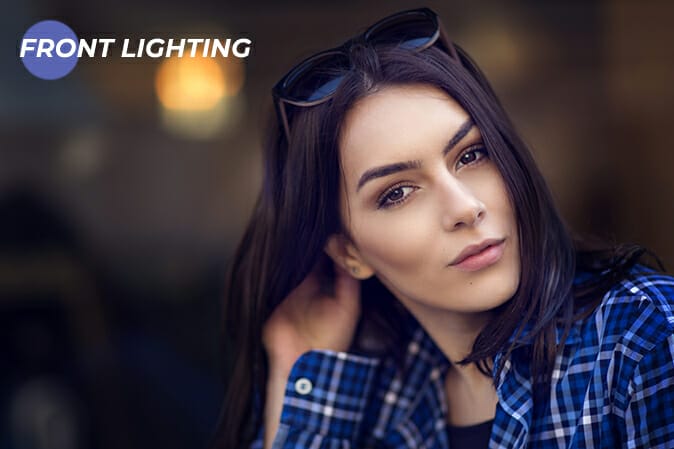
● Front
Pointing your light directly towards your subject is front lighting. It’s bold, affronting and can flatten the appearance of depth.
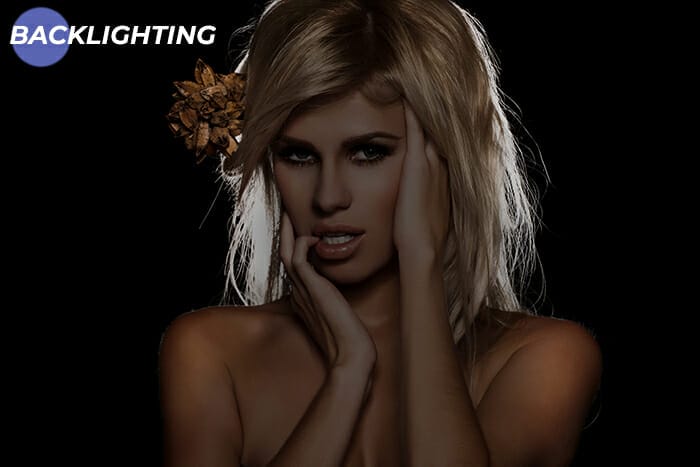
● Back
Sometimes called silhouetting, back lighting illuminates from the rear and normally gives an outline to your subject. To avoid silhouetting you’ll need to use a fill light on the front to balance out the exposure.
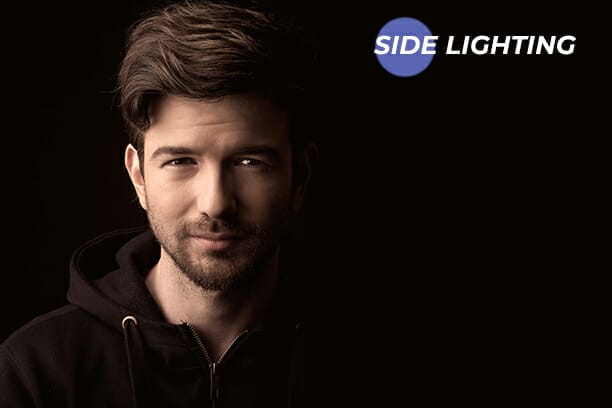
● Side
Side lighting creates more of a moody look to subjects. It offers more shape as (from a front-on position) we can see the light transition from light to dark. Using two side lights, opposing each other help cancel out the shadows that other one creates.
● Top
You’ll see (or not see, unless you have behind the scenes access) top lighting being used most commonly in product photography. Watches and jewellery when laid flat on a surface are lit from above to avoid drop shadows being cast. Top lighting doesn’t work well everywhere but if you’ve got small items to photograph and you don’t want shadows, consider top lighting.
● Floor
Probably the rarest form of lighting positions in photography as it isn’t natural or flattering, but floor lighting (or up lighting) can create some unique effects. We naturally consider light to shine down on subjects, so seeing a light emit from below feels unusual and sinister. Have you ever held a torch under your chin at Halloween? That’s uplighting! It makes objects look ominous and sometimes spooky.
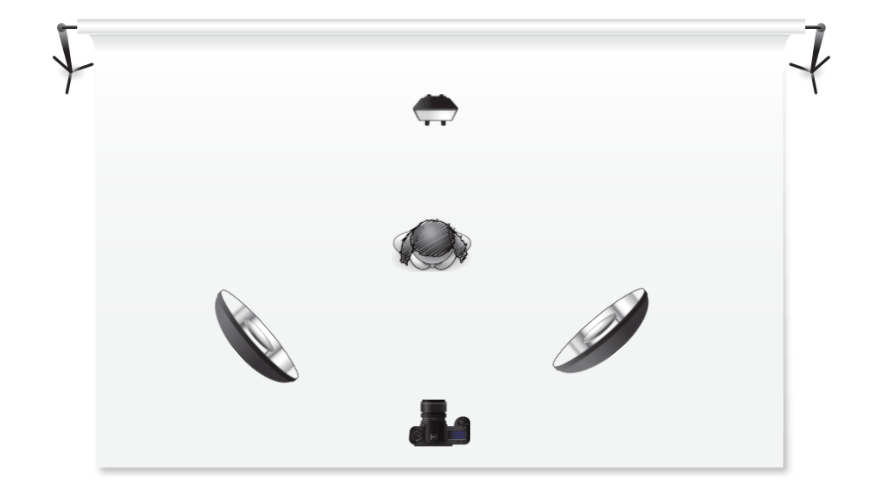
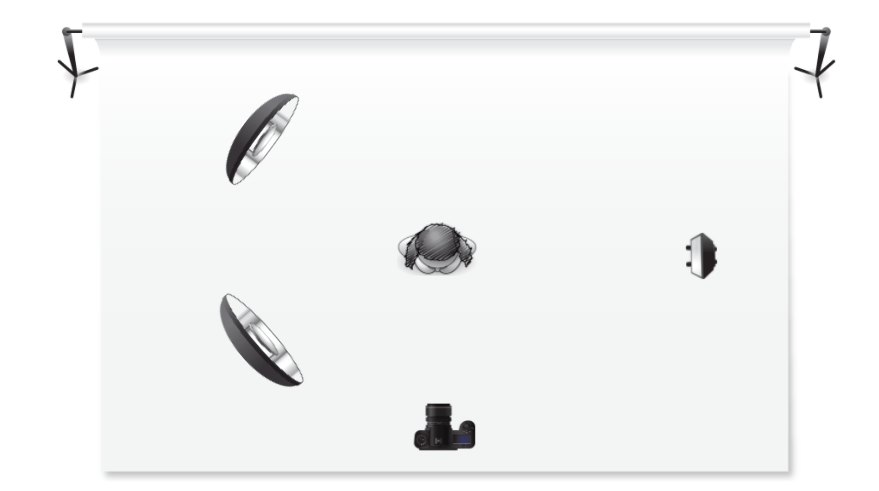
While you only need one light to get started in photography, every photography lighting tutorial should at least touch on the principles of 3 point lighting. This is aimed at photographers who are looking for a more rounded image where the subject is illuminated evenly to show shape, depth and texture.
We’ve got a couple of variations on where to position these 3 lights but the principles are the same. You’ll always have a key and fill light but in different quantities.
When you are using multiple lights, remember to keep the balance of power output consistent. Aim to avoid lights with different colour temperatures too. And positioning these lights at the right angles is also important to consider.
In these following examples, the sources could be sun and flashes, or 3 continuous LED panels. They are designed to give you guidance on positioning your lights.

We’ve covered so much in this photography lighting tutorial so let’s take a second to summarise in 5 tips for photography lighting.
1. Use the right type of light quality for your subject (hard, soft or reflected).
2. Don’t mix light sources with different colour temperatures.
3. Key lights don’t always have to be pointed straight towards a subject – try out other angles.
4. Hard lighting can be diffused through modifiers to capture more depth and texture.
5. Use a fill light (or a reflector) to eliminate shadows on a subject.

Popular memory cards for photography – what’s the best SD card for your digital camera? Choose the right capacity and class speed in our guide

Discover the BEST way on how to clean a camera sensor using swaps, rocket blowers and pencil brushes to give your shots a dust-free finish!

Capture the magic of the night with our beginner’s guide to night photography. Learn tips and techniques for stunning results.
Learn the basics of photography – fast – with our FREE 60-Second Photographer online course. Each class is short and sharp with simple, actionable steps that give you immediate results.
x 30 lessons

© iPhotography™
Become a confident and competent photographer in less than 30 minutes!
Before you leave, make sure you’ve secured your FREE online photography course (worth £29.99)
Each class is just 60-seconds or less making it the fastest and easiest way to learn photography!