 Stephen Walton
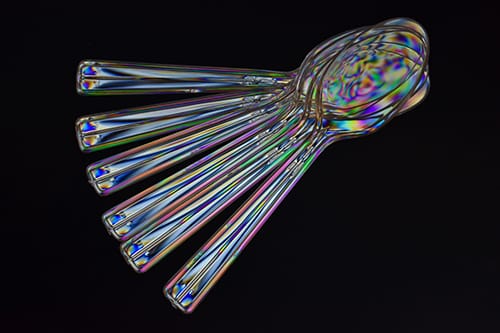
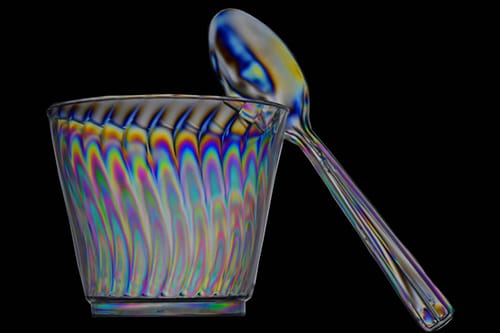
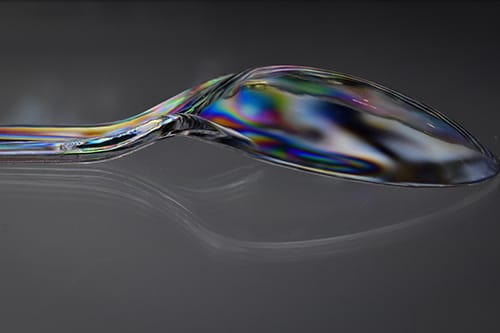
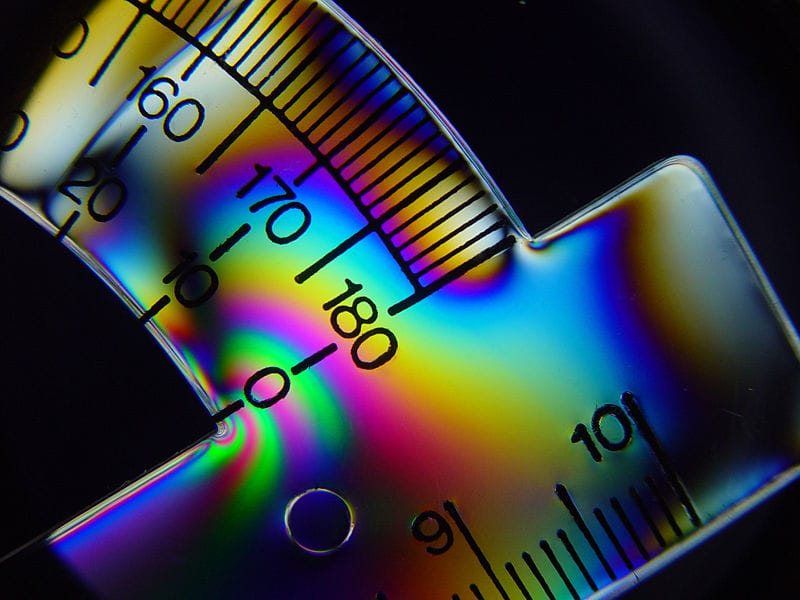
Photoelasticity photography? We know, it sounds totally made up, but we promise you it’s real and it’s amazing. Have a look at these examples from our very own iPhotography member Audrey Schweikert.
The scholarly description of photoelasticity states that it is the ‘changes in the optical properties of a material under mechanical deformation’. Let’s simplify…
… ‘Photoelasticity is the visual effect of demonstrating the stress distribution in a material’…
It’s basically an x-ray of an object. The results though are what us (and our cameras) are really interested in. The stress areas show up as iridescent colours, the heavier the stress the darker the colour.
It’s quite an unusual style of photography, it mixes a bit of science with abstract and sometimes confuses audiences into thinking its all been Photoshopped – but it hasn’t.
Photoelasticity was first discovered by Scottish physicist David Brewster, who was incidentally a close friend of William Henry Fox Talbot – one of the founding pioneers of photography. Small world.
Let’s begin by donning our lab coats and setting up this photoelasticity experiment!
Not all objects are going to give you this effect, so you may need to pop to the shops to get the right equipment, but it won’t be expensive. Transparent plastic is what you’re looking for, hard and thin materials work best. Think plastic cutlery, rulers, storage boxes, packaging, dummy CDs or cups for example. Whatever you can lay your hands on within your budget will be enough.
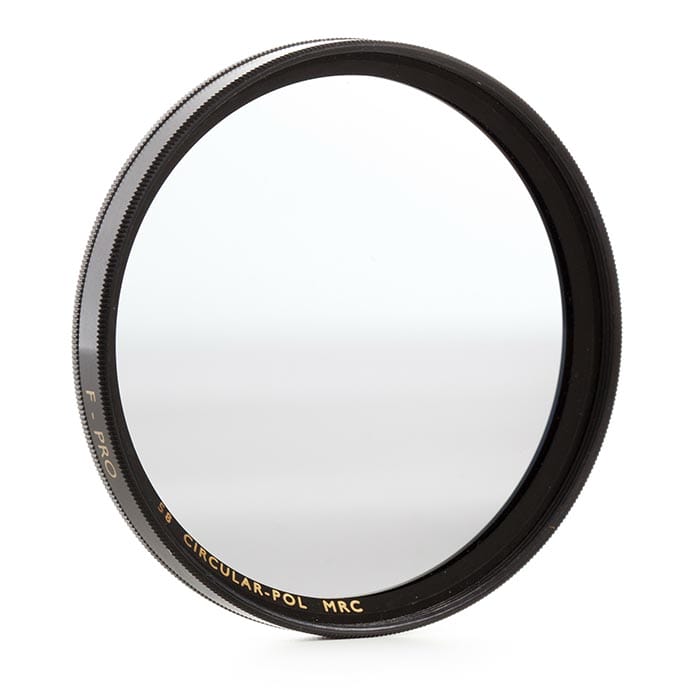
You’re also going to need a circular polarising filter for your lens. Again, they are fairly inexpensive, and you’ll use it more times than just this tutorial, especially if you love landscapes, so it’s worth the investment.
You could also use the lenses from a pair of polarising sunglasses if you don’t want to buy a filter.
Next, sandwich your plastic props in between two polarisers. The front one will be your lens filter but the other one needs to be underneath your props. So, what could we use for that?
Well fortunately there is a linear polariser built into most modern laptops screens, computer monitors and tablets – lucky for us! Lay your laptop or tablet flat to act as a surface for your plastic props and make the screen white.
With the props all set up and curtains closed, it’s time to get behind the camera.
There aren’t any. It’s the truth, no particular camera settings are needed, bar two.
1. Don’t use a flash
2. Set the camera to manual focus. It may be tricky for the AF to see the lines of contrast between a transparent object and a white background.
Take the polarising filter and loosely attach it to your lens, as you turn the filter to tighten, you’ll see the elasticity effect emerge on your screen. Stop turning the filter when the background is looking perfect and take your shot. The stress colours should look vivid and striking on the screen.

Make the most of this technique and start to build strong compositions once you’ve mastered the setup.
Using a mix of plastic cutlery, create symmetrical shots worthy of any high brow restaurant, by alternating positions and creating a sense of repetition.
Have a go at layering your shot by placing crinkled transparent plastic underneath/behind your main prop and watch how the light passes through both differently. It’ll give you a unique background if you don’t want it white.
If you have a few different plastic props, throw them all into your shot and capture a bit of a jumbled mess -just like an airport baggage x-ray.
Be as abstract or as minimalist as you want, don’t just get lost in the effect of photoelasticity, remember there’s always an opportunity to make an eye-catching composition.
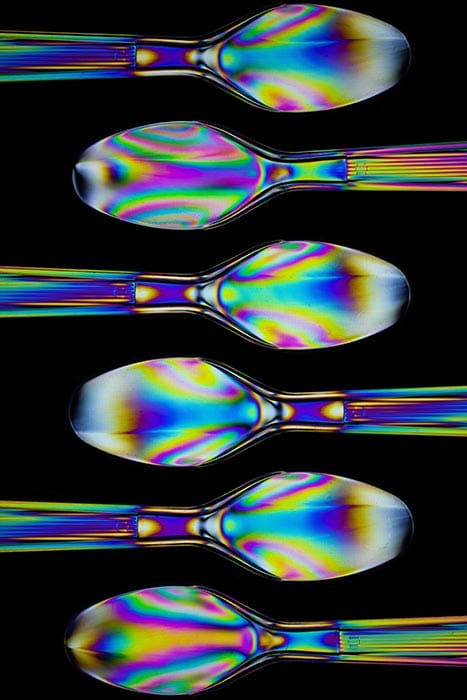
Just like Audrey’s photographs at the start of this tutorial, you can invert your shots to make the background black if you prefer a darker effect.
Simply open up your picture into software such as Pixlr X or Photoshop and press CTRL+I or CMD+I. This will invert all the colours and then you can save your shot again.


The pictures speak for themselves, don’t they? Photoelasticity is really a wonder of science and a great technique that we can use to capture beautiful abstract photographs.
If you’ve been a bit of an Albert Einstein and carried out this experiment too, then share your results with us and tell us what you thought.
Are there some plastic props we didn’t think of? Did you find a different trick or composition that love? Found any interesting editing effects that you could add in?
Share it with us in the feedback gallery and on social media so we can all have a good natter about what worked well.

Popular memory cards for photography – what’s the best SD card for your digital camera? Choose the right capacity and class speed in our guide

Discover the BEST way on how to clean a camera sensor using swaps, rocket blowers and pencil brushes to give your shots a dust-free finish!

Capture the magic of the night with our beginner’s guide to night photography. Learn tips and techniques for stunning results.
Learn the basics of photography – fast – with our FREE 60-Second Photographer online course. Each class is short and sharp with simple, actionable steps that give you immediate results.
x 30 lessons

© iPhotography™
Become a confident and competent photographer in less than 30 minutes!
Before you leave, make sure you’ve secured your FREE online photography course (worth £29.99)
Each class is just 60-seconds or less making it the fastest and easiest way to learn photography!