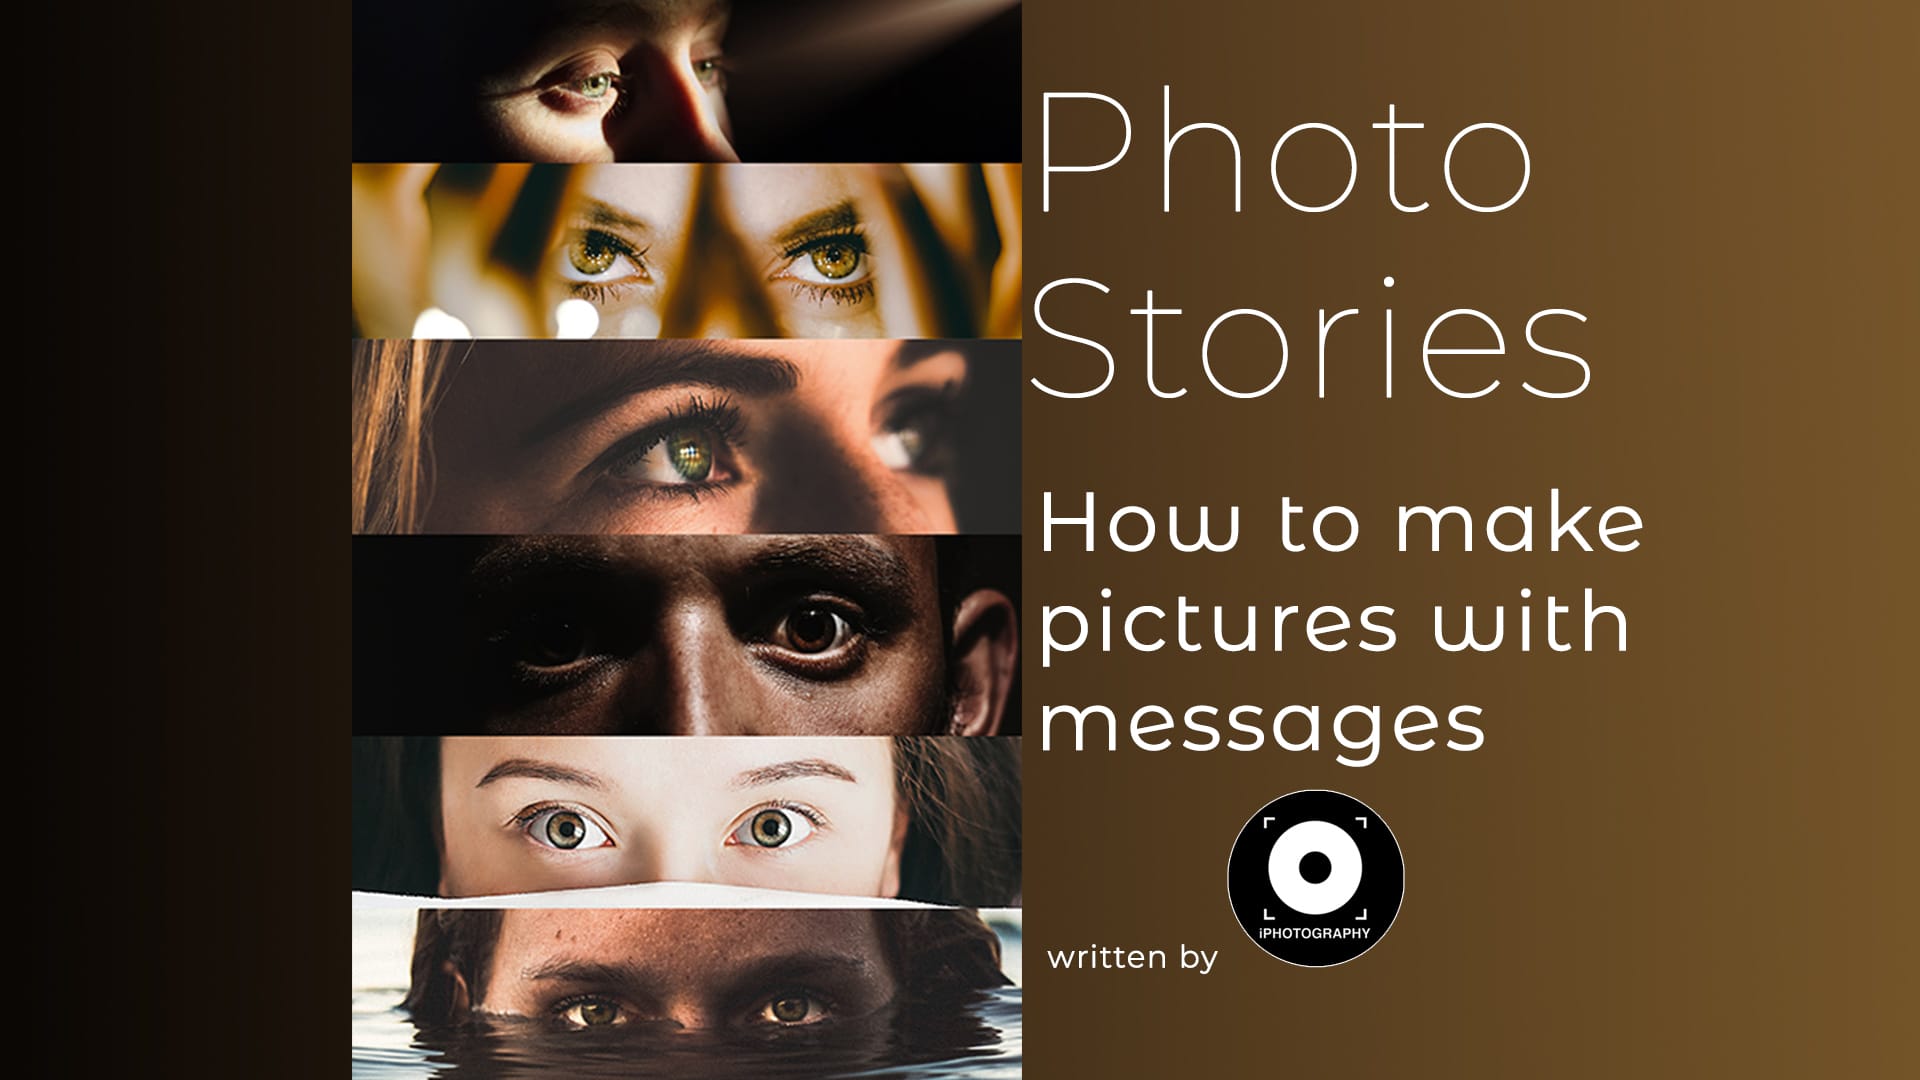
 Stephen Walton
Anyone with a camera can take a photograph. But to become a true artist you will need to master how to tell a story with a camera.
A photograph takes a moment out of time to be viewed again and every pair of eyes will read a different tale.
All good story tellers create narratives that matter to them, so to begin with you need to discover what it is that interests you. From stories of humanity to nature, capturing the essence of each subject can transform your photography and increase audience engagement.
“You don’t take a photograph, you make it.”
- Ansel Adams
The setting that your subject is in can make or break the shot, particularly with candid portraits; you need to be cautious not to overwhelm your subject by enveloping them in too much detail.
Firstly, use your knowledge of aperture and shutter speed, which you have developed throughout your iPhotography course, to set the best possible exposure.
By carefully selecting the correct F/stop, your aperture can assist the story to unfold. Whether it’s a shallow DoF (depth of field) to focus on a singular feature, or a deep DoF to draw in as much detail as possible.
Next, the direction and quality of light is important to set the right atmosphere. Adding in soft side light can create a moody yet low key image. Whereas a hard light shining on the front of the subject will appear cleaner cut and innocent.
If you are using ambient (natural/pre-existing) lighting, consider the effect of colour temperature to your story.
Calm sunsets make viewers think of relaxing, romantic, uplifting and warm contexts. Whereas cooler light from a cloudy day can bring feelings of loneliness, melancholy or emptiness.

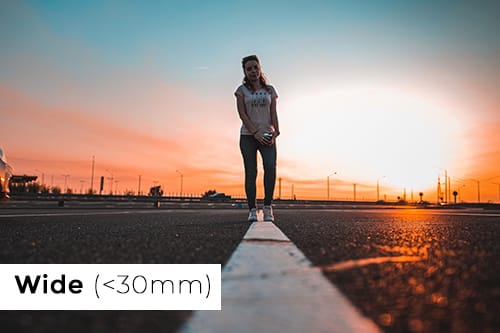
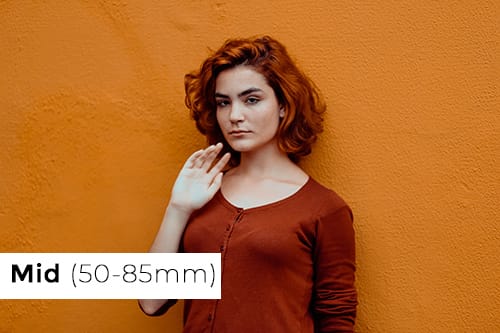
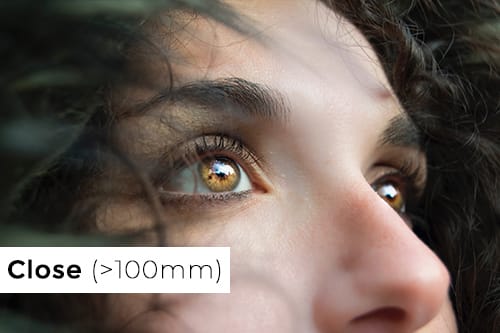
Therefore, as long the lighting and camera settings are adding to your image, it’s time to pick the right lens based on how much of the surrounding scene you want in shot.
In the context of a portrait…
• Shorter focal lengths include more of the view so work around 30mm or lower.
• Mid-length to head and shoulder shots are better around 50-85mm.
• Highly compressed backgrounds are easier to achieve over 100mm.
Only include elements that are vital to the story. You may have to be handy with editing if you can’t remove annoying distractions in the camera!
Emotion or a feeling in photography is what helps the viewer piece together the connection as it can give the audience a recognisable quality to relate to. To capture true emotion in a photograph, you need to pay attention to small details in your frame.
Look out at facial expressions, mannerisms, gestures and movements. Sometimes, setting the camera down and simply observing your surroundings can help you to absorb your subject and immerse completely in the mood.
Body language can play an important part in telling the emotion of a story; simple, small changes to poses can transform the overall feeling from happy to isolation or discontent.
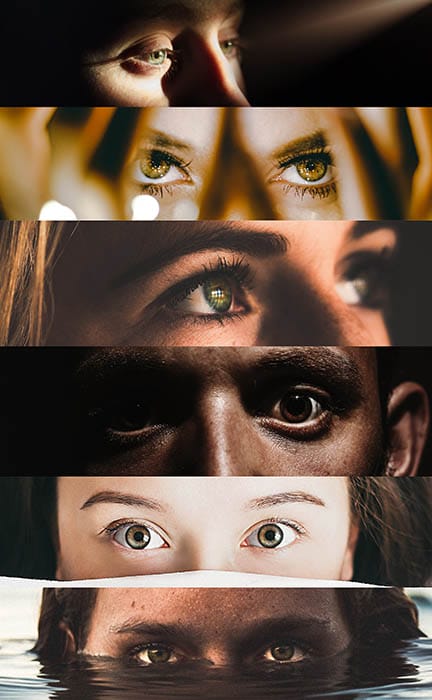
In a portrait, the eyes offer passage into your subject’s soul, so it is imperative to make sure you consider your subject’s eye direction when posing.
Have a look at these cropped portraits and see how many different emotions are displayed just by the eyes alone.
Before capturing the actual content of your story, ask yourself…What emotion am I trying to depict?
Every subject, human or not, holds the potential to create a unique story. It’s down to you to display the emotions that you feel (or want others to feel) in the image. Angles are a good place to start.
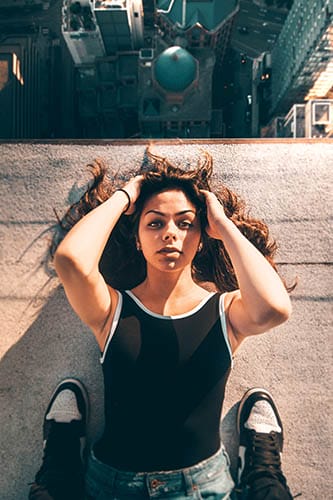
Taking up high angle positions with your camera make an audience feel powerful, in charge and all-seeing of the scene below. You can use high angles to make a subject look cute, compact and non-threatening too.
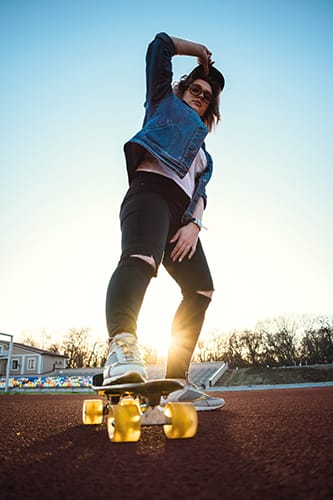
Placing your camera down low will make your audience feel that they are diminutive, insignificant and subordinate to the surroundings.
If you are shooting a subject from a low angle though, expect them to look dominant, feared and controlling to your viewers. It’s important to consider the emotion that your angle creates and what it says of your subject (if there is one).
Observing or creating emotion it is not the only way to tell story in your photography. More often than not, introducing signifiers or symbols, in the form of props, can further (or change) the context of the story you are trying to tell.
Using the correct prop can translate more of your story to your viewer quicker than an expression, dressed up location or hired clothing. Don’t overlook the power of props to save time, energy and money in your photography.
Take this scene for a moment…
• Do you see a resolute and strong tree, outlasting all others?
• Do you feel empowered by its stubbornness to exist in a barren landscape?
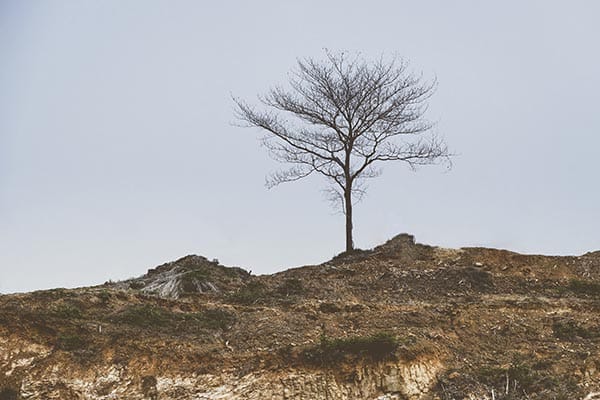
Keep those feelings in mind as you see the true photograph (with the original props). Now how do you feel…
• Do you feel sorry for the withered and weak tree?
• Do you still feel empowered or angry?

It can take a simple prop to set the message of the story. Consider adding in extra details like this to your story when you are wanting to create drama, conflict and debate.
Use your earlier learning of ‘choosing an emotion’ to depict in order to select the right prop, symbol or signifier. Here are a few top choices;
o Balloons
o Bubbles
o Fireworks
o Sunflowers
o Cake
o Rollercoaster
o Sports Cars
o Presents / Gifts
o Unopened Boxes / Books
o Water
o Fences / Barriers
o Empty Chairs
o Unfinished Meals
o Letters
o Damaged Flowers
o Hearts
o Flowers
o Rings
o Locks
o Fire
Every photograph you take may be a stand-alone story, but it doesn’t have to be.
Once you are comfortable with building a story in a single frame try spreading it out over 3 or 4 to create a sequence of how that story develops. In the way that a movie is a series of stills played out a 24 frames per second, think of this as an opportunity to create a story with different chapters.
You’ll have to plan out what the story is in advance and then shoot each scene. If you want to upload your sequence to the iPhotography gallery then stitch them all together in a single frame in Photoshop or Pixlr X.
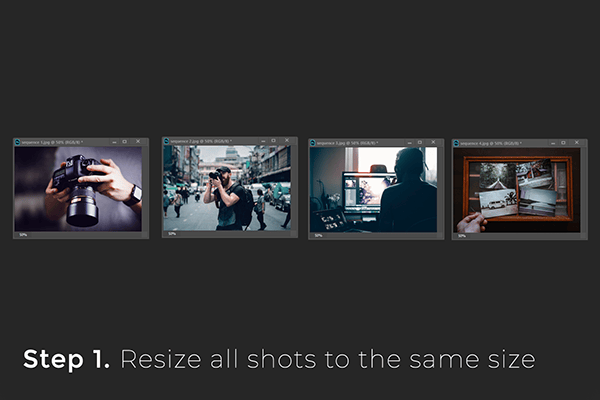
Here are 10 steps on how:
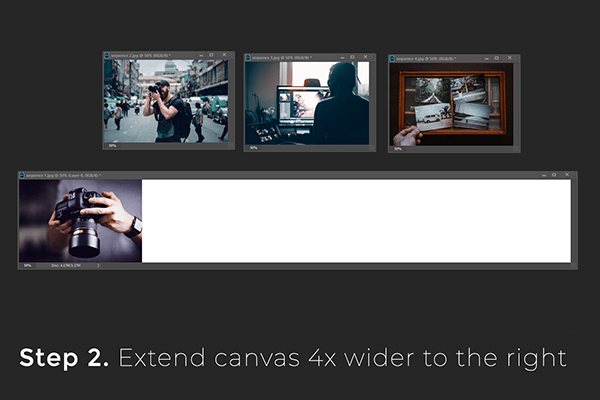
1. Resize all your photos to the same size and resolution
2. Select your first shot (the one that starts the story)
3. Go to IMAGE > CANVAS SIZE
4. Extend the canvas to the right 4x the width of each image. i.e., if your photos are 1000 pixels wide then extend the canvas 4000 pixels to the right.
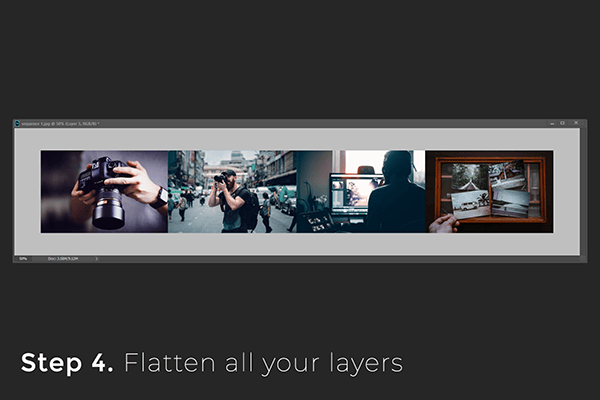
5. Copy and paste each photo into the blank space
6. Arrange them to the correct order
7. Flatten the layers
8. Go to IMAGE>IMAGE SIZE
9. Resize the document so it’s under 5000px on the longest size
10. Save and upload to the gallery!
And if you’re ready to develop your stories further then take some inspiration from iconic portraits and the rules of street photography. These tips and tricks will help you adapt your skills to a fluid environment where the stories occur in front of you – it’s down to you to capture it.

Now you’ve got some hefty tips to work with, we want to see your creations. Upload your photo stories to the iPhotography member feedback gallery and let us know what challenges you found, and overcome, whilst shooting.
It’s important to share your experiences with others so we can build a stronger network of knowledge amongst the iPhotography community.
Has this article helped you create some new ideas or give you a better understanding of creating stories in your photography?
If so, let us know. Your feedback is vital so we can keep creating the perfect content you need to improve your photography.

Capture the magic of the night with our beginner’s guide to night photography. Learn tips and techniques for stunning results.

Master the art of solar eclipse photography with expert tips on equipment, settings, and precautions for stunning celestial images.

Elevate your photography with Lofaris Backdrops. Discover a range of various styles and looks. What’s the best backdrop material?
Learn the basics of photography – fast – with our FREE 60-Second Photographer online course. Each class is short and sharp with simple, actionable steps that give you immediate results.
x 30 lessons

© iPhotography™
Become a confident and competent photographer in less than 30 minutes!
Before you leave, make sure you’ve secured your FREE online photography course (worth £29.99)
Each class is just 60-seconds or less making it the fastest and easiest way to learn photography!