 Stephen Walton
If you enjoy a walk in the great outdoors, or even just around your local park but landscape photography seems too demanding then turn your attention to nature photography instead.
This nature photography tutorial will give you lots of inspiration and photography ideas that you can try out with your camera in any local park, woodland or forest (and even in your garden!)
Yes, there is a difference between nature photography and landscape photography. The former is designed to focus your attention on the small details within a natural area. Landscapes consider the wider overall view.
We’re not going to need to think like Ansel Adams for this nature photography tutorial!
Nature photography requires a slower pace of shooting. It’s easy to walk past interesting subjects in nature. You need to be consciously thinking and looking out for the smallest points of interest and consider ‘will it work as an image?’

Given that the terrain can be a little rugged if you’re heading out into rural woodlands, national parks or forests, packing light is sensible. Packing a good zoom lens and a macro is all you really need in our experience for taking nature photos.
Your zoom should cover from 18mm to about 100mm and the macro around 60 or 100mm. This will help you deal with the small intricate textures, as well as shoot wider and sometimes inaccessible views.
It doesn’t really matter what DSLR or Mirrorless camera you have as nature photography relies more on the art rather than the technical. As long as you have manual settings to change those all-important exposure settings you’ll be fine.
You may find compact cameras and iPhones for example a little restrictive when you want to decrease the depth of field and really show off fine details at a macro level.
Don’t use a flash, as the beauty of nature photography is that it’s all led by natural light. A flash, depending upon the density of trees, wouldn’t do much justice in a cluttered environment.
If you’ve got space for a tripod and small gold reflector then it’s definitely worth throwing in the bag for macro photos, as you’ll see later.
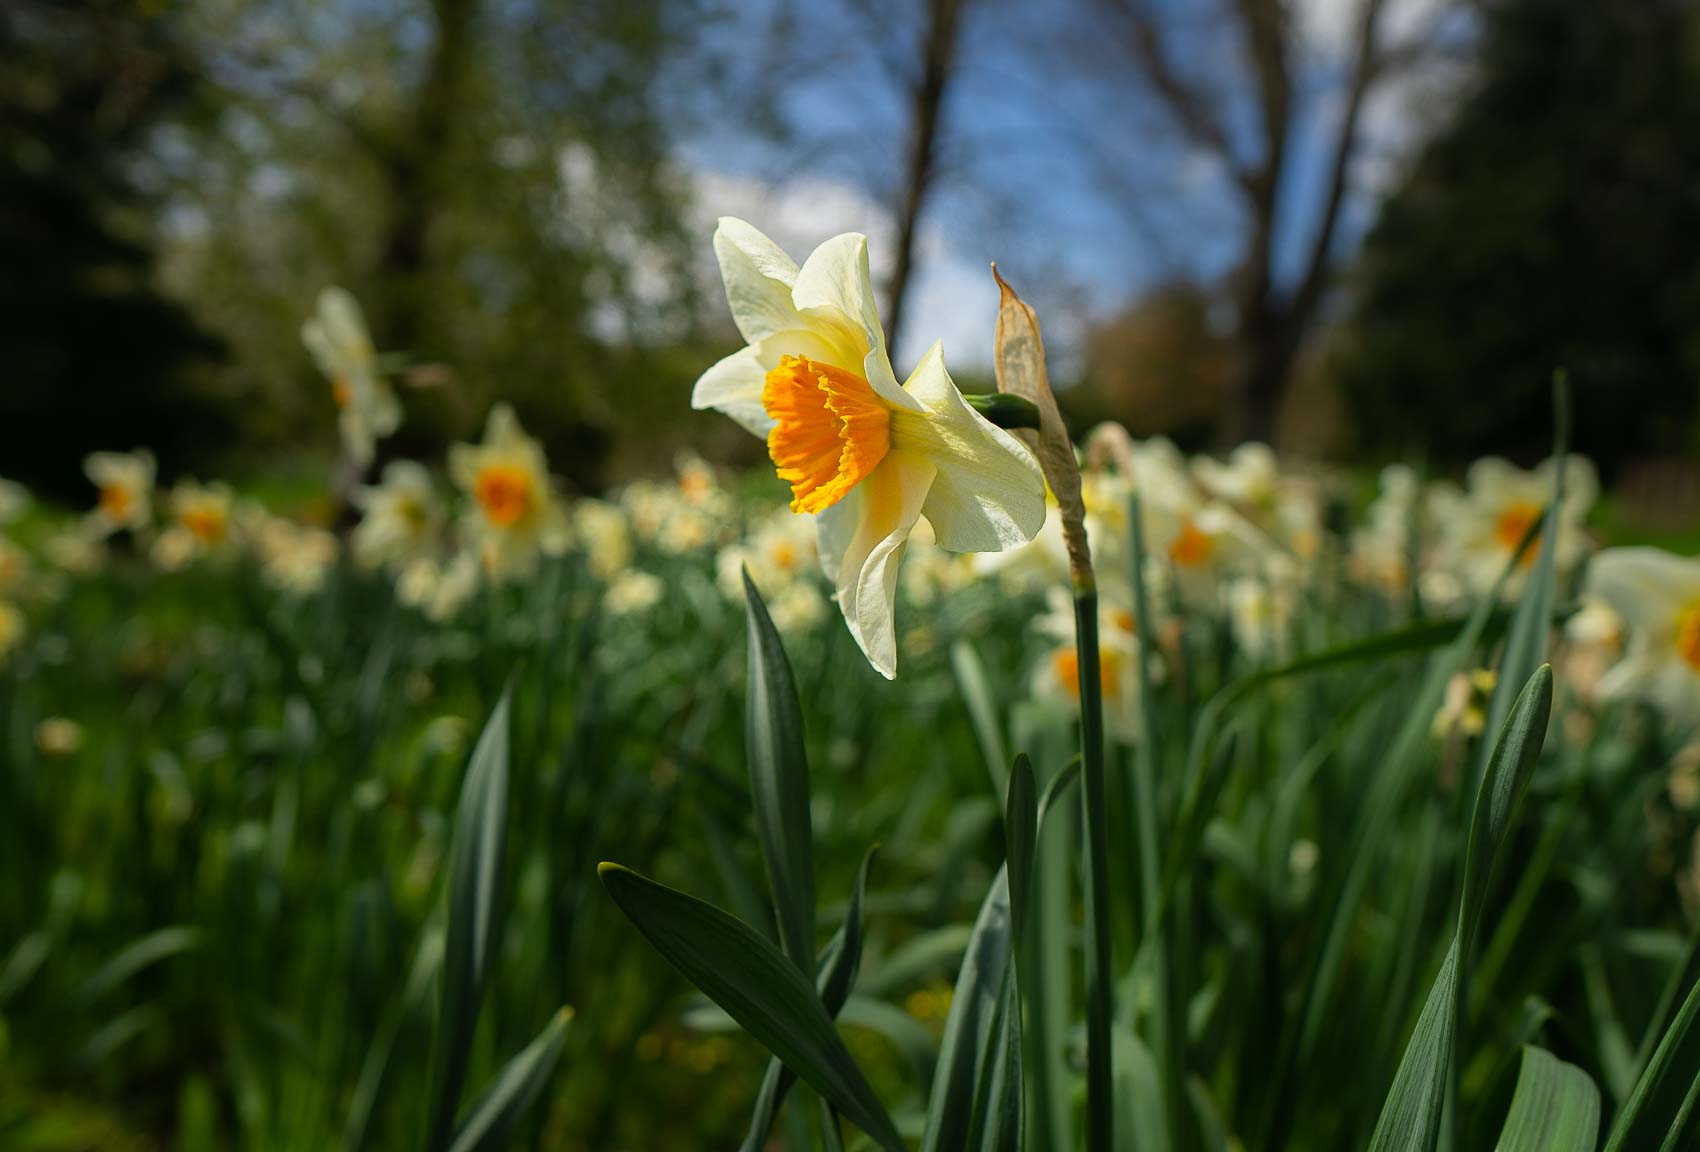
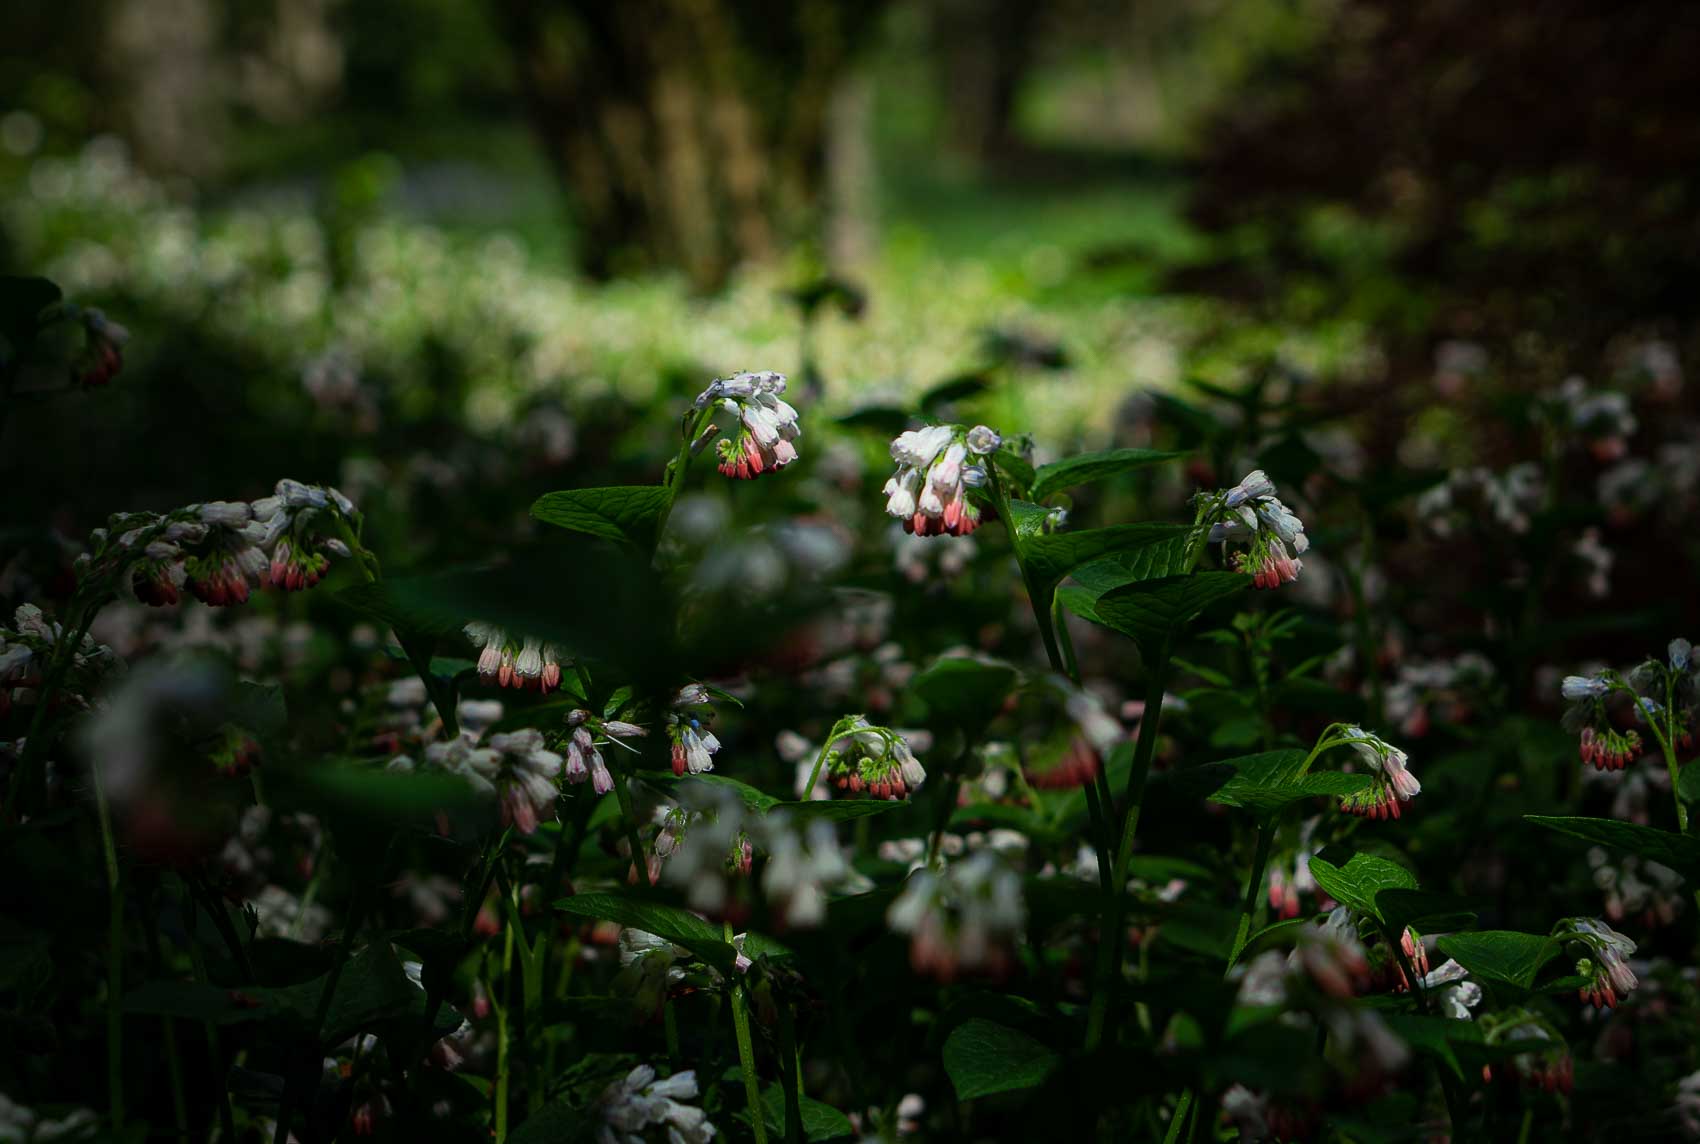
The most interesting light quality for nature photography comes in the early mornings. When the light is strong and bursting through the woodland canopy is when you want to be out and shooting.
Nature flowers look amazing in the glow of the early morning sunshine. The strong light rays will find any opportunity to illuminate the forest floor.
As the light moves throughout the day the rays will soften and the effect lessens, so early mornings are the best. This strong light can cause problems with backlighting through. If you want to capture little light flares by shooting into the sun, then make sure you’re not underexposing other objects facing you. Consider bracketing your exposure to get the most balanced result.
But you don’t necessarily need to travel far as a nature photographer to capture shots of amazing flowers and delicate natural objects. Your back garden may have enough already.
If you’ve got some large trees in your garden or dense shrubbery there could be opportunities to get in tight to capture shots of leaves, branches, pinecones, spider webs, long grasses, thistles and more.
Photography ideas at home may be more abundant than you expect when you know what makes a good nature shot.
Where do we begin? A good nature photographer over time can instinctively spot interesting objects and make incredible nature photos from something that looks very banal to the untrained eye.
Here’s a list of objects to look out for on your nature walk;
● Bluebells
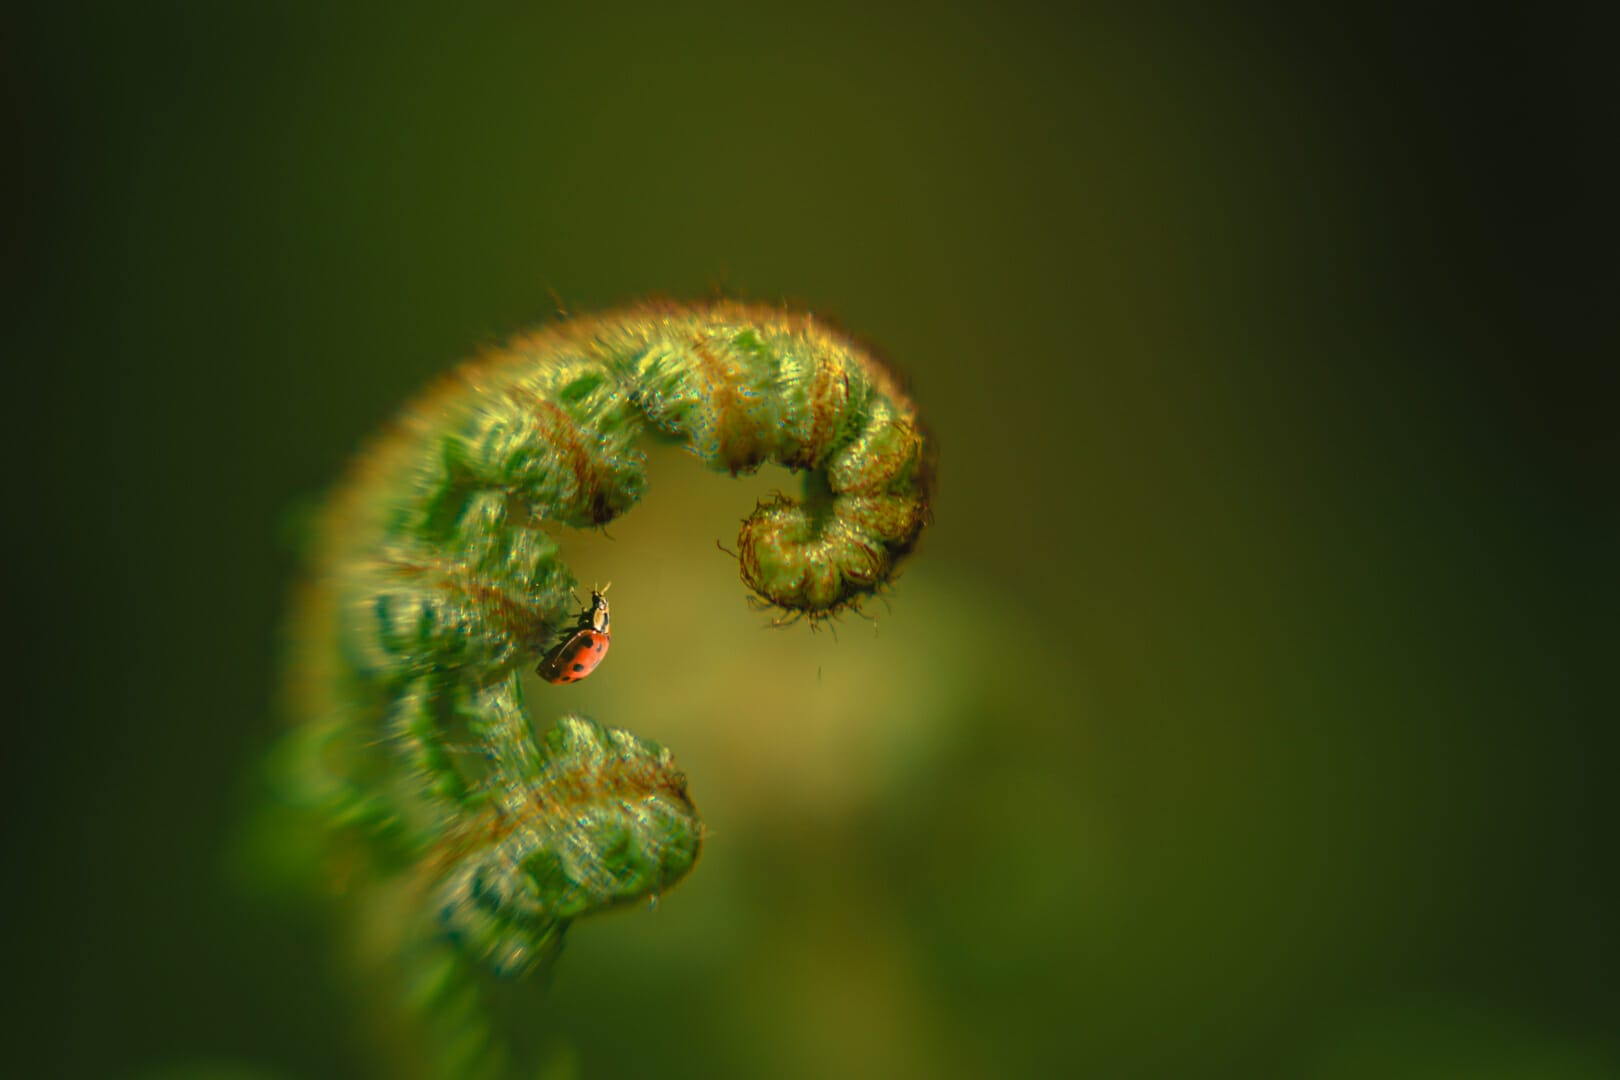
● Toadstools
● Leaves
● Branches
● Logs
● Feathers
● Dead Animals
● Moss covered rocks
● Tree bark
● Spider Webs
● Thistles
● Foxglove
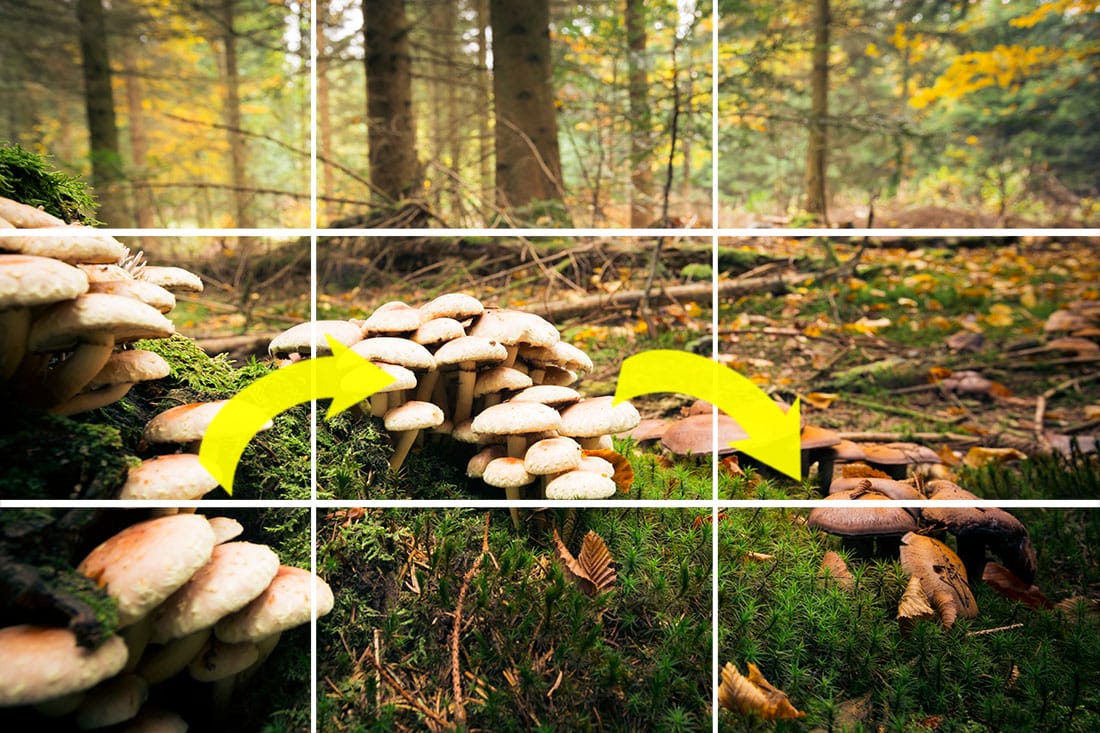
● Mushroom / Fungi
● Pawprints
● Pinecones / Acorns / Conkers
● Nests
● Berries
● Fallen trees
● Woodland paths
● Morning dew on leaves
● Dandelion seed heads
● Streams
● Pebbles
It feels like the list is endless as woodlands in different seasons, across the world, will provide something unique to every photographer.
If you keep your mind focused on the smaller objects and not the wider landscape of where you are you’ll start to notice more and more. It’s not just all amazing flowers either – try your hand at things that aren’t naturally colourful and ‘beautiful’.
Be as honest in your nature photos as nature is with you. If the leaf is a bit dirty then don’t clean it before shooting, it spoils the idea of this being about nature. Show off the raw side, blemishes and all. You can enhance this further through your edit to make it look gritty, dark but with a glimmer of beauty.
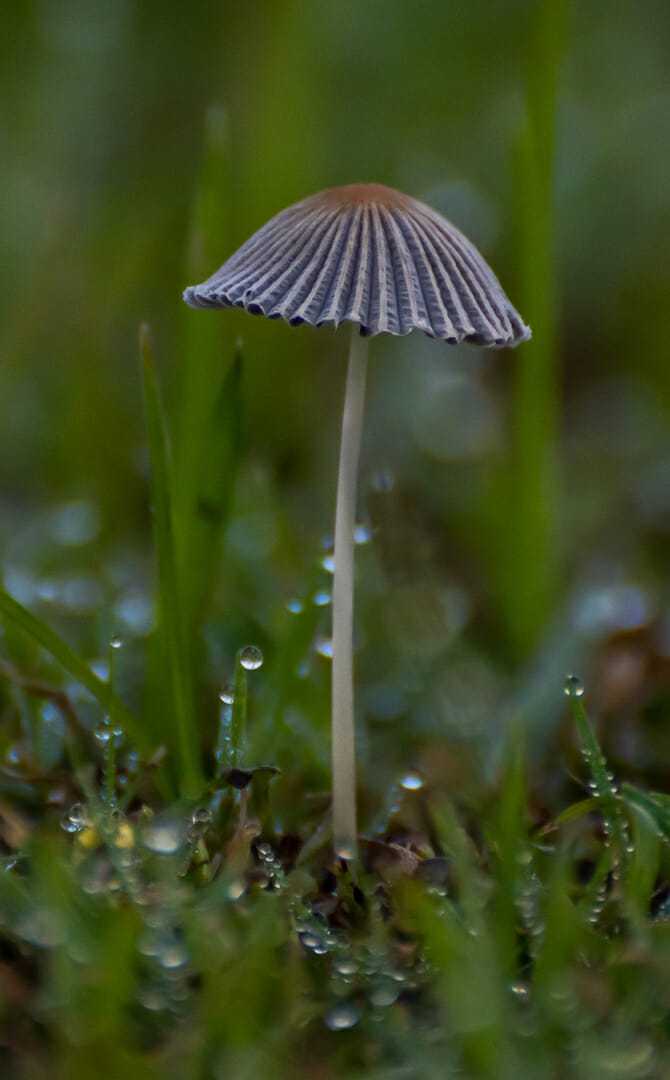
Time to change out the lens for a macro when approaching nature photography. You need to take your time and look for something special. Try not to disturb the wildlife and delicate ecosystems when searching for something interesting.
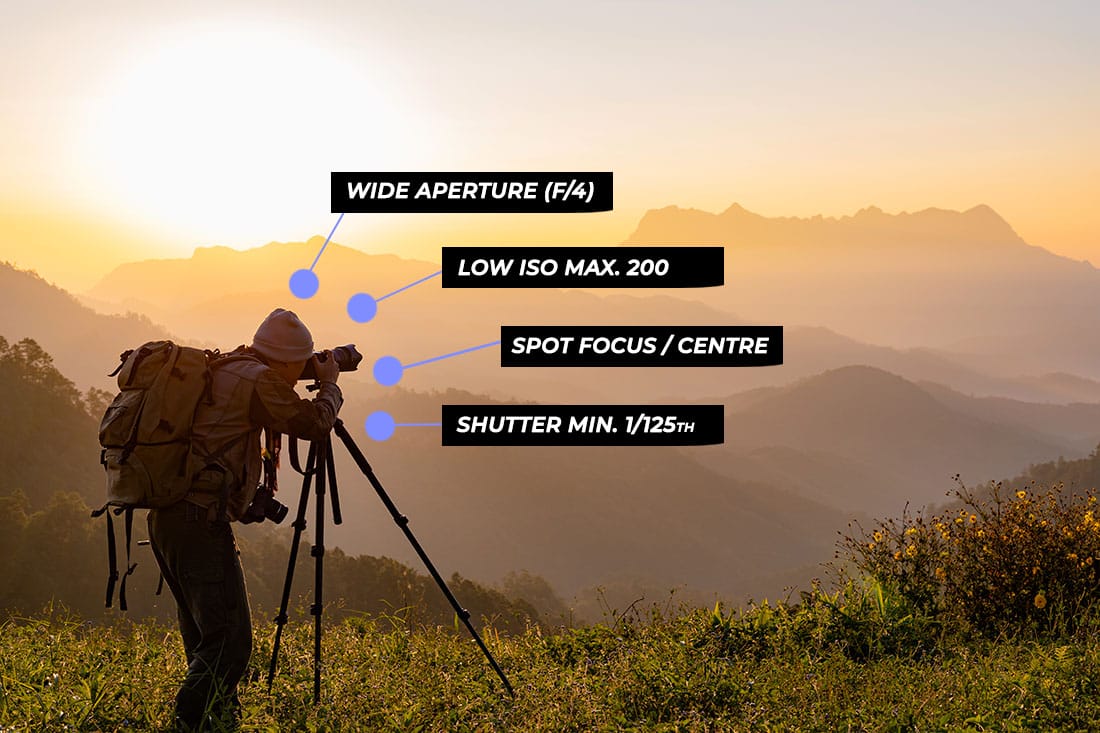
Firstly, a shallow depth of field will help the brightness as woodlands can be a very dark place, regardless of the time of day. Shoot around F/4 or a little wider to bring in more light.
Secondly, we’ve found through experience that the best way to get sharp shots is to use a spot focus method for small macro photos. Your subject won’t be moving so you can stay in single shot drive mode.
Thirdly, though it may not look like it makes a big difference, change your exposure metering mode to spot or centre. This means your camera’s light meter will read the exposure from the centre of the image and move the exposure dial accordingly. You want the main subject to be the best exposed area in nature photography – the background should be blurred with the shallow depth of field.
Next, don’t touch your ISO setting unless your shutter speed is going to go slower than 1/100th. At that point boost it to 200 and keep your shutter speed around 1/125th as you’ll be handheld for most of your nature photos.
If you’re out in the woodlands or dense forests you may have to battle with low light levels at times. This is why it’s better to shoot early mornings on clear days. Overcast days suck all the light out woodlands and it rarely penetrates to the forest floor where you need it.
With that said there are a few camera tricks to help you get a little more light to the sensor if you do find yourself in low light.
Many cameras and lenses have built-in IS/IBIS (image stabilisation/in-built image stabilisation) or VR (vibration reduction). These are technologies which are designed to minimise any camera shake that occurs during an exposure and get the best possible sharpness.
They also have added bonuses when shooting in low light. IS/IBIS/VR can allow up to 4 extra stops of exposure compensation (EV). Basically, it could let you shoot at 1/15th or slower, with minimal motion blur.
Once you’ve taken your nature shots you may need to do a little more work to get rid of any distracting patches of noise in the shadow areas. Software such as Lightroom has dedicated noise reduction tools to cope with this.
It’s important to reduce overall noise as well as colour noise reduction too. Shooting in low light means that the colour temperature of any ambient light in the scene can cast tones across the shadows which appear in the noise.
Don’t go too heavy on the noise reduction sliders though as this can reduce clarity and contrast in the shot. Read more about shooting in low light here.
If you’d like to keep the compositions of your photos natural then you need to think in two different ways – the larger objects (trees & paths) and the microenvironment (leaves, plants, insects). Each needs a different approach – let’s start off with the larger objects.
Some maintained woodlands have paths already marked out. Use these paths as leading lines to feature through your composition. Winding paths look great to meander through the beautiful, natural woodland. Get down low to make the path appear closer and wider, it’ll draw audiences in faster.
Look for trees with unique markings, or ones that stand out in a barren area. Using a shallow depth of field helps increase that feeling of separation from the surroundings.
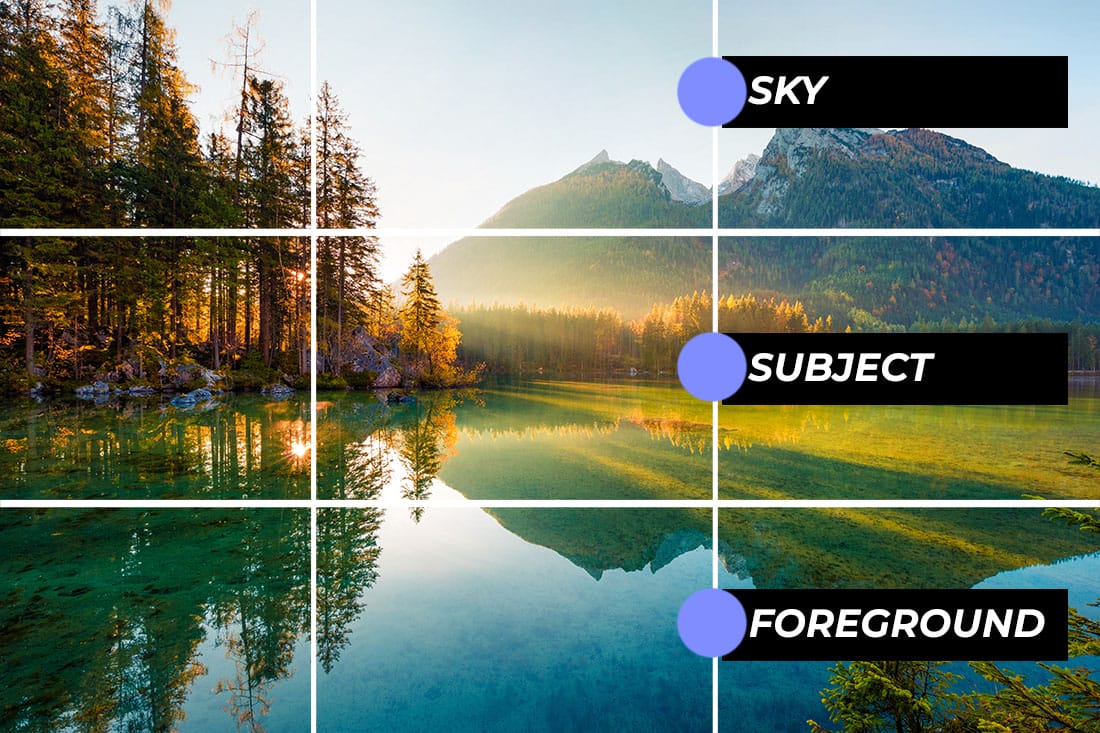
Apply the rule of thirds where possible, to proportion your nature photos correctly.
● The top third should the sky
● The middle is the tree/woodland subject
● The lower is the grass/woodland floor
Alternate the orientation of your shot, especially with tall trees. Let the trees suggest which way you should shoot – if they’re very tall shoot portrait; if they aren’t shoot landscape.
If you’re in a cluster of trees get up close to one but focus further in the distance. This will create a foreground blur and introduces a voyeuristic look in the photo – as if we are peeking around a tree at something.
For the smaller scale shots treat this more like ‘art photography’. Don’t worry so much about the technical camera composition (but don’t completely forget it either). Instead work on exploiting the interesting thing about the item(s) you’ve chosen to shoot.
You could bundle a few objects together or just shoot them as they appear.
Here’s an idea – pick out different coloured leaves and rest them on fallen trees, capture pinecones on the floor and watch out for native plants blooming in the light. Nature photos can be as easy as that. You can pick out a few items from the forest floor and arrange them artificially creating contrasts in textures, colours and sizes.
Look for pools of light too. In forests and woodlands the tall tree canopy can steal most of the light but where some rays break through you’ll discover little pools of light shining on the forest floor. Investigate further and see what is in the light. Better lit areas will mean you won’t need to rely on pushing up your ISO or slowing down your shutter speed too much either.
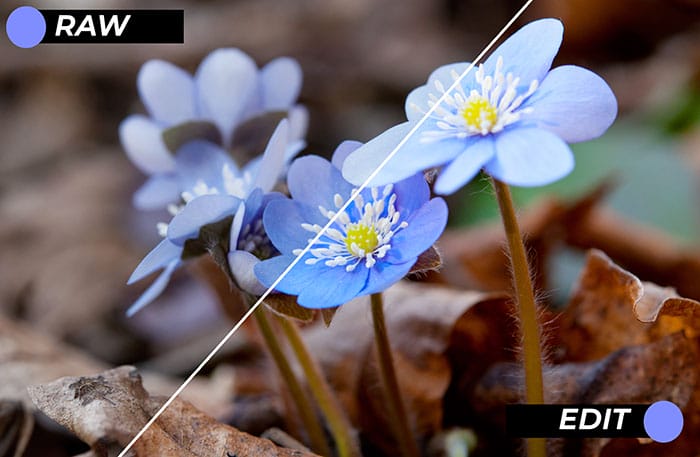
When it comes to editing your nature photos it’s important to be as delicate as the subject matter. Don’t push the contrast high or the clarity sliders either. Hopefully you’ve shot it sharp enough that you shouldn’t need to go full throttle on any slider.
Here are a few little basic adjustments we tend to make to most of our nature photos.
● A little boost in exposure
● Reduce the highlights a little
● Slight increase in the sharpness (only to compensate for online compression)
● Add a small vignette to concentrate eyes to the centre
● Crop out any distracting branches and bold colours that aren’t putting attention on your main subject
Stay away from the saturation tool either, you can boost the colour luminance or individual colour channels according to the tones in the photo but global changes in nature photography can make shots look over-processed. Local edits over global ones for the win!
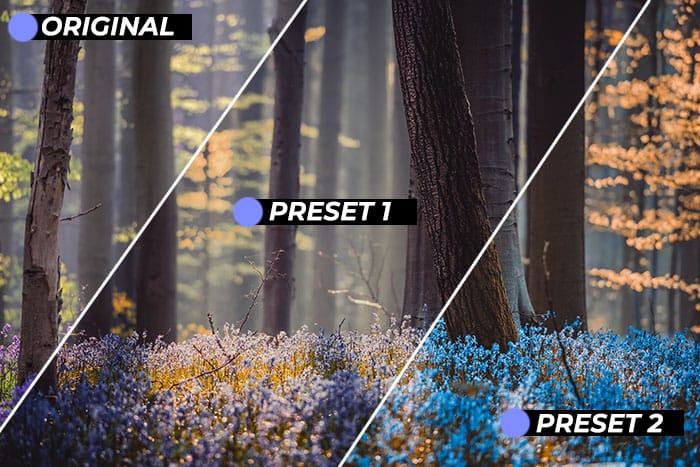
We’ve got 80 Lightroom and Camera RAW presets for you to add a moody look to your nature shots. These are presets we swear by and we know they’ll a unique style to your photography.
Remember that presets aren’t a one-click solution, and they may not work with every nature shot. Once applied tweak sliders that the presets have made too heavy or bright and maintain the attention on the main subject.
As we wrap up our nature photography tutorial for beginners then let’s leave you with 5 top tips on how to think as an artistic photographer to capture the beauty of nature in small objects whether you’re shooting at home or in the great outdoors.
Read our 10 Tips for Nature Photography article here for more ideas.
1. Use a macro lens for the best quality but a wide-ranging zoom allows you to capture trees as well as amazing flower shots
2. Don’t use a flash – instead get out in the early mornings when the sky is clear to get the striking light as it angles through the forests, woodlands and parks
3. Keep reminding yourself of the flowers and plant life blooming right now. Go looking for these items wherever you can for topical shots.
4. Look for contrasts in textures with nature photos – hard against soft, large next to small, bright next to dark. The arrangement is really important unless you’re shooting the objects in place.
5. Go slow, it’s not a race to get the best shot first. Nature photographers can spend hours walking through a location to find the most interesting elements illuminated by the best light.

Shooting sunsets using amazing 5-in-1 magnetic lens filters from Kentfaith, the 1st choice for photo & video products.

Popular memory cards for photography – what’s the best SD card for your digital camera? Choose the right capacity and class speed in our guide

Discover the BEST way on how to clean a camera sensor using swaps, rocket blowers and pencil brushes to give your shots a dust-free finish!
Learn the basics of photography – fast – with our FREE 60-Second Photographer online course. Each class is short and sharp with simple, actionable steps that give you immediate results.
x 30 lessons

© iPhotography™
Become a confident and competent photographer in less than 30 minutes!
Before you leave, make sure you’ve secured your FREE online photography course (worth £29.99)
Each class is just 60-seconds or less making it the fastest and easiest way to learn photography!