 Stephen Walton
A good natural light photography tutorial should give you all the information about when, how and why to take your photos. Through this article, we’ll show you how to use natural light indoors and outdoors, and what effects you’ll get when shooting at different times of day too.
By the end of this tutorial, you’ll have a fantastic grasp of how to use natural light and use it to your camera’s advantage
Natural light is all around us. For photographers (and everyone else for that matter) sunlight is our only source of natural light.
Natural light differs from ambient light because ambient can refer to the light that pre-exists in a scene. This could be street lights, car headlights, shop signs etc. Ambient light doesn’t have to be naturally occurring; it only means you (as the photographer) didn’t add it to the scene when taking the shot.
Using sunlight in your photography is cost-effective but you are at the mercy of the weather and whether it’s delivering the quality of light that you are needing.
Sunlight can be discussed using a few different photography terms and approaches. There are normally 4 considerations photographers look at when using natural light in their photos – Direction, Colour, Intensity and Quality.

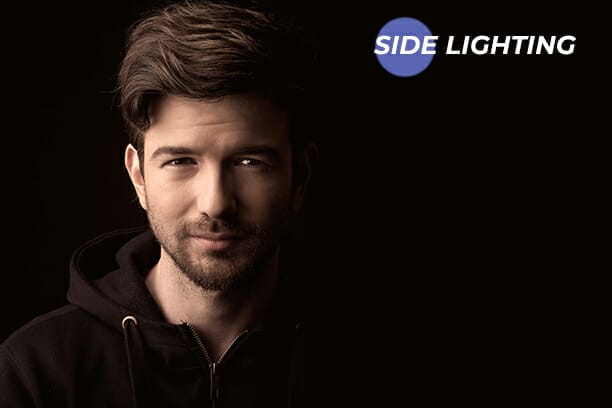
In which direction is the light falling? Is the direction of the light where you need it to be? While it’s very hard to change the direction of natural light unless you’re using reflectors you may have to move your subject into the path of the light to get the right finish.
There are 3 main directions that you can use natural light in a photo;
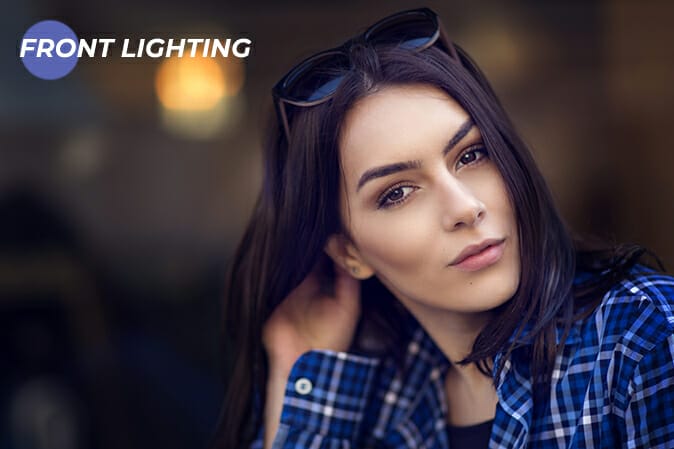
By simply positioning your subject into the direct path of the sunlight facing straight on you can create a front-lit image. This can (depending upon light quality) make the subject look flat unless you angle it to create shadows, which give depth.
To create depth turning your subject side onto the path of the natural light is a wonderful way to give a subject more depth and shape. In portrait photography, a 45-90 degree angle is used with natural light photos to create this more 3D appearance of a person.
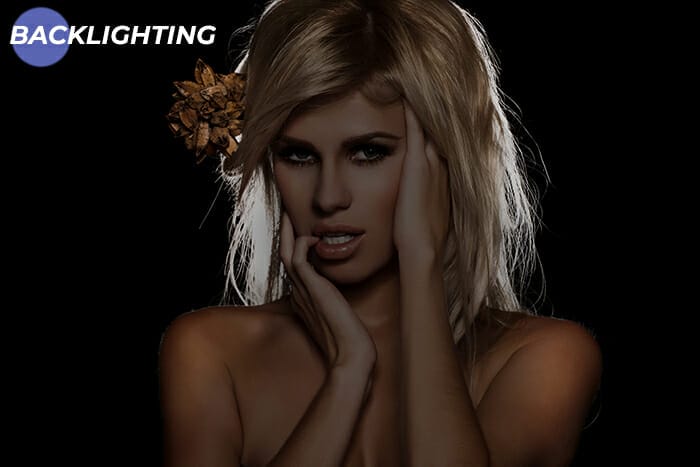
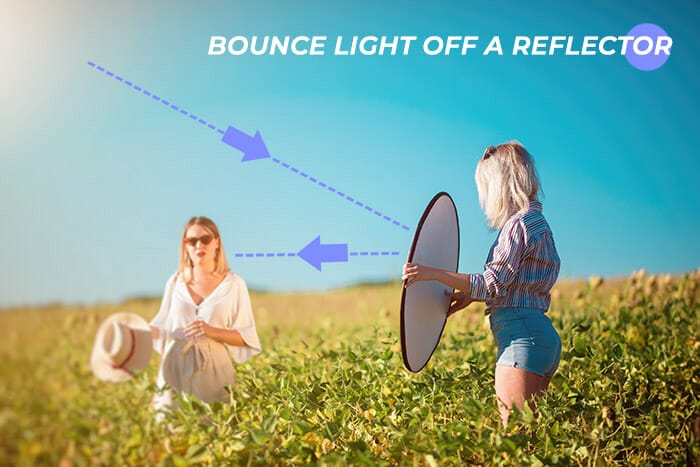
If you position your subject in front of the daylight you’ll shroud them in a silhouette, leaving an outline of their shape visible to the camera. Given that light only travels in one direction, the nearside (that the camera sees) will be darker. You’ll need a reflector to bounce light back towards the subject to fill in that detail.
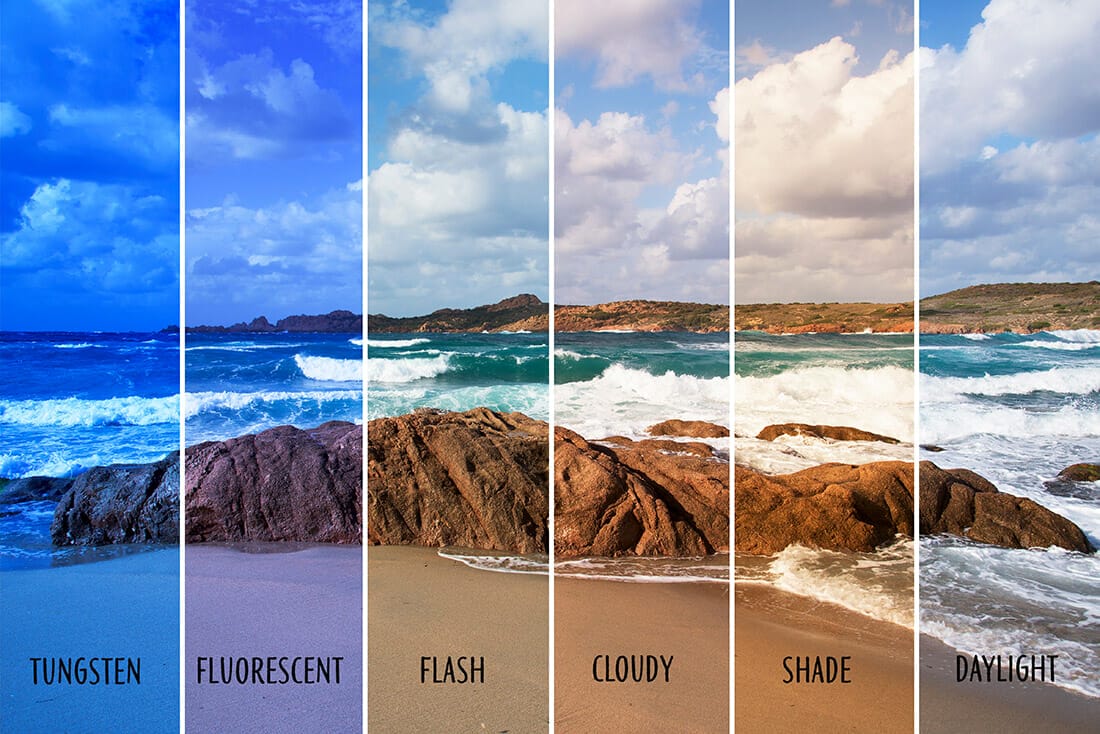
Daylight can also appear in different colours depending on the time of day you are photographing.
Colour temperature, as photographers refer, alters from when the sun rises (giving out cool light blue tones), through to midday when the sun appears more balanced and whiter. When the sun starts to set this is the time of ‘Golden Hour’ where the light turns warmer and more orange/red. This is because the red waves of light are longer in the spectrum of visible light.
Just after the sun has set you may also get a period referred to as the ‘Blue Hour’ or Twilight when there is still a hint of light in the sky sometimes being reflected off the moon.
The intensity of natural light is connected to its quality. With different qualities, you’ll get different levels of intensity.
The intensity of natural light can range dramatically from strong summer sunshine leaving heavy shadows to soft, diffused light on an overcast day with very few shadows.
Time of day also may also have a bearing on the intensity of natural light if the skies are clear. When the sun is lower in the sky shadows that are cast will appear longer than they would be when the sun is higher.
There are 3 common qualities of light that will guide your natural light photos in terms of under which condition to shoot. They are hard, soft and reflected.
Hard light appears most when the sun is unfiltered on a bright day with no clouds in the sky.
Strong sunshine equals strong shadows. Hard light intensifies colours and makes everything appear a little crisper (as long as the shot is sharp). It can though make scenes look flat when used as a front-lit source.
Hard light is symbolised by a quick transition from light to shadow. Think about when you go outdoors on a bright summer’s day and the light is intense – that’s hard light.

Soft light is the total opposite to hard light. You’ll need a cloudy day to see the effects of soft light when shooting outdoors. The clouds will diffuse the sunshine and spread it wider meaning it is less intense.
The transition from light to dark is much longer and this means you can demonstrate more shape in a subject. Portraits, for example, are much more flattering under soft light as it is most gentle to the skin.

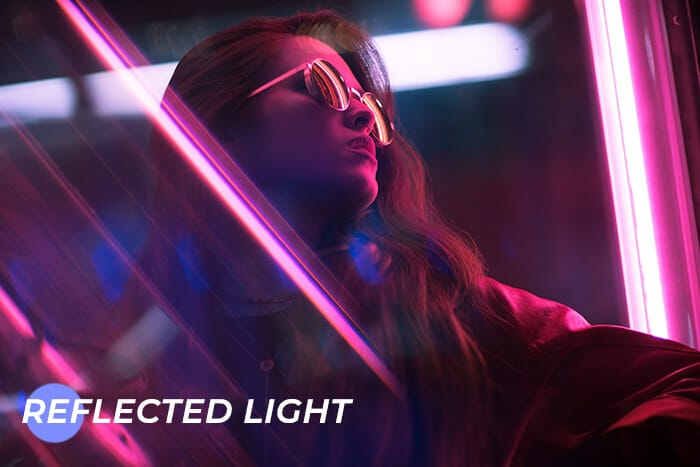
When you get natural light that is bounced off of surfaces this is what we call reflected light. Light can be reflected off of walls, the ground, or any other surface.
Reflected light can create a soft glow as the light intensity is dramatically reduced and spread wider when bounced. It’s worth noting that if you reflect light off a coloured surface then colour transfer can occur i.e. bouncing light off a red wall means that your subject can end up with tones of red falling on it.
You could consider dappled light an alternative style of natural light. It appears when light is passing through an object (such as tree branches). Some light is absorbed, other areas make it through creating this patchy ‘dabbled’ look.
It can be quite pretty when used accurately but sometimes, if overlooked, can leave bright areas in backgrounds distracting the eye or unwanted dark areas on the subject.
Natural light photography doesn’t require a specific camera or certain accessories, just a clear understanding of what light you’ll experience based on the weather conditions. With that said there are some camera settings for natural light photos that will help you manipulate the exposure if needed.
OK, obvious much, but we don’t just mean you need ANY camera. A camera that will allow you to alter exposure settings such as aperture, shutter speed and ISO are really helpful for natural light photos. Sometimes soft light may occur on a very dull, dank day and you’ll need to boost the exposure to show off detail which is why a camera with manual settings is useful.
Given that light only travels in one direction you may find a need to bounce it in another direction to fill in shadows and this is what reflectors are made for. You can pick them up pretty cheaply in white, silver, gold and black to bounce light with different intensities and colours.
It’s not essential to have a lens filter for natural light photography but you will see advantages to having them at certain times. ND (neutral density) filters reduce the amount of light entering the lens – great for sunny days when you want a shallow depth of field but you’d be otherwise overexposed without an ND filter.
A polariser helps take the glare and flare out of lights slightly so if you are shooting into the light on occasions then a polariser filter will soften the effects of a harsh glare.
We said earlier that the weather will have a massive effect on your light quality, intensity, direction and colour. Photos taken on a sunny day will look totally different to an overcast one.
Many natural light photographers love the soft, even light of a cloudy day. Photos taken under these conditions can have a bluish tone and little contrast. This type of natural light is ideal for any photos involving models or products with muted colours.
Whereas sunny days have strong, direct light which can cause harsh shadows. However, when done right, this quality of natural light can be powerful. It’s best for wide, distant photos or for up-close images of products with contrasting patterns or textures. If you’re a landscape photographer you’ll find that shooting early morning sunrises will give you dramatic hard light.
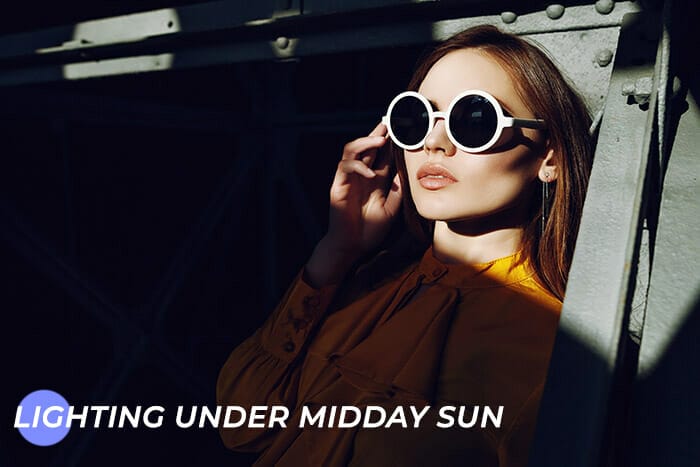
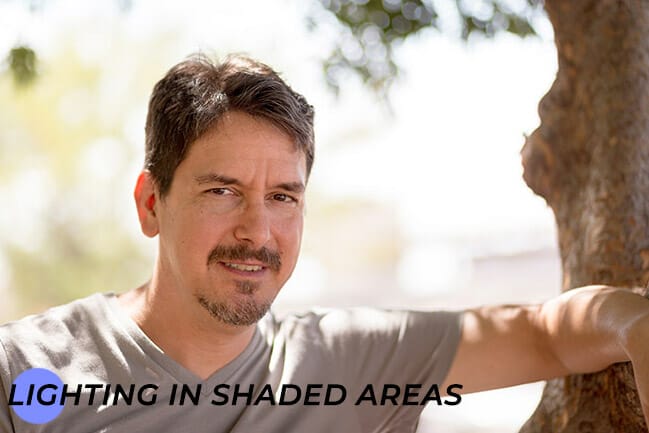
During most of the day, the sun is almost directly overhead. This creates shadows and hard light. You may have to work harder to find a position that doesn’t have shadows. On the other hand, the bright light is ideal for photographing texture.
Generally, most photographers avoid shadows by shooting in the shade, underneath a porch or tree. The light, when overhead, won’t always illuminate the areas of your subject that you mean as the camera is on a different angle to the incoming light.
Watch out for subtle changes in light as the clouds may be shifting constantly. Days when the cloud cover is total means you’ll have a more consistent set of images. When shooting on a cloudy day we’d recommend widening your aperture by 1-2 F/stops.
This can help increase the contrast between your subject and the background.
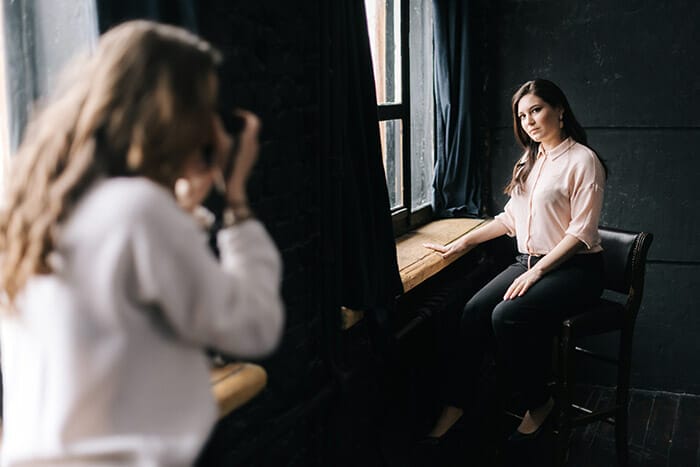
When indoors, the natural light will be coming in through a window. Unless the light is passing through a thin sheet or net curtain hung over the window then the quality and intensity of the natural light won’t change – unless you have tinted windows.
Treat natural light indoors no different to as you would if shooting outdoors. Have the most important area of your subject face toward the window. This reduces the chance for shadows and means the audience’s attention will be drawn to the right area.
Make sure the incoming natural light illuminates all the areas of the subject that you want to show in your photo. If it isn’t you’ll need to add in a reflector bounce light back onto those areas.
A natural light photography tutorial wouldn’t be complete with a boiled checklist to make sure that you’ve fully understood what to expect and how to react to different directions, intensities, colours and qualities of light.
Here are 5 tips to success when shooting with natural light.
1. Shoot at the right time of day – The intensity and colour temperature of light changes during the day. Wait for the right time to shoot.
2. Use the right quality of light for your subject – Think about how you want your subject to look (strong, dominant, crisp or soft and gentle). Wait for the right light quality to shoot to help complement your subject.
3. Bounce light with reflectors – Natural light may not shine everywhere you need so use a white reflector to fill in shadows without transferring colours.
4. Use filters to balance exposures under strong light – Use an ND filter (like sunglasses for your lens) to reduce the brightness when shooting on very sunny days.
5. Avoid dappled light for larger subjects – If you’re shooting large objects under dabbled light parts of the subject will be darker than others making the composition look messy. Look for larger pools of light with bigger subjects and shoot small objects (flowers etc) under dappled/soft light.

Popular memory cards for photography – what’s the best SD card for your digital camera? Choose the right capacity and class speed in our guide

Discover the BEST way on how to clean a camera sensor using swaps, rocket blowers and pencil brushes to give your shots a dust-free finish!

Capture the magic of the night with our beginner’s guide to night photography. Learn tips and techniques for stunning results.
Learn the basics of photography – fast – with our FREE 60-Second Photographer online course. Each class is short and sharp with simple, actionable steps that give you immediate results.
x 30 lessons

© iPhotography™
Become a confident and competent photographer in less than 30 minutes!
Before you leave, make sure you’ve secured your FREE online photography course (worth £29.99)
Each class is just 60-seconds or less making it the fastest and easiest way to learn photography!