 Chris Sale
While there are many types of photography taking landscape photos seems to be is one of the most popular amongst beginners and amateurs. In this landscape photography tutorial, we’ll give some tips and tricks on making it a fun adventure with your camera!
When you first start landscape photography it can be difficult to know where to start. If you focus on the wrong things, it will slow your progress and ultimately lead to frustration.
In this article, written by professional landscape photographer Chris Sale we’ll outline the 5 steps that you should follow to produce successful landscape photographs.
Even the famous photographers such as Ansel Adams would agree with this point! The first step in taking successful scenic photography is to learn how to operate your camera.
This is the biggest problem that I observe in amateur landscape photographers that I work with and is always the first thing that I address.
Modern digital cameras are very complex. Navigating the menus, trying to figure out how to change particular landscape photography settings can be time-consuming. At best this can distract you from the job at hand, and at worst it can cause you to miss the shot entirely!
“Good camera technique is the foundation upon which we build our photographs.”
Fortunately, I’ve found, that there are only a limited number of functions that you need to be able to use for landscape photography.
In-camera workflow is covered in the wonderful iPhotography landscape course, but here is a brief checklist of the things that you need to be able to do with your camera:
● Change the exposure mode (where appropriate)
● Manually control aperture, shutter speed and ISO
● Enable/disable autofocus
● Enable/disable stabilisation (both in lens and in body)
● Turn on live view and display the histogram and artificial horizon
● “Magnify” live view (for focusing manually)
● Review an image (check exposure and focus)
Initially, you should focus on developing a repeatable workflow that you follow every time you take a photograph. With enough practice, this will eventually become second nature, much like driving a car.
This will allow you to focus on what is really important such as picking subjects, composing images and reacting to changes in the light/conditions.
While there isn’t such a thing as a landscape photography lens that everyone successful shooter needs you do need to understand the limitations of your equipment are so you can upgrade in the right places when budget allows.
The same goes with landscape photography cameras – there isn’t such a singular device, almost any camera will be enough to get you started – just learn about it’s features and capabilities.
Once you have developed a repeatable in-camera workflow, the next step is to start to build a knowledge of the locations in your local area. This is a landscape photography technique I’d recommend to every aspiring amateur – get to know your surroundings!
A common mistake that I observe in novice photographers is that they rarely, if ever, return to a location after visiting it for the first time.
One of the most exciting aspects of landscape photography is discovering new and interesting scenes to photograph. No matter whether it’s abstract landscape photography or another sub-genre, photography encourages us to explore the world around us.
But good landscape photography, whatever the genre, often depends upon an intimate understanding of your subject. Even if it is a famous landscape photography viewpoint in your area that you are drawn to or somewhere a little more off the beaten track it doesn’t matter, just make sure you do your research.
When visiting a location for the first time there is always an element of luck if you come away with a pleasing photograph. In my experience, it is rare to stumble upon a great composition just at the moment when the conditions are at their very best. More often it leads to the speculation of ‘what might have been’ and ultimately frustration.
Instead, I advocate an approach that involves visiting a location many times for several months or even years. This allows you to fine-tune compositions and to experience a location under a variety of different conditions.
I recommend building a list of between 10 and 15 locations within easy reach of your home, say no more than an hour’s drive away. Landscape photography ideas can come from taking trips around your local area and studying the opportunities. Throughout the year, you should aim to visit each location once during each of the seasons.
To begin to understand a location you should aim to answer the following questions:
● How long does it take to drive to a location?
● Where can you park once you arrive?
● How long does it take to walk from the car to where you will be shooting?
● What is your preferred composition?
● What conditions best suit the location?
Success in landscape photography is so often a case of being in the right place at the right time. If you have an intimate understanding of several locations this makes it much easier to plan ahead and to pick the right location based on the foreseeable conditions.
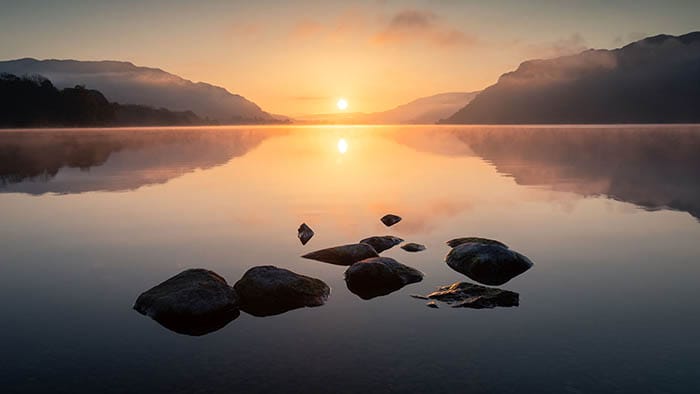
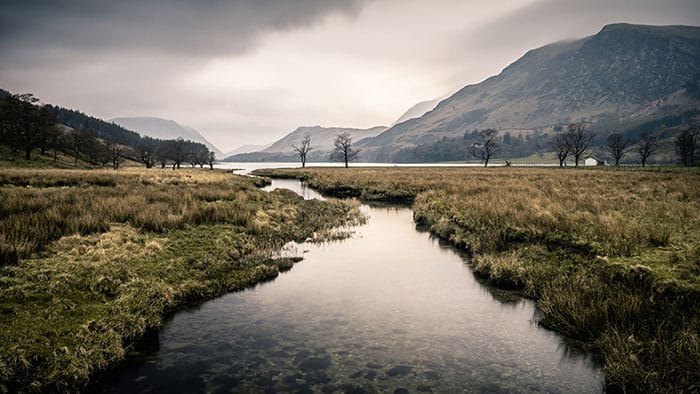
Consider the photograph above, taken from Glencoyne on Ullswater in the Lake District, UK. I first photographed this scene in April 2016, revisiting it many times in the years that followed.
At first, I focused on composition. My initial attempts were a little unbalanced, so I spent time experimenting with different focal lengths to balance the hills on either side of the lake. I then made a plan to return when the sun would be rising in the perfect position.
For the shots to work as landscape prints I needed the perfect conditions:
1. No wind to spoil the reflections
2. The level of the lake to be low enough to reveal the rocks
3. No cloud on the horizon to block the rising sun
Eventually, after many attempts, on the 1st of May 2021, I finally got the conditions that I needed and was able to capture an image that had been 5 years in the making. How to plan a landscape photography shoot is also covered in depth in the iPhotography landscape course.

I would argue that composition is the most important aspect of any landscape photograph. It is how we guide the viewer’s eye to what is important within a scene. And unlike light, it is one aspect of landscape photography that we have complete control over.
“The point at which we start to consider composition is the point at which we elevate our photographs beyond that of mere snapshots.”
Much of what I have learnt about composition has come from studying my photographs and working out how they could be improved. Many of my best images are the result of multiple visits to a location to make improvements to a composition. In these cases, I always take a copy of the photo on my phone so that I can refer to it.
There are numerous compositional guides such as the rule of thirds that we can use to create more pleasing compositions, many of which are discussed in the iPhotography landscape course.
But for me the most important aspect to consider is balance. Whether you’re creating panoramic photo prints, images for landscape magazines, or uploading to a landscape photography gallery all require you to think about the final look.
And I am not alone. Even some of my favourite British pro shooters follow this thinking. Famous nature landscape photography trio Joe Cornish, Charlie Whait and David Ward wrote in the book Developing Vision and Style…
“my style reflects my belief in the interconnectedness of things, and a fascination with depth, and space, and texture, and light; and an overriding belief that composition (like life) is a question of balance.”
Balance in a landscape photograph is a complex issue, but at a fundamental level, it is simply a case of ensuring that the ‘interest’ in a scene is evenly distributed. To produce a balanced image it is important to ensure that neither top or bottom, nor left or right is overly dominant.
Incorporating balance in your photographs requires that you first understand visual weight. This describes how differences in shape, texture and tone (amongst others) influence the extent to which the viewer’s attention will be drawn to different elements within the frame.
Image: It took me 5 years to produce this photograph of the sun rising over Ullswater.

In landscape photography, light is so often the difference between a good photograph and a great one. Light is so important in setting the mood of an image and defining the overall narrative. So often, success in landscape photography is dependent upon the photographer’s ability to match the subject to the light.
“There is no such thing as bad light, only the wrong subject.”
A landscape photographer needs to appreciate how the intensity, colour and direction of light will impact a scene. It is also important to acknowledge the transient nature of light and how it changes throughout the day as the sun climbs higher in the sky.
Some scenes work well in the warm, direct light that you get during sunrise or sunset. Others work better in the soft, diffused light that you get on a bright, overcast day. And then some suit the dramatic light that you get in stormy weather. Matching the subject to the light is discussed further in the iPhotography landscape course.
An understanding of which scenes work best in which conditions comes with experience. The only way to gain this experience is to photograph lots of different scenes in lots of different conditions.
One approach that I found to be extremely helpful was to set aside the same time every week to take photographs. Unless it was hammering it down I would head out with my camera every Saturday morning. As a result, I got to encounter many different types of light.
In the beginning, I was under the impression that the best time of day to take landscape photographs was during golden hour. However, after a while, I found that I was more attracted to the way that both texture and colour are revealed in the softer light that you get on a cloudy day. Today I still like to shoot at sunrise, but this is mostly because conditions are calmer and locations less busy with people.
Another important aspect to consider is the direction of light. I used to plan my locations so that I was shooting towards the rising sun to increase the chances of getting a colourful sky. Today I am more inclined to look for opportunities to keep the sun off to one side to create more pleasing shadows and tones.
My last tip for success as landscape photographer is to never stop being adventurous. We all approach photography differently. What subjects we like to photograph, how we compose our images, how we match subjects to the conditions. Our photographic ‘style’ reflects consistencies in this approach that can be observed from one image to the next.
“Our style is our unique artistic signature. It is what makes a photograph uniquely ours so that it stands apart from the work of others.”
When most of us start photography our subjects, compositions and use of light will likely vary from one photograph to another. It can therefore be difficult to identify any characteristics that might contribute to our style. However, as we become more experienced these consistencies will start to emerge.
Our style comes from how we see the world, how we feel about the landscape and how we choose to express those emotions. Acknowledging this connection and working to develop our style helps us to imprint more of ourselves on our work. Our photographs become a greater reflection of what we have to say about the world around us.
I choose to photograph the Lake District because that is the landscape that inspires me the most. I tend to combine foreground and background elements to create a sense of depth that reflects the scale of the landscape, and my preference for soft light comes from my need for quiet contemplation over excitement or drama.
Another thing that can contribute to our style is how we post-process our images. Which elements of a photograph do we look to enhance and which ones do we attempt to subdue. Post-processing is covered extensively during the iPhotography landscape course.
The key to developing your style is awareness. An understanding of what creates that emotional connection to our favourite images. This can be difficult to determine at first but it is worth persevering. Photography is one way of communicating how we feel about a particular subject. The ability to reproduce that emotional connection consistently will elevate your work to the next level.
Whether you are a beginner, amateur or an out of practise photographer looking to expand into landscape photography, following these 5 steps will ensure that you focus on what is important and accelerate you along the path to becoming a successful landscape photographer.
For more practical advice on creating successful landscape photos be sure to sign up for the iPhotography landscape course. This online digital photography class will show you, in detail, my setup, planning, in-camera workflow right through to how I edit my landscape photos.
Whether you’re into urban landscape photography, rural settings or you’re looking for tips on nature photography this course can help.
It’s a fantastic place to start your landscape photography journey in a fun and entertaining course. Alongside the course tutorials I’ve prepared some photography for beginner’s pdf files for you to download and read away from the computer.
Who knows where you’ll end up – maybe one day you’ll be showcasing your landscape shots in outdoor photography magazine!

Discover the BEST way on how to clean a camera sensor using swaps, rocket blowers and pencil brushes to give your shots a dust-free finish!

Capture the magic of the night with our beginner’s guide to night photography. Learn tips and techniques for stunning results.

Master the art of solar eclipse photography with expert tips on equipment, settings, and precautions for stunning celestial images.
Learn the basics of photography – fast – with our FREE 60-Second Photographer online course. Each class is short and sharp with simple, actionable steps that give you immediate results.
x 30 lessons

© iPhotography™
Become a confident and competent photographer in less than 30 minutes!
Before you leave, make sure you’ve secured your FREE online photography course (worth £29.99)
Each class is just 60-seconds or less making it the fastest and easiest way to learn photography!