 Stephen Walton
Knowing how to get the best exposure in your photographs is an eternal battle which offers photographers, of all experiences, a combative opponent.
For beginners, achieving the perfect exposure requires an understanding of your cameras built-in light meter and which settings you need to make your photos evenly lit.
Until you know what a good exposure looks like it’ll be impossible to know how to achieve one.
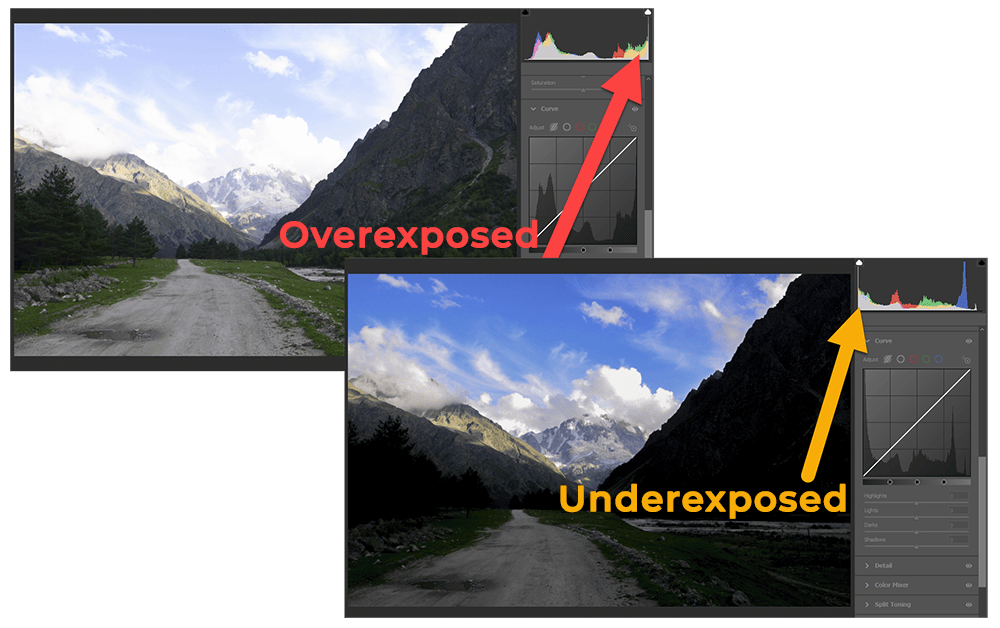
The dynamic range of your photo, which is the ratio between the brightest and darkest measurable pixels, is key to getting the best exposure. Having a photo with lots of dynamic range, without pixels being too dark or too bright (known as clipping) is essential.
For example, if your skies are too bright and look like a solid block of white then you’re probably overexposed. Inversely, if you’re shooting in low light and can’t make out detail on a subject then you’re probably underexposed.
In both instances, on a histogram (on your camera, or in editing), you’ll see a tall peak to the extremes of the chart indicating these issues. The aim is to keep the peak to the centre of the histogram.
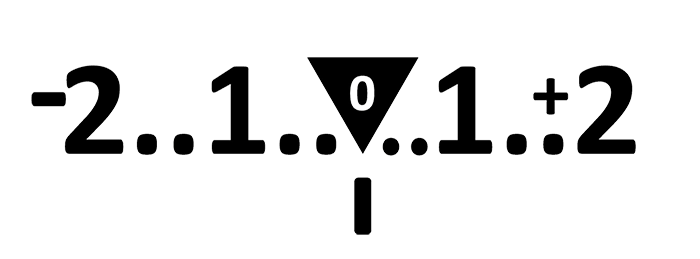
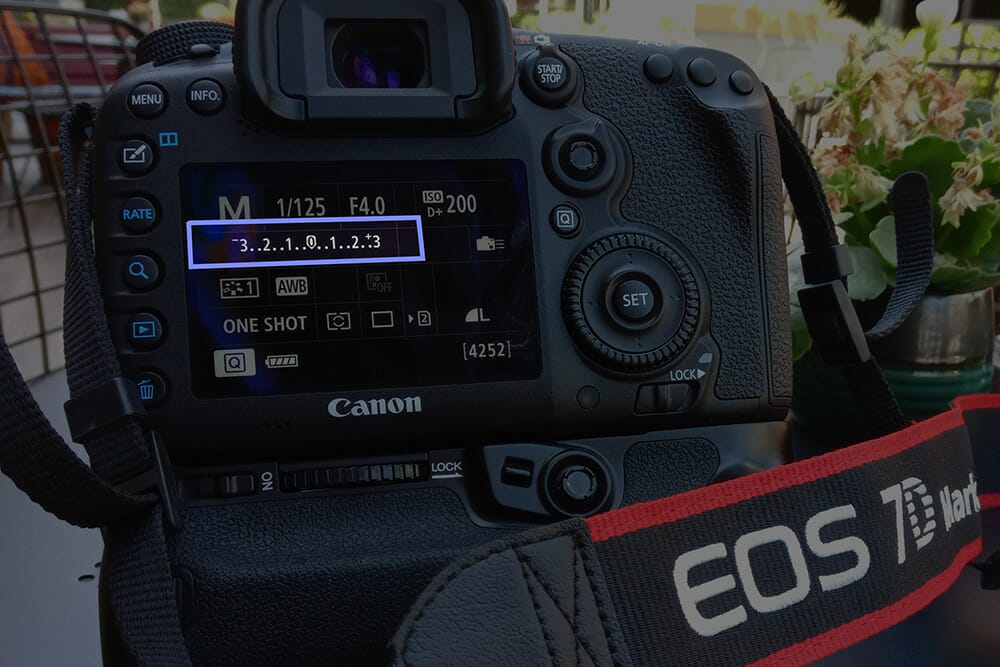
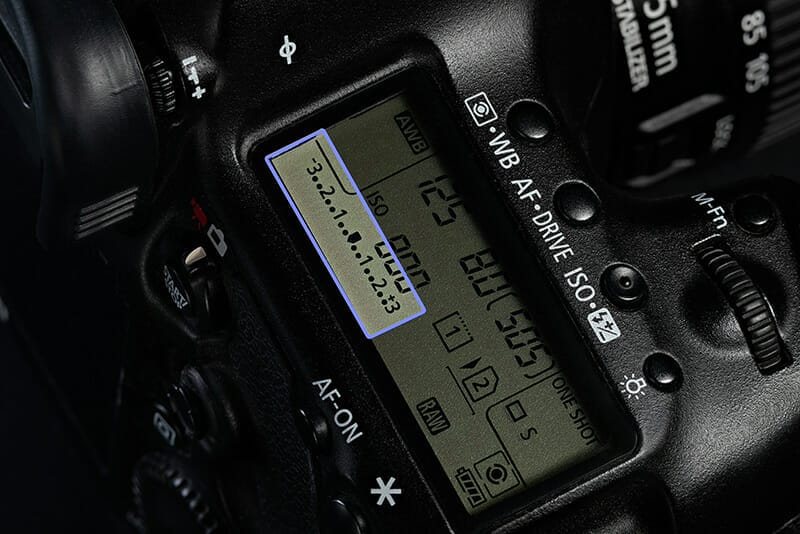
On most digital cameras you’ll notice a scale which indicates the current exposure value. Ideally you want this scale to remain at 0 (zero). If you notice it slip down to the minus, then your exposure will end up darker. And if it goes to the right, then you may notice it’s brighter than necessary.
By tweaking your aperture and shutter speed you can keep this exposure scale at 0 (zero).
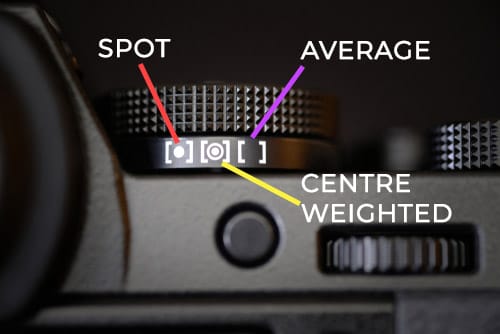
But to initially aid your camera in reading the available light you need to choose 1 of 3 common settings. They all read the light in different areas of your frame.
If you are using a smartphone, tablet or compact camera you may not find all these options are available to you as your camera takes full control.
Exposure metering is a digital camera’s process of checking the amount of reflected light in the scene and calculating the appropriate exposure settings (i.e. shutter speed, aperture, and/or ISO sensitivity).
A typical digital camera will use a reference of 18% reflectivity of a particular grey tone as a normal exposure. It will then attempt to adjust exposure settings in a way such that the final photo will reflect this ‘normal’ exposure.
There are a number of different ways to set up your camera to take a light meter reading to set a good exposure. Be aware that these settings don’t work in Auto or Manual mode.
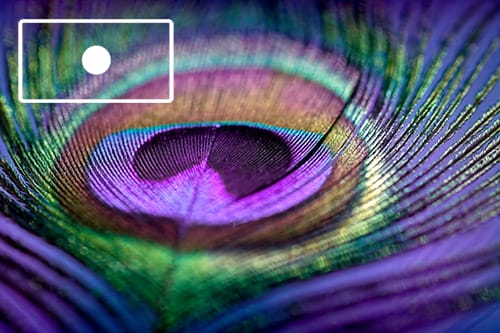
Spot metering is similar to centre mode and is a great way to get the best exposure if you like shooting a lot of macro photos. It works by taking a light meter reading from wherever the auto focus point is placed on the screen, because you can move it around.
The light reflecting off your subject forms the reading for the exposure. In this instance, you need to make sure the most important element of your shot is highlighted correctly as other areas can appear under/overexposed accordingly.
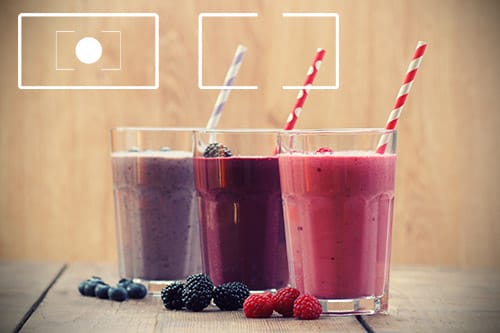
Centre (or centre-weighted) metering works by basing exposure on the centre of the shot. It’s a really easy way to shoot as long as your subject is always in the middle of the photo.
If your subject is bigger than a flower or small trinket then consider using centre weighted. It occupies more of the frame, but not all of it. Therefore larger, singular subjects (such as portraits) will work great for this type of metering.
It can also help in instances of backlighting where no light is falling on your subject’s surface that’s visible to the camera. Use centre metering to get the best exposure for your subject, otherwise you can end up with a silhouetted outline.
Generally speaking, to get an even exposure with backlighting I’d recommend exposing for the background first. Then add in a flash or separate light to solely illuminate your subject. This will give you the best exposure for both aspects. But otherwise centre weighted metering (combined with a reflector) will be the next best alternative when you’ve got no second light.
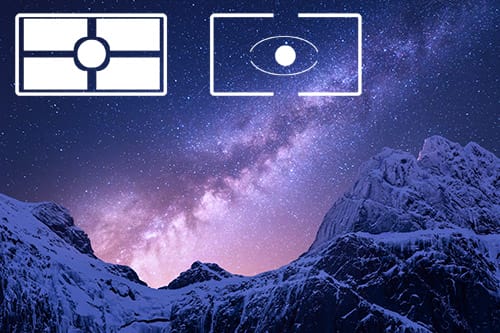
Depending upon your camera this may also be called Matrix / Multi-Segment or Evaluative metering – but they all pretty much work in the same way.
The camera breaks down your shot into 4 (or more) zones, generally quadrants. Each zone is evaluated by the camera to give the best possible exposure per zone.
It’s the most balanced form of exposure metering and one you can use most of the time as a beginner photographer.
It will have its uses when taking pictures of large groups to make sure the light is fairly even across all faces. Wedding photographers will find a great use for multi-metering.
Highlight metering solely looks at the brightest part of your photo. The camera automatically reduces the brightness of these highlights to make sure they aren’t clipping.
This is great for shooting in dark conditions, like concerts for example, when the tendency is to over-brighten the exposure as everything looks naturally too dark.
A Sony camera-specific mode but this mode reads the brightest and darkest points of your photo to create an average exposure. This ensures the highlights and shadows aren’t out of exposure range.
The advantage of this exposure metering mode is that it allows you to keep exposure settings between shots exactly the same even if the subject moves or if the composition changes (without altering the average of the scene).
Recapping on what’s good and when here’s a quick take-away chart of what metering mode to use on what type of subject. Obviously, there are always exceptions to these guidelines in photography, but these are good starting points to know how to get the best exposure.
Spot
Centre
Multi-Metering
Highlight Priority
Entire Screen Average (Sony Specific)
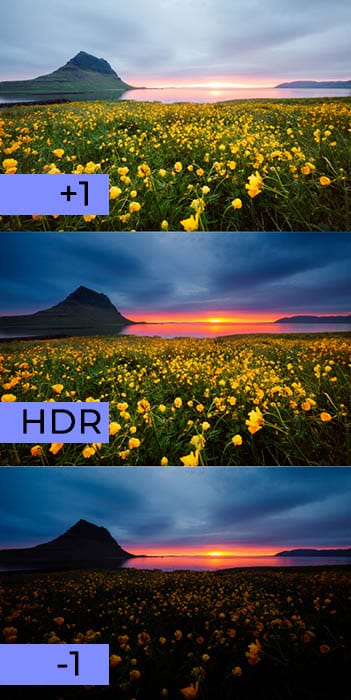
How to get the best exposure isn’t a straightforward process. There are always times you’ll have to adapt. But there is one more way you can improve your chances of a greater dynamic range- and that’s by bracketing.
Bracketing is either an automated (or manual) process of taking multiple shots, at different stops of light (by changing the aperture, but generally it’s the shutter speed) of the same scene and blending them all together.
This allows you to capture details in the shadows and highlights which may be otherwise impossible in just one frame. Landscape photographers use bracketing a lot. You may also hear it called HDR (High Dynamic Range).
Check out your camera’s AEB (auto exposure bracketing) function or HDR options to give it a try. If you don’t have these tools, then simply shoot 3-5 shots of the same scene.
1 shot will be taken at the correct exposure. Second shot at one-stop (usually changing the shutter speed, but you can do it with aperture) brighter and a third at one stop darker than the original. You can merge all shots together using automated scripts in Photoshop, Lightroom or Affinity Photo for example.
In conclusion, exposure isn’t a scary subject the beginner photographers should shy away from and rely on auto. How to get the best exposure just takes awareness and a reaction.
If you take note of your camera’s readouts through the exposure scale or the histogram then you can make live changes to improve the exposure. It’s better than cursing yourself as you try to pull back detail from blown-out highlights in the editing suite.
If you’ve been working on how to get the best exposure recently then show off your efforts in the iPhotography gallery for other members to discover.

Shooting sunsets using amazing 5-in-1 magnetic lens filters from Kentfaith, the 1st choice for photo & video products.

Popular memory cards for photography – what’s the best SD card for your digital camera? Choose the right capacity and class speed in our guide

Discover the BEST way on how to clean a camera sensor using swaps, rocket blowers and pencil brushes to give your shots a dust-free finish!
Learn the basics of photography – fast – with our FREE 60-Second Photographer online course. Each class is short and sharp with simple, actionable steps that give you immediate results.
x 30 lessons

© iPhotography™
Become a confident and competent photographer in less than 30 minutes!
Before you leave, make sure you’ve secured your FREE online photography course (worth £29.99)
Each class is just 60-seconds or less making it the fastest and easiest way to learn photography!