 Stephen Walton
As a follow up to our popular low key photography guide then we thought it was about time we created one about high key photography lighting too!
If you find yourself struggling to get rid of nasty shadows in your photographs it could be high time you tried out high key lighting instead.
This essential high key photography guide will walk you through the setup, camera tricks and adding a little editing magic.
If you’ve had a chance to read the low key guide, then you should have a fair idea of what to expect from its opposite.
But just in case you haven’t let’s start from the beginning.
High key lighting is a technique that is primarily, but not exclusively, seen in portrait photography. Its key indicators are:
• The use of a bright light source
• Flat lighting on a subject
• Adds no shape or dimension
• Very few shadows
• Exposes all surface areas to light
• Subject can look overexposed
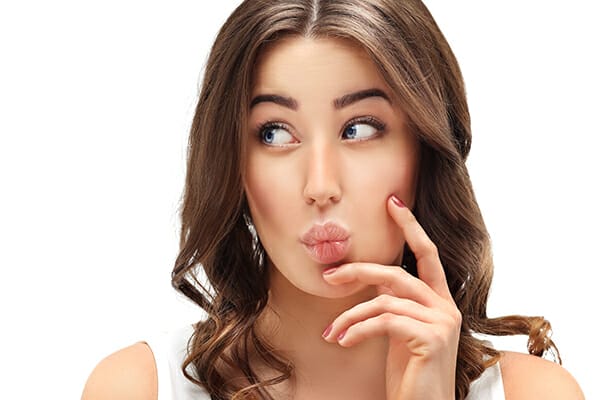
Because of these key features, as we said, high key is generally used in portraits – children and women. Why is that?
For it’s flattering benefits simply. The overexposed style of high key can make skin appear smoother and blemishes are harder to see. Though it is most common in portraiture, you can apply high key lighting to still life subjects too. Just take some of the lighting tips we’ll talk about and adjust them for your photo.
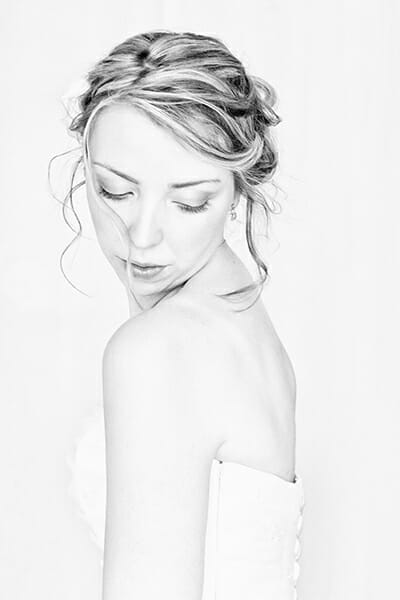
The feel of the photo should be light and airy. There are very few shadows left by high key, so it’s a great chance to throw in lots of bold colours or even a striking black and white.


For high key lighting, you need a bright light source. If you’ve studied our iPhotography or portrait training courses, then you’ll know all about light. If not, don’t worry, we simply need to use a large bank of light.
Think of using sunshine, diffused camera flash or filtered studio lights. Low powered lights are going to create too many shadows.
The sun will be the best (and cheapest) high key light source. Shooting on a cloudless day will make the light harder and it could increase the chance of one or two shadows, but in the right place they can look great for high contrast fashion shots (we’ll come to that later). But otherwise shooting on a dull cloudy day will make the light more even.
But if you’re more of a strobe shooter, then using a flash will be a good alternative. Built in camera flashes aren’t going to be helpful as you need a bit of height here. Instead, an off-camera flash will be perfect, especially teamed up with a wireless trigger so you can position it wherever you want. You’ll also need a little diffuser to cover the light.
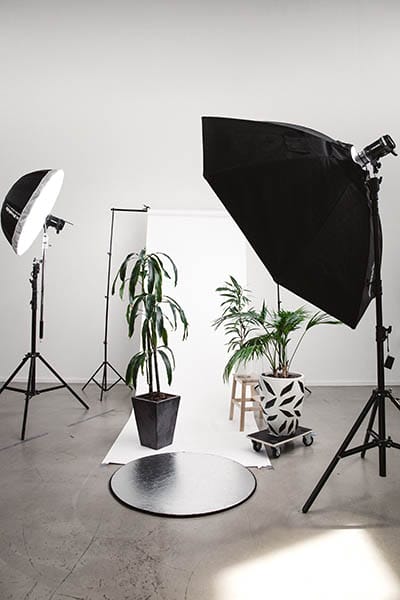
If you are very lucky and you’ve got a whole kit back of lights, then use as many as you can. More light the better, you could use some on the background too. We just want to flood the shot with light.
And if you are luckier and you have access to studio lights then you could even use 3 or 4 diffused (soft) lights. Larger lights will bounce off white walls and create a wall of light hitting your subject giving that high key effect with low contrast. We’ll show you high key in low and high contrast forms shortly.

There are 3 areas you need to setup correctly to make sure you pull off an amazing high key photograph:
Firstly, moving the sun is going to be impossible, so if you’re shooting outdoors then you’ll just need to do your best. Your light needs to be positioned above and behind the camera ideally. Make sure it’s directly facing your subject and not to the side, or behind them.
If there are any shadows on your subject, then use a reflector to bounce light back in to fill those areas.
Though we said on its own built-in flashes are pretty useless for high key, used in combination with daylight they can help fill in shadow area directly facing the camera.
How you position your subject is just as important as your light. Remember from our last point that the light needs to be straight on to the subject, therefore the subject really needs to be straight onto the camera as well.
Of course, you can turn their body a bit but watch out for shadows creeping in the more you turn them away from the light.
If you’re shooting portraits, then keep your subject’s face towards the light source. Maybe tilt their chin up or lean their head to get the best light.
Because high key shots are meant to be bright, light and airy your subject should reflect that in their pose and expression. Action shots are great with high key – get the kids running around and snap away!
For more posed portraits, try sitting your subject down and set your camera on a tripod. Chat away to them and get them laughing, keep your camera on the shutter for that perfect expression.
Finally, to the all-important camera settings, the thing that everyone seems to crave over. But please remember any exact settings we talk about are just a rule of thumb, you’ll need to apply the theory to your own experiences.
Shooting high key photography at F/5.6 outdoors today will not look the same in 6 months’ time so adapt to how it looks on your camera screen.
Like we said earlier, high key has an overexposed look, and that’s deliberate, especially for portraits. All you need to do is try a few test shots for example at F/8 and see how the exposure is playing.
If your histogram is looking fairly balanced with no huge peaks, then it’s time to open your aperture up. Widen the aperture from F/8 to F/5.6 and see the difference. Skin tone should look a little brighter, but it may be too bright!
If your camera has highlight peak warnings, then enable them so you can see which areas are totally blown out!
The beauty of digital cameras is that they can move to half and quarter F/stops. If F/5.6 is too much, then try F/6.3 or F/7.1. You still want to be able to see features, but not too much skin detail.
Your histogram should be leaning a little more towards the right now. We need more highlights than shadows. Keep adjusting your aperture to get this right.
The shutter speed only needs to be adjusted based on what you’re shooting. Therefore, we’d say to shoot in Aperture Priority mode.
You can also use the EV +/- option on some cameras to slightly increase the exposure rather than changing the aperture. Change the value to +2 for that exposure boost.
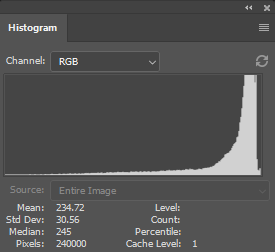
Image: Expect your histogram to be grouped towards the right with high peaks.
Once your shot is in the bag then you can take it one step further with a little bit of high key editing. You may have read that high key photography lighting can be combined with either low or high contrasts.
Let’s have a look at both ways to edit for these high key lighting effects.
A low contrast finish will be closer to what comes out of your camera, depending upon how you shot your picture. The more light you used (in the right way) then softer the shot will look. This is very flattering for babies and children. It makes the skin appear smoother, which is why the older generations like the finish too.
You may just want to desaturate the shot. In Photoshop, go to Image > Adjustments > Hue/Saturation and drop the Saturation slide to -100.
In Lightroom it’s not too dissimilar. Just find the Saturation slider with the Clarity and Dehaze tools and push it all the way to the left.
Don’t be tempted to saturate the colours in a low contrast shot to make it more appealing, it won’t work. Instead, go high contrast.
High contrast finishes to high key shots are a little bit more specific to where you find them. Magazine and Fashion photographers love going for bold, striking imagery and therefore high key lighting is used regularly here. Photographers such as Rankin built their portfolio off the back of this high key approach.
You can still go black and white or keep the colour with high contrast. If you use Photoshop go to Image > Adjustments > Curves and place a marker in the top right and one in the lower left. Push them in opposite directions to raise the contrast.
In Lightroom, it’s much easier. There is a single slider for contrast, just push it as far as you want.
The little secret behind these eye-catching shots is that the photographer leaves a little bit of shadow on the original shot. It’s not a lot, but when the contrast is raised then the effect becomes more obvious. Furthermore, combined with the rich intensities of the colours as the contrast is tweaked and the whole shot becomes very glamourous.
Be careful not to overdo the contrast, it can make the subject look featureless!

High key lighting is a really striking way to approach a photograph. It’s not going to suit every occasion and it can take some practise getting it right, but most photographers say it’s a lot easier to master than low key lighting. But practise makes perfect keep trying both!
Let us know how you found high key lighting? What did you think? Easier than you thought? Did you like the effect? Found any problems we need to add?
It would be great to hear from you, so just drop us a line.

Shooting sunsets using amazing 5-in-1 magnetic lens filters from Kentfaith, the 1st choice for photo & video products.

Popular memory cards for photography – what’s the best SD card for your digital camera? Choose the right capacity and class speed in our guide

Discover the BEST way on how to clean a camera sensor using swaps, rocket blowers and pencil brushes to give your shots a dust-free finish!
Learn the basics of photography – fast – with our FREE 60-Second Photographer online course. Each class is short and sharp with simple, actionable steps that give you immediate results.
x 30 lessons

© iPhotography™
Become a confident and competent photographer in less than 30 minutes!
Before you leave, make sure you’ve secured your FREE online photography course (worth £29.99)
Each class is just 60-seconds or less making it the fastest and easiest way to learn photography!