 Stephen Walton
Exposure compensation basically photographers to override exposure decided on by your camera’s internal light meter. It’ll help you darken or brighten images in unique situations.
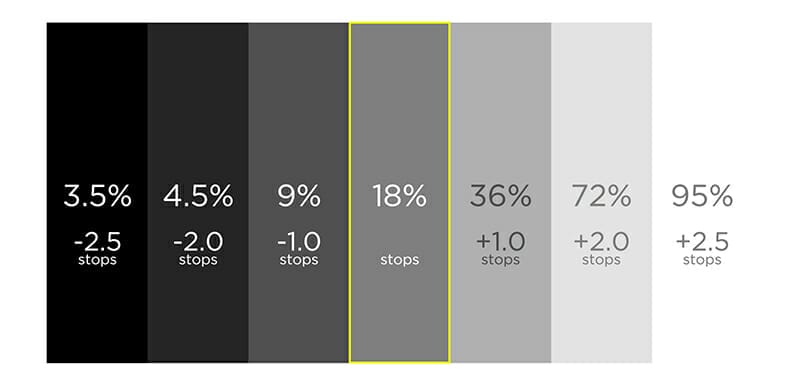
If you want to know the science behind it, a camera’s internal light meter works by evaluating light reflected off subjects. They are standardised on middle grey (aka 18% grey).
When your camera is taking a photo in a dark scene, the meter will work the opposite to brighten up the shot. Inversely, if too super bright the meter will aim to darken the scene and balance the exposure to the best of its ability to get close to that 18% grey.
While most of the time the light meter does a good job, there will be times you’ll want to change the exposure for stylistic effect.
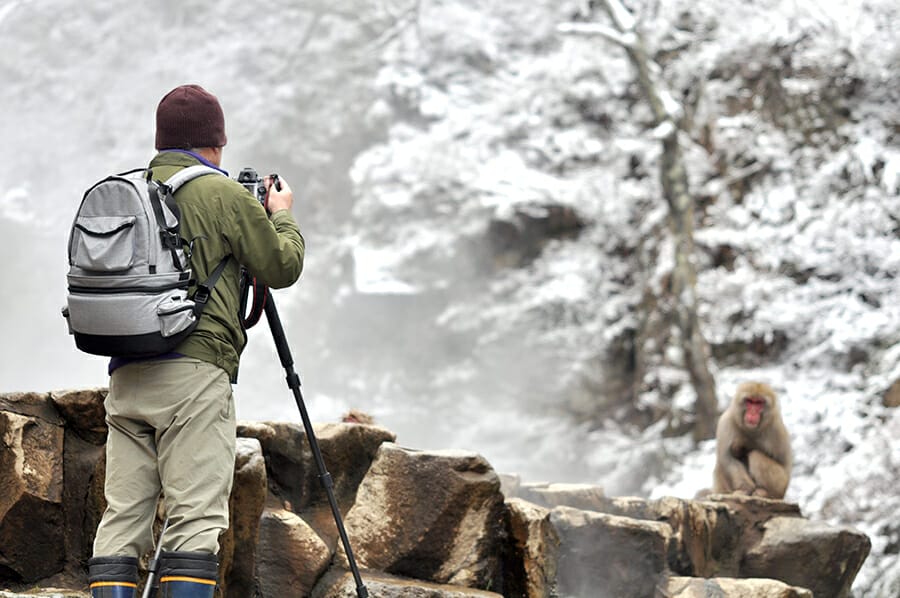
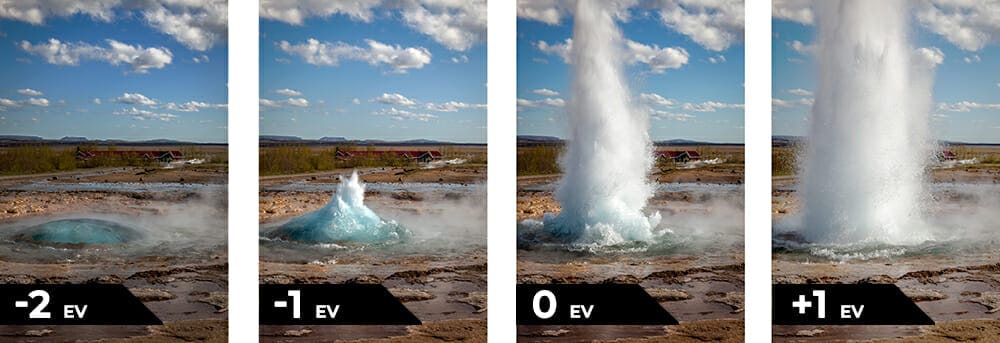
One of the most common situations is when you’re photographing snow. A camera will natural think that white snow should be middle grey which in turn makes the whole shot underexposed. This happens because the camera (wrongly in this instance) assumes that there is already full range of tones in the shot.
You’ll find exposure compensation quite helpful in situations where you are faced with large areas of white or black that can trick the camera’s light meter.
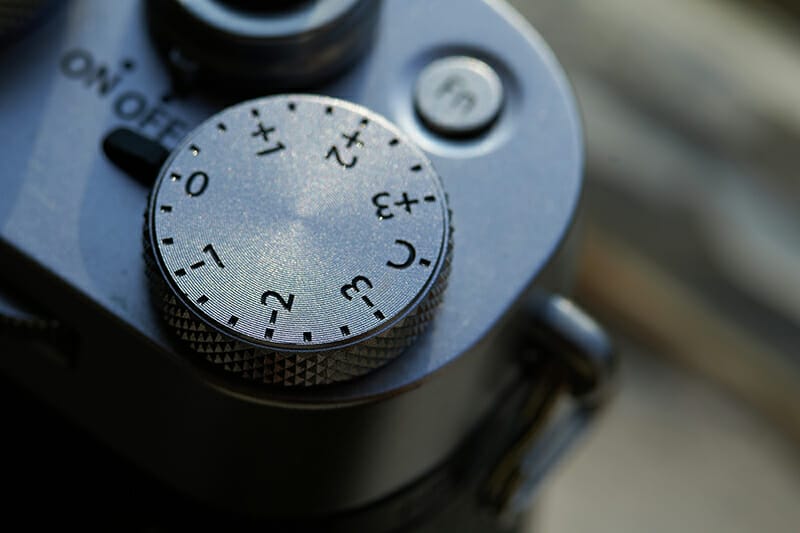
It’ll differ from camera to camera as to how many stops of exposure compensation you’ll have access too. Most cover 4-5 stops of compensation when shooting in A/Av, S/Tv or P modes. You’ll common see a scale going from -2EV (exposure value) up to +2EV.
You won’t be able to use exposure compensation when shooting in auto, manual or a dedicated scene mode (nighttime, portrait, landscape etc).
You’ll notice the exposure compensation button/feature by it’s familiar + and – symbols. Hopefully it’s a clear button on your camera body, but it could be a dedicated dial or a in-menu tool to adjust.
Using it correctly is quite easy. If your shot is looking a little dark add (+) a stop of compensation or two. If it’s looking a little too bright for your liking then dial it down (-). Keep your eye on the histogram to judge the changes you make.
The exposure bar which you’ll spot along the bottom of the viewfinder, or on your LCD screen will move left or right depending upon your changes.
Given that certain camera modes are part manual-part automatic using exposure compensation will have an effect on the automatic parts of the settings. This could have a potentially negative effect on your photo if you’re not paying aware.
S/Tv (Shutter Priority) – Exposure compensation will alter the size of your aperture. You’ll still be able to manually change the shutter speed, but the camera chooses the aperture (based on how much exposure compensation you’ve added or subtracted).
P (Program) – When shooting in Program mode the camera will change the shutter speed based on your exposure compensation.
A/Av (Aperture Priority) – Exposure compensation will alter the size of your shutter speed. You’ll still be able to manually change the aperture, but the camera chooses the aperture (based on how much exposure compensation you’ve added or subtracted).
It’s super important to be aware of this especially if you’re shooting handheld or trying to capture movement. In these two instances it’s better to be shooting in Shutter Priority mode anyway.
Exposure compensation in shot is a shortcut to adding a little extra brightness or darkening a troublesome scene quickly. Remember to change it back to 0 when you’ve finished shooting so it doesn’t affect future shots accidentally.

Discover the BEST way on how to clean a camera sensor using swaps, rocket blowers and pencil brushes to give your shots a dust-free finish!

Capture the magic of the night with our beginner’s guide to night photography. Learn tips and techniques for stunning results.

Master the art of solar eclipse photography with expert tips on equipment, settings, and precautions for stunning celestial images.
Learn the basics of photography – fast – with our FREE 60-Second Photographer online course. Each class is short and sharp with simple, actionable steps that give you immediate results.
x 30 lessons

© iPhotography™
Become a confident and competent photographer in less than 30 minutes!
Before you leave, make sure you’ve secured your FREE online photography course (worth £29.99)
Each class is just 60-seconds or less making it the fastest and easiest way to learn photography!