 Stephen Walton
It feels that with every new camera there are more and more buttons, dials, and menus to get your head around. Simply looking at a DSLR camera these days can be overwhelming for a beginner photographer. But don’t worry, I’ve got your back!
I’m going to explain all the buttons, dials, and ports that you’ll come across on a common DSLR camera. For the purposes of my example, I’m using a Canon 80D – an entry-level DSLR. Of course, you can sit and read your camera manual to get this info – but who’s got time for that?
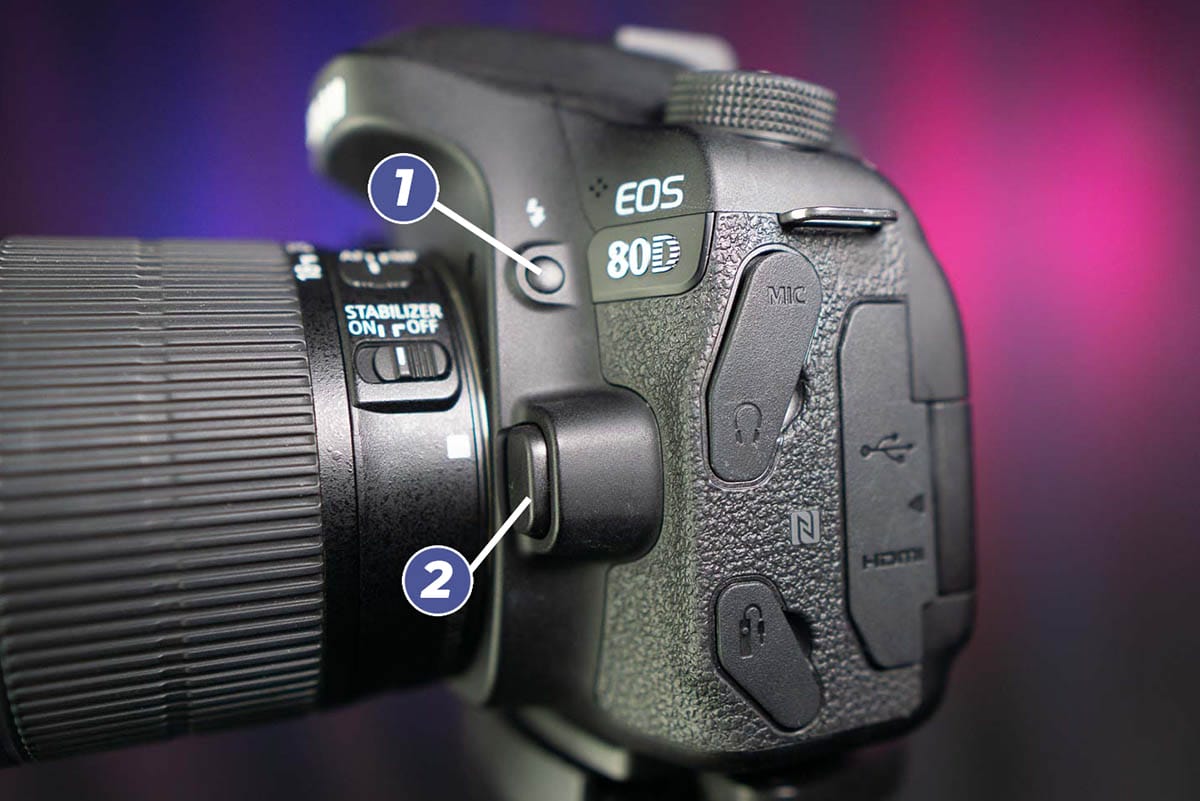
As you look straight at a camera there are usually only 1 or 2 buttons on a DSLR.
1. Pop-Up Flash – this button may otherwise be located on the back of the camera body for some but otherwise, you’ll find it on the front.
2. Lens Unlock – press this button as you twist (anti-clockwise) the lens to uncouple it from the camera body.
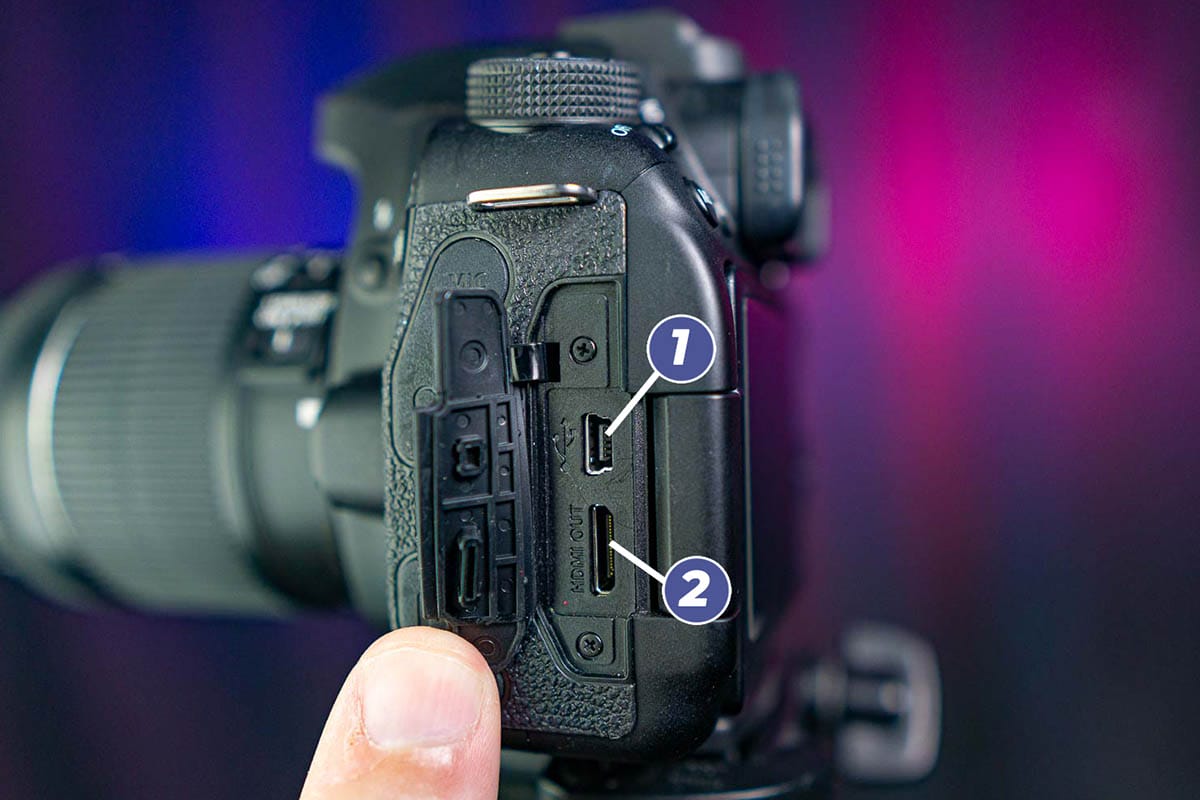
Depending upon the standard of your DSLR camera some of the following ports might not be available on the side of your camera. Larger, pro-grade cameras will have different ports for other types of connections.
1. USB – you can connect a range of other accessories via a USB port. This is mostly used for connecting your camera to a PC/Mac computer.
2. HDMI Out – use an appropriate HDMI cable to connect your camera to a TV. HDMI carries audio and video so it’s great for playing videos recorded on your camera on a larger screen.
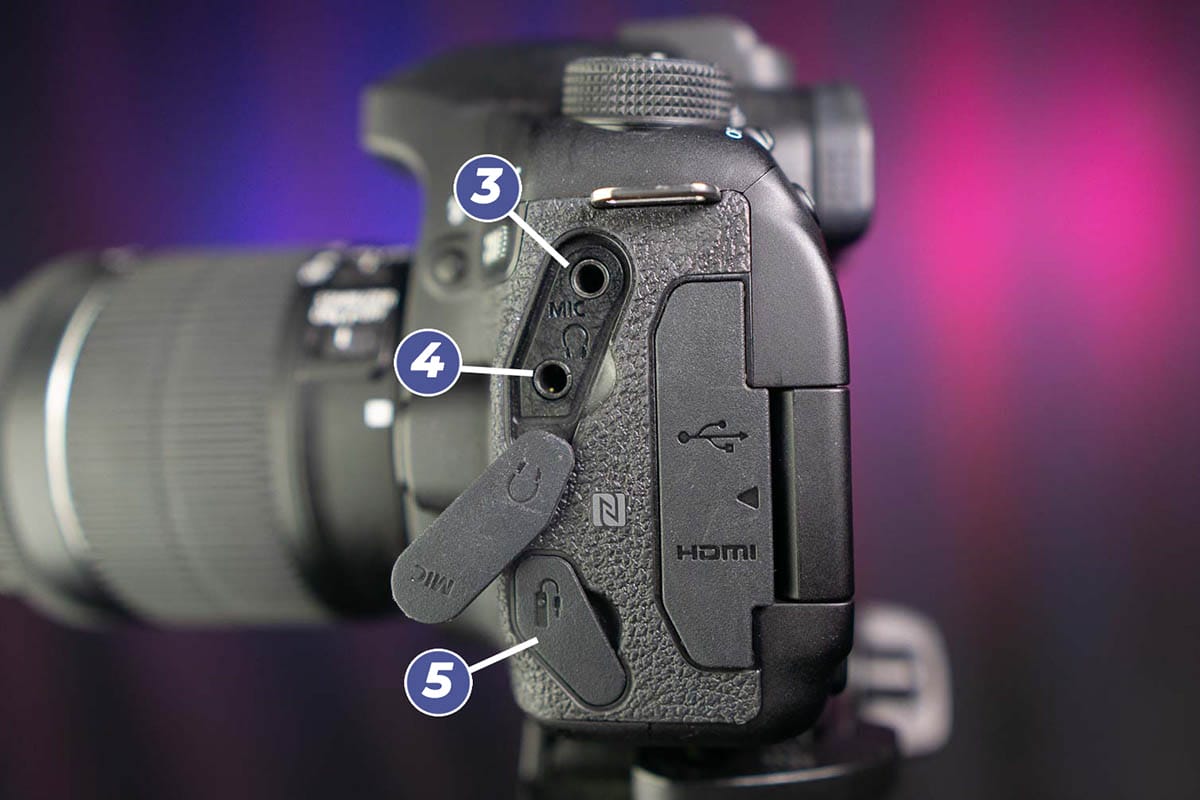
Again, the external accessory ports on the side of this DSLR may be different camera to camera. Typically there should be a short description or icon to help you understand what you can input to each port.
3. Microphone – for recording sound along with a video recording. Many DSLRs have the ability to record audio internally without the need for an external microphone but the quality is limited.
4. Headphones – plug in your headphones here to listen to all audio that is being recorded by the external or internal microphone. You can listen back to audio from recorded clips as well as listening for live recordings.
5. Remote Shutter Release Cable – the covered port at the bottom of the photo is for a remote shutter release cable which means you don’t have to be stood behind the camera to take the photo. Cameras have a countdown timer which means you can delay the taking of the photo to get yourself in position if you’re taking a self portrait for example. Remote cables give you more control but make sure it’s long enough!
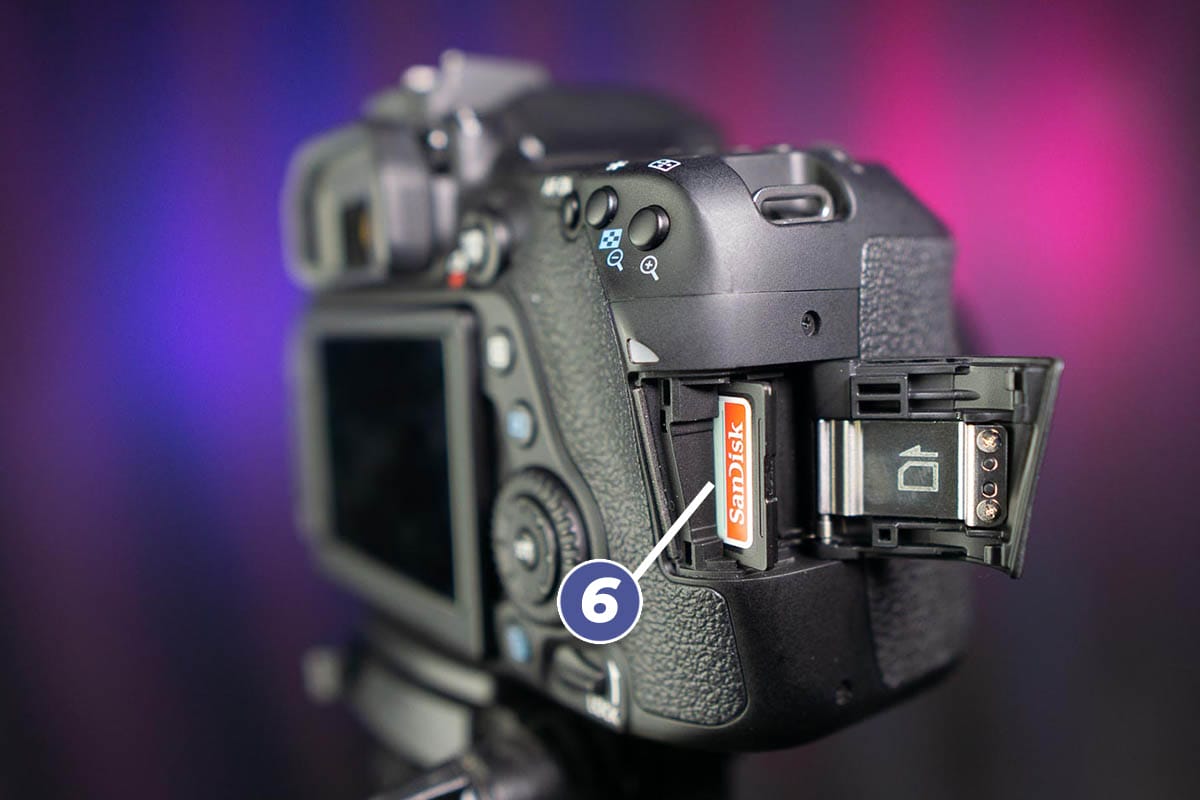
6. Memory Card Input – On the right side of the camera body is normally where you insert your SD memory card. Some cameras have dual memory card slots so you might see two slots together. If there is no side port like this on your camera the memory card might be inserted alongside the battery underneath your camera.
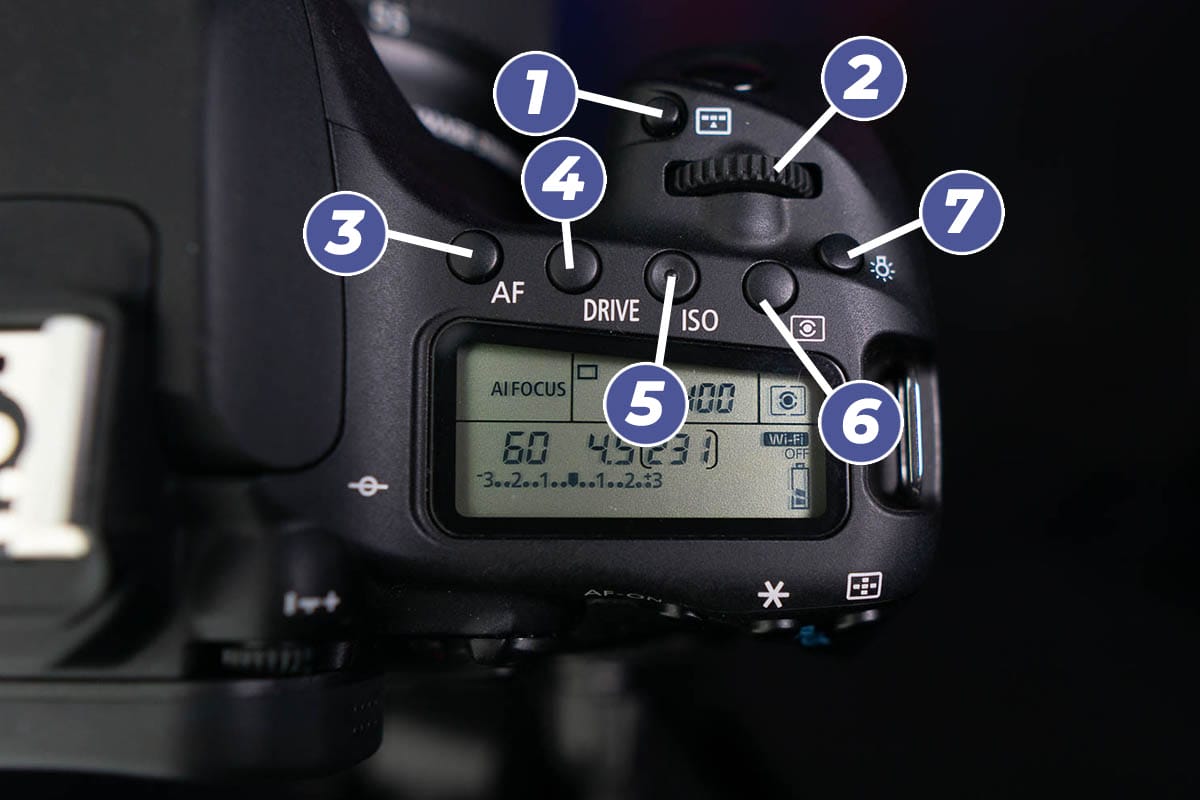
On the top of the camera there will be a mixture of buttons and a camera dial. Only high end pro-grade cameras don’t have camera dials as they’ll be fixed to manual mode only. Let’s look at the buttons and wheels on the right side to begin with.
1. AF Area Selection – press this button to change the way your camera focuses. From single spot, centre weighted and zone mode you can customise how and where your camera’s focus spot is placed in combination with using this button and the large selection wheel on the back of the camera. Different camera brands name their AF modes differently.
2. Main Dial – Not all cameras have this wheel in the same place but they can be customised for changing different settings. It may be setup by default to change the camera’s F/stop or shutter speed. By scrolling the wheel left or right you’ll notice the setting change on screen.
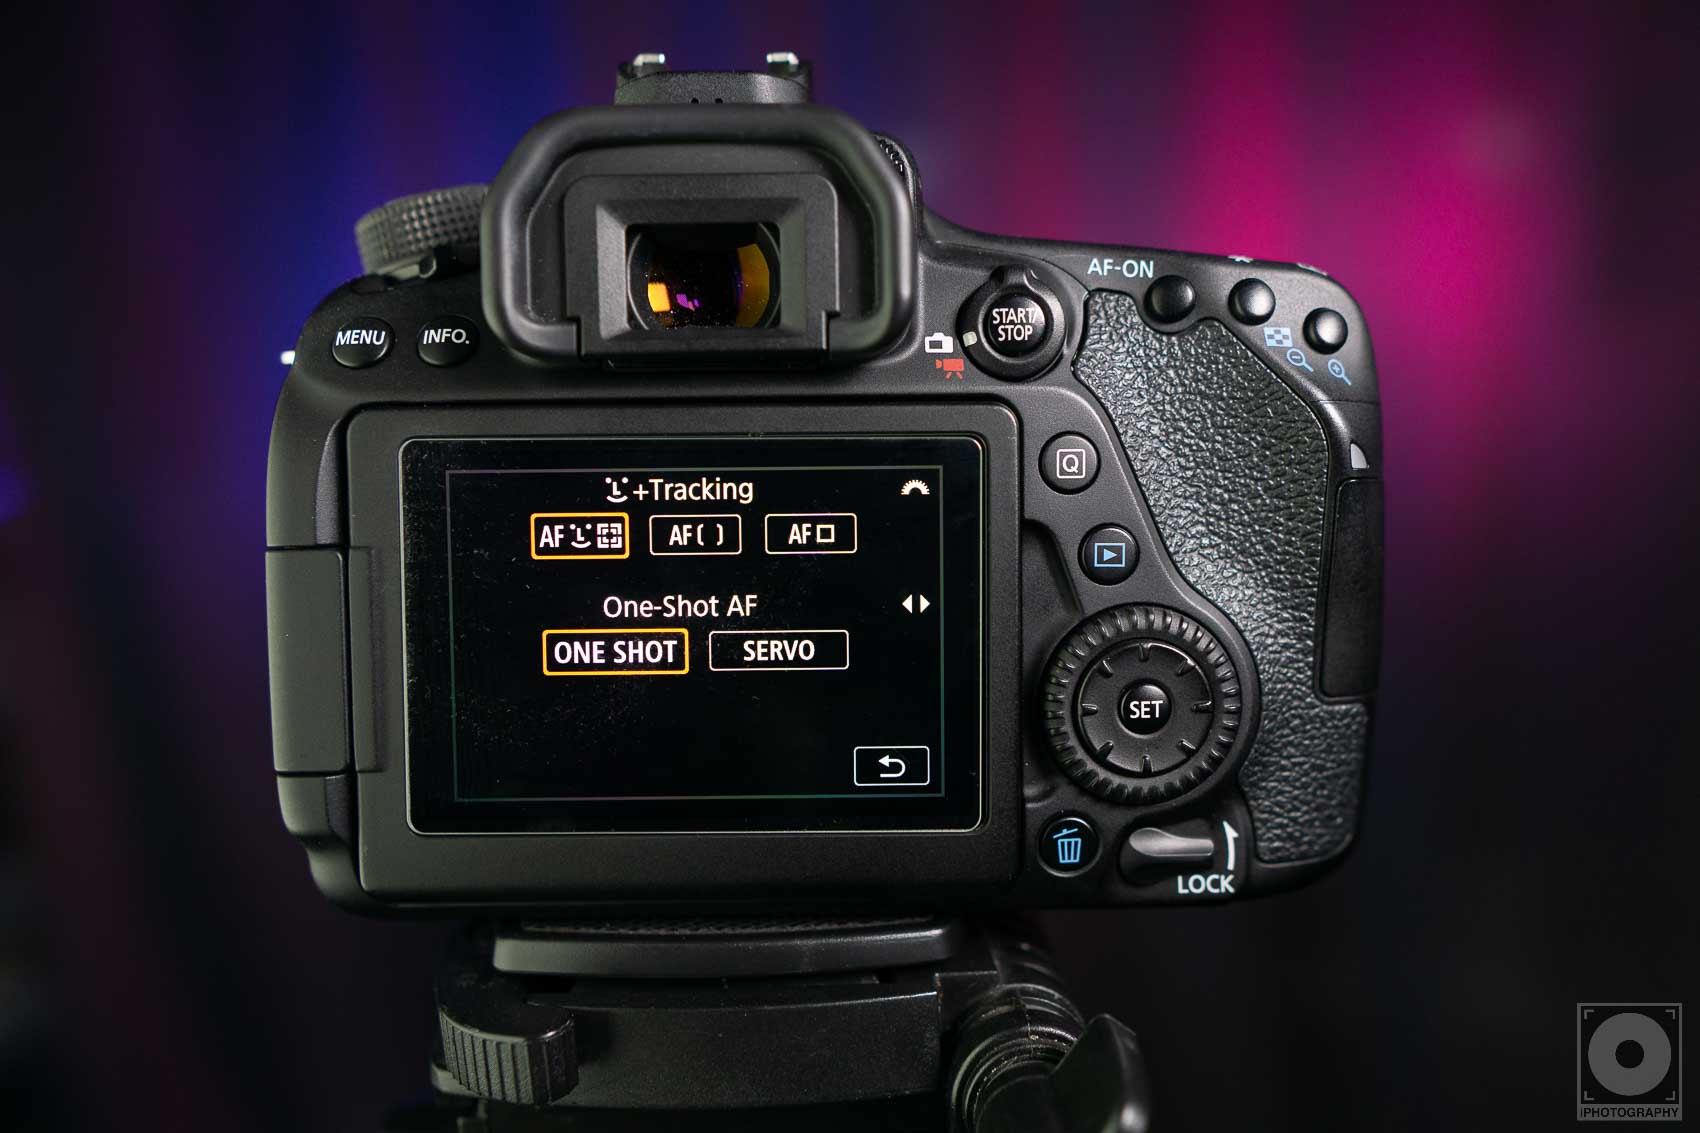
3. AF Operation Selection – You can select the AF operation to suit the subject or the conditions you’re shooting in. This could be either One-Shot AF for still subjects, AI Servo for moving subjects or AI Focus for a hybrid of the two.
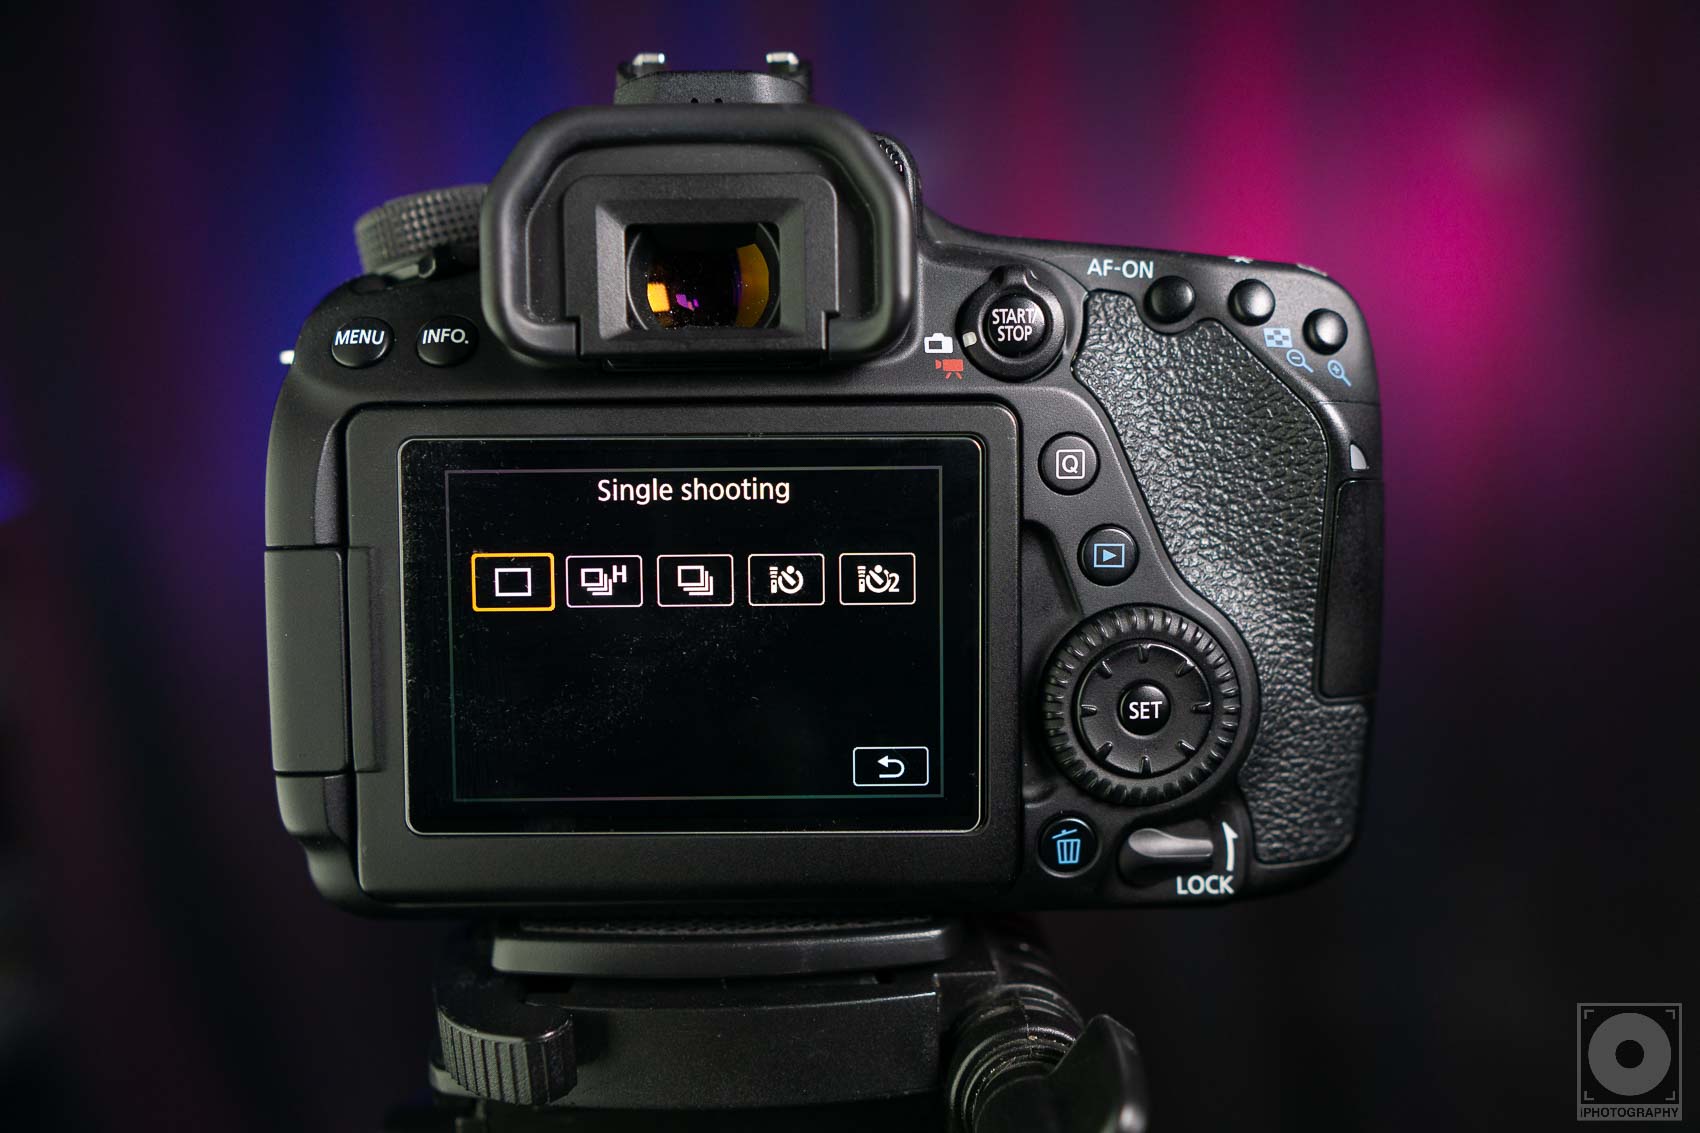
4. Drive Mode – you can change how fast your camera takes photos by using the drive button. Most cameras are set up to shoot single photos at a time (its the most commonly used). But you’ll also find options to change to shooting frame burst (lots of photos quickly, great for sports) or setting a countdown timer (great for self portraits).
5. ISO – alter the ISO setting by holding down this button and using the wheel on the back of the DSLR camera to raise and lower the value.
6. Metering Mode – This end icon changes how the camera reads the incoming light and sets the automatic exposure. Cameras can read light from wherever you place the marker on the screen, the very centre of the frame, or using an average of the whole frame. It depends on what you’re shooting as to which is best for your exposure.
7. LED Illuminator – handy for when you’re shooting in the dark and you don’t have a torch. Press the lightbulb button to backlight the LED screen on top of the camera so you can see all your current camera settings. Press it again to turn it off.
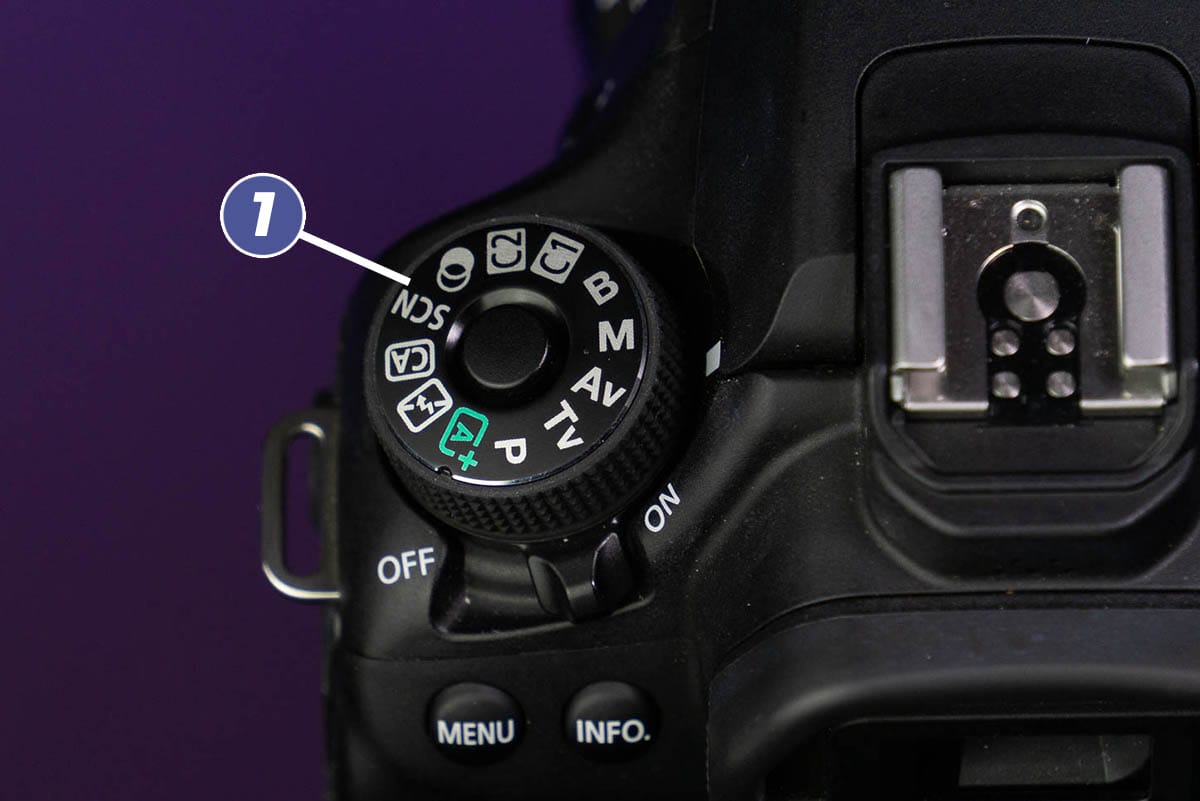
Most DSLR camera dials are fairly similar but with a few differences. The main M, A/Av, S/Tv and P modes are found on all camera dials (1) and all explained here. The dial sets the camera into different operational modes, each giving you a different amount of control over the camera settings.
Auto is the most familiar to a beginner photographer and means the camera does everything for you. Manual (m) is the most advanced and means the photographer is in charge of the aperture, shutter speed and ISO settings as well as metering and focus modes.
To change modes simple turn the wheel, but there may be a locking button in the centre you have to depress first.
The white line to the side of the dial shows which mode the camera is currently set to.
Read more about the camera dial here.
The hotshoe is the metal plate on top the camera. It designed for an external flash to be attached but other accessories can be added here instead.
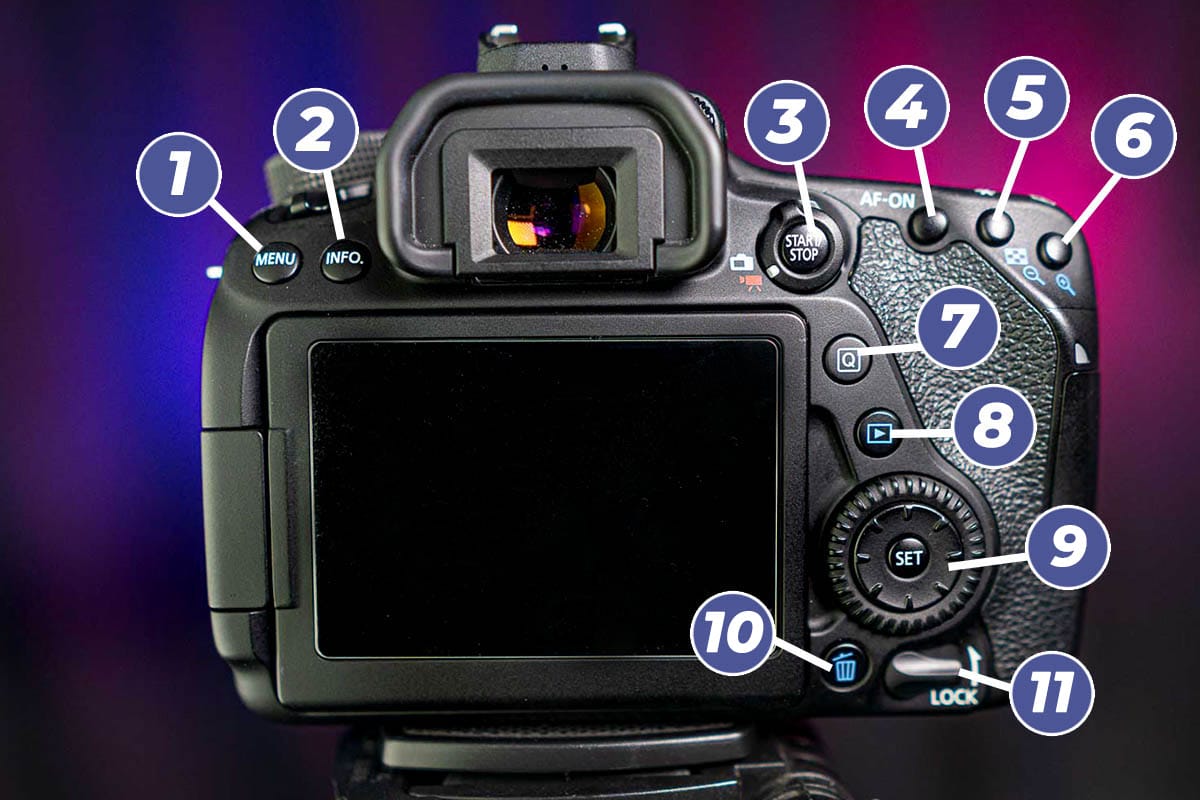
On the back of your DSLR camera body there will be another set of buttons and wheels.
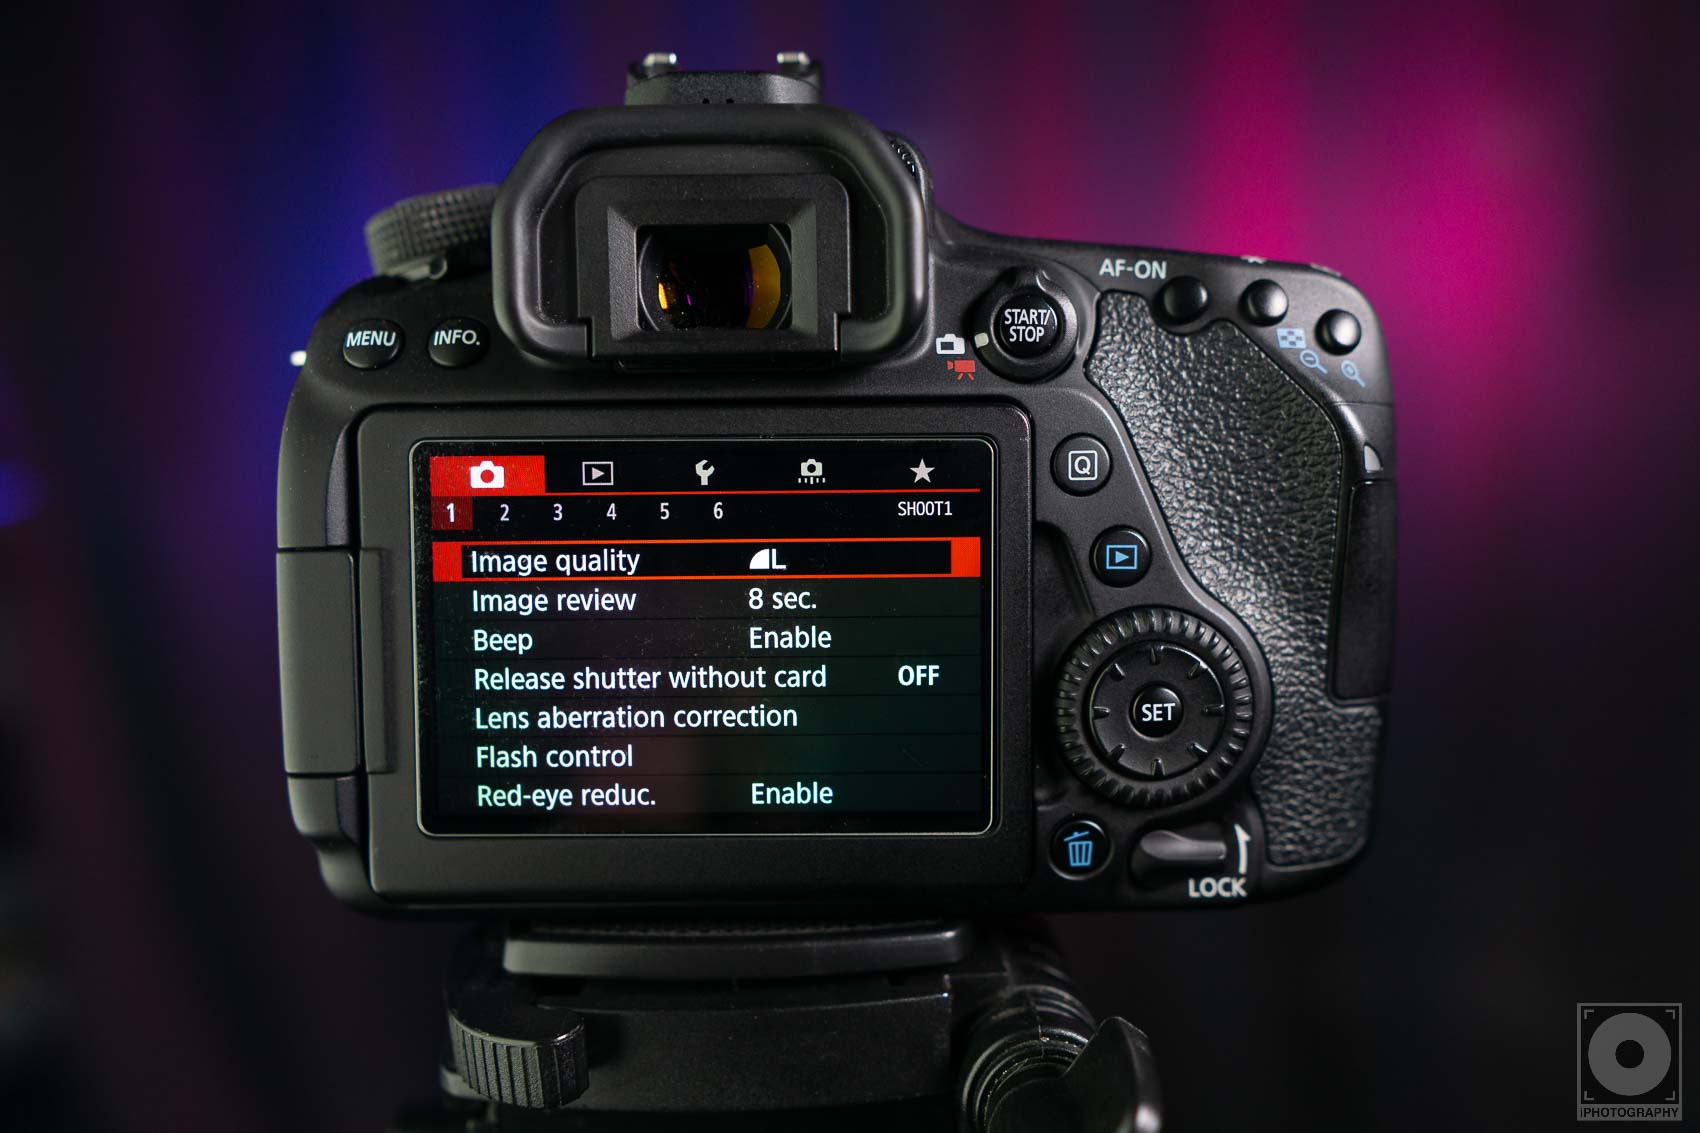
1. Menu – press the menu button to access the camera’s internal settings such as image quality (RAW / JPEG), how long the image stays on screen after shooting, external flash settings, memory card formatting and lots of other tools. The menu system is broken down into different tabs with camera settings, playback view, internal tools and customised settings grouped accordingly.
2. Info – By pressing the INFO button a number of times the LCD screen on the back of the camera will scroll through a range of different shooting function settings. You’ll be able to see more details about the F/stop, shutter speed and ISO settings. You might also get short description of what each camera dial mode is suitable for shooting on other displays.
3. Start / Stop – This is a button more specific to this camera but allows quick switching between shooting stills and recording video. When you switch to the red video icon press start/stop to begin and end recordings.
4. AF-ON – Back button focus option on Canon cameras will be labelled as AF-ON. This is a quicker process for locking focus in One-Shot AF mode.
5. Zoom Out / * (Asterisk) / AE Lock – You can lock the exposure of a photo, ideal for when you’re shooting under changing lighting conditions, by pressing this button. It stops the camera from reassessing the exposure for each shot. Not available in Manual or Auto mode. When looking back at photos you can also use this button to zoom out.
6. Zoom In / AF Point Selection – When playing back photos use this button to zoom in to check focus and detail. You can also use this button while shooting to change the AF selection point from a single spot to zonal or tracking focus modes etc.
7. Q – The Quick Control button opens a menu on the back of the camera which allows you to change general settings. This is further helpful is the camera offers a touchscreen option.

8. Playback / Image Review – To look back at your photos or replay video clips you’ve recorded press the playback button and use the scroll wheel below it to cycle through all the images you’ve taken.
9. Quick Control Dial – This dial is generally at the centre of your navigation controls. Think of it like a mouse to your PC. To move up and down menus and change other settings this dial is usually the tool to use. To select an option in the menu system press SET. This might access sub-menu options too.
10. Trash Can – If you want to delete a photo permanently when using the playback / image review button press the trash can icon. You might be prompted to make sure this isn’t done accidentally.
11. Lock – Because the Quick Control Dial is large and easily knocked while taking photos you might find a lock switch which prevents and buttons or dials being accidentally pressed during shooting. You won’t be able to make any camera setting changes while the lock button is on.
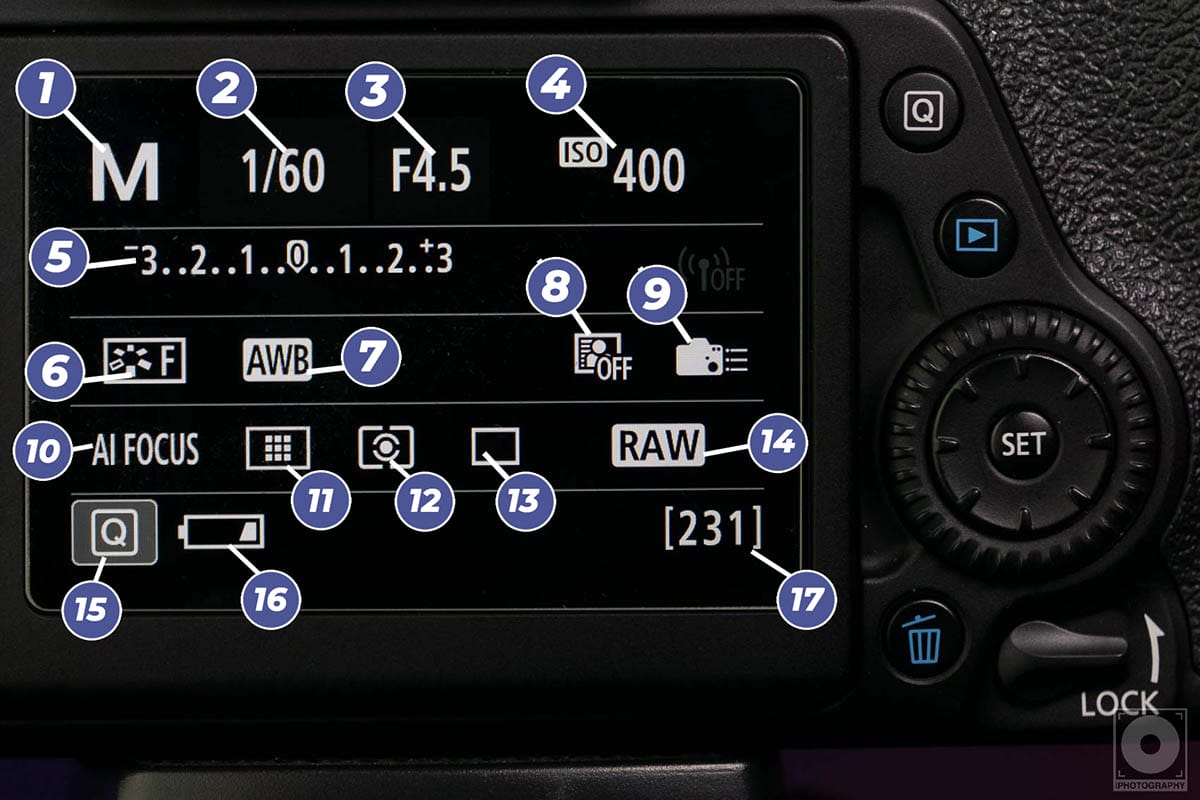
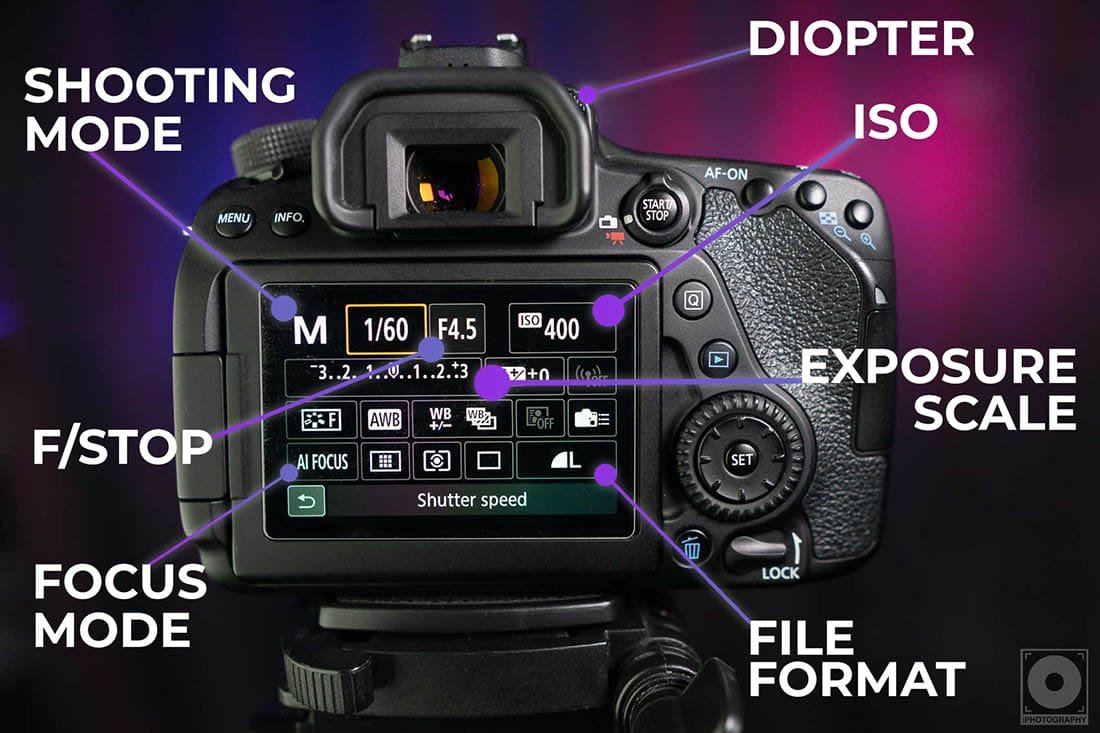
When you turn on the camera a settings screen similar to the one below might appear. Most of the time it displays, in one place, all the settings currently activated elsewhere in the camera. It’s like a dashboard/home page for your photography.
Let me explain what each of these icons mean based on the example image.
1. M – This is the camera dial mode you’re currently in. M stands for Manual but it could be Auto or P for program for example.
2. 1/60th – This is the camera’s current shutter speed.
3. F4.5 – This is the current aperture/ f/stop setting.
4. ISO 400 – This is the current ISO rating.
5. AEB / Exposure Scale – This -3 to +3 scale displays what the camera thinks of the current exposure. A small marker will appear under the scale to state whether the shot is evenly exposed (0), underexposed (-1 to -3) or overexposed (+1 to +3). Read more exposure compensation here.
6. Picture Style – By changing picture styles in the menu system you can alter the appearance of colours and characteristics to match your photographic style. This might be to saturate colours or shoot in black and white.
7. White Balance – Most of the time AWB (auto white balance) does a good enough job but you can alter white balance if you’re shooting with mixed lighting temperatures indoors.
8. Auto Lighting Optimiser – If your photo comes out dark or at low control the exposure is corrected automatically. You can change the amount of optimisation in the camera menu. This option isn’t available in Manual or Bulb mode, only fully/semi-automatic modes.
9. Custom Controls – If you are using any custom controls these will be noted here.
10. Focus Mode – Which focus mode you are currently using (AI Focus, Single Shot, AI Servo).
11. Focus Area – A indication of which AF selection area is currently active.
12. Exposure Mode – This exposure mode is currently being used to read the incoming light.
13. Drive Mode – How the camera is taking photos (single shot, burst mode or with a countdown timer).
14. Image Quality – Displays whether the camera is taking photos in RAW or JPEG format.
15. Q – As a touchscreen, you can quickly access the Quick Control screen here.
16. Battery Level – This displays how much power is remaining on your camera’s battery.
17. Images Remaining – Based on the current file format (RAW/JPEG) and the capacity of the inserted memory card, this displays how many photos you can take before the memory card is full.

Of course, there are going to be different buttons on different cameras but the ones outlined in this DSLR camera buttons guide will at least help you recognise and understand what the most common buttons do and what each button icon represents as some are universal in photography.
Make sure to continue your photography journey by discovering how your DSLR camera dial works here and what the different operational modes are.

Popular memory cards for photography – what’s the best SD card for your digital camera? Choose the right capacity and class speed in our guide

Discover the BEST way on how to clean a camera sensor using swaps, rocket blowers and pencil brushes to give your shots a dust-free finish!

Capture the magic of the night with our beginner’s guide to night photography. Learn tips and techniques for stunning results.
Learn the basics of photography – fast – with our FREE 60-Second Photographer online course. Each class is short and sharp with simple, actionable steps that give you immediate results.
x 30 lessons

© iPhotography™
Become a confident and competent photographer in less than 30 minutes!
Before you leave, make sure you’ve secured your FREE online photography course (worth £29.99)
Each class is just 60-seconds or less making it the fastest and easiest way to learn photography!