 Stephen Walton
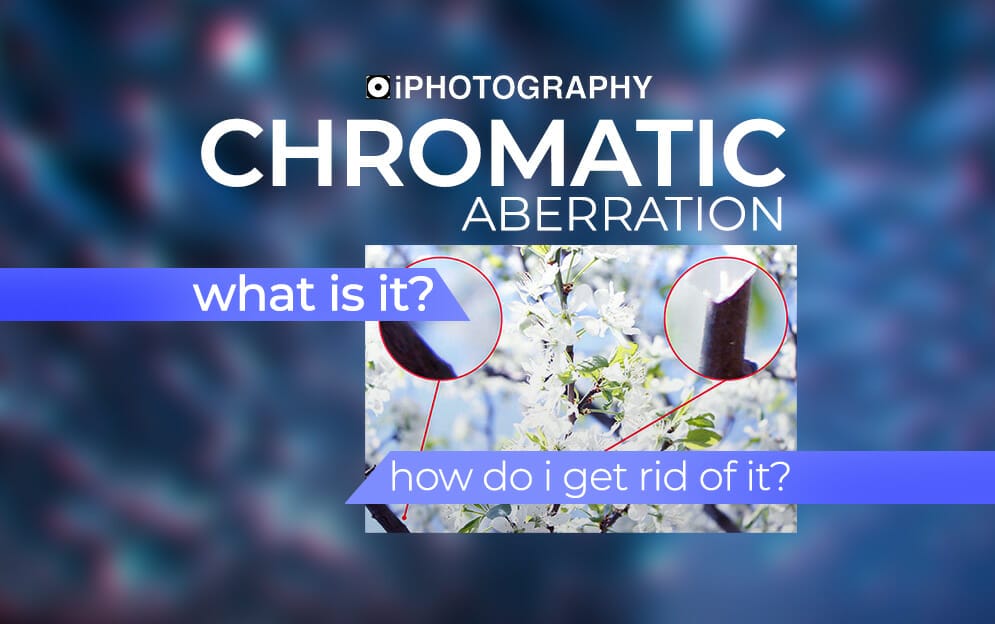
Chromatic aberration that affects certain camera lenses resulting in image quality issues. But what is chromatic aberration and how do we stop it appearing in images?
In this article I will look at the common causes of chromatic aberration so that we can stop it from happening in camera.
I will also demonstrate 3 ways remove Chromatic Aberration from images in Photoshop, Lightroom and Luminar.
Chromatic aberration can also be referred to as ‘colour fringing’. It can occur when the lens is unable to focus on the different waves of light.
Ultimately, you are most at risk of chromatic aberration when shooting in a high contrast area, on a bright sunny day. As a result, the image can be left with a halo or fringe of colour around an object.
Chromatic aberration generally occurs around objects, such as tops of trees, that are in a high contrast area. Within the object the colours are more similar so there is less chance of this happening.

I am sure you’re aware that the camera lens sees light in a similar way to the human eye. If you think of a rainbow for example, you can see the spectrum of colours within the light wavelength.
When the light hits the lens glass it is refracted where the rays then change direction or bend.
Chromatic aberration is caused by the sensor ‘misplacing’ certain coloured wavelengths. Generally, these colours tend to be in purple or blue hues, though it may vary. It can also arise when the light rays do not converge back together at the same point.
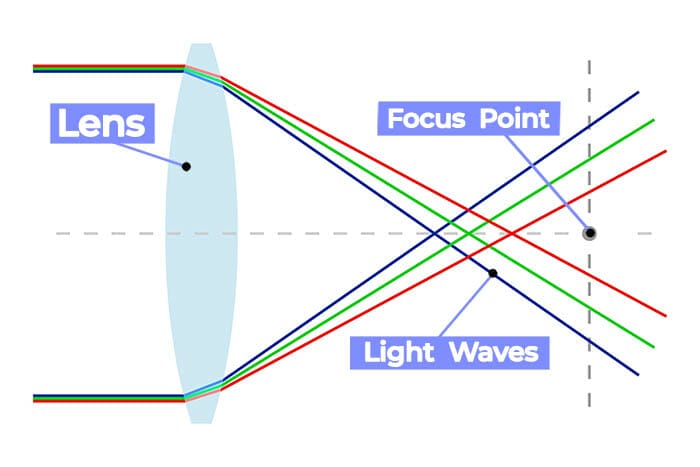
Image: Chromatic aberration is when the light entering the lens doesn’t converge together at the focus point.


Modern lenses have new and improved glass elements that can help to redirect the light in the right way. Although this isn’t always perfect.
Relying on the glass means relying on a product that you’re probably going to have to spend a lot of money on. So how can we do this without breaking the bank?
More expensive lenses contain ED (extra dispersion) coating or super low dispersion glass which help to reduce the dispersion of light wavelengths.
There are other ways to avoid chromatic aberration without investing in an expensive new lens. Here are 3 examples of how to avoid colour fringing in your images:

Colour fringing can be difficult to see on the back of a small camera screen, particularly because it usually occurs on bright sunny days. Often, it is unavoidable to not pick up any chromatic aberration if you’re out and about enjoying the sunshine. Luckily for us, there’s a very quick fix to this; with a few clicks in post-production your colour will be back to normal!
In Photoshop, the option to remove chromatic aberration is rather hidden! However, it gives us the most control over the amount of fringing to remove. Use the eyedrop tool to select an area of your image that is showing fringing and adjust the amount from there. Be sure to check any similar colours in your image as it will affect every purple and blue hue.
Filter > Camera Raw Filter > Optics > Defringe.
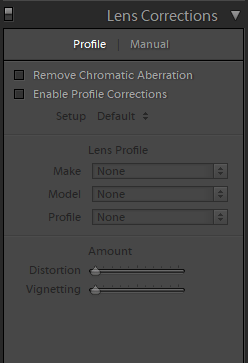
Correcting colour fringing in Lightroom is very simple. There’s only a few check boxes you need to select. Using Lightroom is quick and easy as the software will automatically try it’s best to remove all chromatic aberration. You may need to take the image into Photoshop for more control.
Develop > Lens Correction > Basic > Check ‘Enable Profile Corrections’ and ‘Remove Chromatic Aberration’
Removing chromatic aberration in Luminar is one simple step but can only be applied to RAW images and not jpegs.
Lens & Geometry Tool > Remove Chromatic Aberration
Hopefully, this blog has taken away the fear factor surrounding chromatic aberration. Instead, think of it as an unwanted purple halo to your subject – much less scary and much more solvable!

Discover the BEST way on how to clean a camera sensor using swaps, rocket blowers and pencil brushes to give your shots a dust-free finish!

Capture the magic of the night with our beginner’s guide to night photography. Learn tips and techniques for stunning results.

Master the art of solar eclipse photography with expert tips on equipment, settings, and precautions for stunning celestial images.
Learn the basics of photography – fast – with our FREE 60-Second Photographer online course. Each class is short and sharp with simple, actionable steps that give you immediate results.
x 30 lessons

© iPhotography™
Become a confident and competent photographer in less than 30 minutes!
Before you leave, make sure you’ve secured your FREE online photography course (worth £29.99)
Each class is just 60-seconds or less making it the fastest and easiest way to learn photography!